Showing posts with label Coffee Plans stamp. Show all posts

Monday, April 16, 2018

Coffee Cards by Shelly


Hey y'all! Shelly, here.
Today, I'm sharing some fun and simple coffee cards with you.


I started with my background piece, which I used a die for and some patterned paper. After I used the SRM Stickers Coffee Plans clear stamp set for my coffee cups/images. I simply colored them in with colored pencils. Then added them to my squares on my card, which for one of the cups in each square I 'popped up' with foam tape on the back.


To finish my cards off I added my sentiment in the rectangle on my card. Easy peasy, right?!...


Thanks so much for stopping by!
Enjoy your day!
SRM Stickers supplies:


Friday, December 29, 2017

Holiday Cheer by Michele


Michele Kovack is so glad she participated in the recent Coffee Lover's Blog Hop!   She used this cute little Coffee Plans stamp set from SRM Stickers!


For her card, she wanted to create a background using the coffee cup.  She stamped it in a brown ink and used Prisma Colored pencils.  Then added a sentiment from the Stickers by the Dozen collection across the front.  She tucked a red die cut leaf behind it.  (After the leaf had been given a coating of glossy accents and glitter!)


Michele added a bit of rustic twine tied into a bow.  She scattered several gems and stars to the front. 


Michele rounded the back panel's edges on two sides and adhered the entire front to a kraft card.


Thank you all for stopping by!  We appreciate your visits!

Friday, December 8, 2017

Coffee Lover's Blog Hop


Welcome to SRM's Blog!  We are so excited to be participating in the Winter Coffee Lover's Blog Hop!  And excited to be a Super Sponsor.  We will be posting 
special posts throughout the week from different design team members.  Be sure to leave a comment for a chance to WIN our Coffee Plans stamp set that will be used in all the projects. 


Today we are sharing a fun project from Shanna Slater who loves coffee and crafting.  What a perfect combination!

And now let's hear from Shanna in her own words! 

Hello fellow caffeinated crafters!! 
Shanna here, and I am back again today to help celebrate the Winter Coffee Lover's Blog hop with super sponsor SRM Stickers!  I utilized the ever-so-versatile Coffee Plans stamp set that SRM carries which worked perfectly for my gift card holder... Just in time for holiday gifting!


I adore this sentiment, and have used it on a variety of projects.  I will list the supplies below I used for this particular one :)
I hope you enjoy it, and happy hopping!!


Supplies used:
         

Monday, November 6, 2017

4 Ways to Wrap Gift Cards & A Video Too by Christine


Gift cards are always such a lovely gift to receive but it can be a challenge to figure out how to present them.  Christine joining you and Today I am offering up 4 ways to wrap gift cards that feature the Coffee Plans Stamp.  I really like to give gift cards to places with coffee so this stamp set was perfect for this!  Let's have a look at the four different ways and then I will share a video with you that walks you thru how to make each one!


This first one requires very little patterned paper and can tuck nicely into a card or on top of another gift.


Built around a tag, this one doesn't require a lot of extra supplies either and can easily be added on to something else as well (or hung on the tree!)


This is a bigger one and more of a stand-alone card, making it ideal to stick in the mail!  And you can't miss the inside!


Inside the card pops up to showcase the gift card!  And how fun is that coffee mug stamped with #coffeebreak.  Coffee Plans is such a fun set!


Another stand alone card, this one is constructed easily (despite how it looks) from four circles and a square!  It folds up nicely with a box fold and is a sweet surprise for the recipient.


You can check out the full tutorial on constructing these holders in this video:


Head on over to the SRM Store and get those stamps ready to start your holiday creating!


Wednesday, October 25, 2017

Rainbow Birthday Week by Jenn


Hello friends, Jenn here! I am very eager to show you a very special week in my planner this month, my daughter's 7th birthday.  Bring on the confetti, cake, rainbows and sunshine and lets jump on into this super bright cheerful spread.


I began by pulling out my planner stamps, rainbow washi, birthday stickers, and a little fun rainbow scrapbook paper cut to the boxes of my erin condren planner (1.5"x2"). I really like having a weekend banner in my planner spreads, so I chose this adorable star garland from 'Birthday Plans'. To color in the stars I used my le plume II markers colored onto an acrylic block picking up the color with my waterin blending brush. I used this same technique to color in the coffee cup on my Friday. One more quick technique ...if you love the look of patterns and no whitespace planning try using small stamps to create patterns. Washi tape is my secret to clean lines and perfect looking boxes...just be very very careful when removing and repositioning the tape it is very easy to pull the top layer off the paper.


I hope this gives you a little inspiration and perhaps a new technique or two to try. Be blessed sweet friends as you plan your beautiful life...each day is a gift spend and share it wisely.


Products Used:

Monday, October 23, 2017

Plan On It! by Angie


Hello SRM friends and fans!! Angie here with you to share  some planner pages using some of the amazing stamps, stickers and pens from SRM. 


Since my planner pages already had a pink and teal theme, I knew I wanted to play up those colors. I also added in some black and white to give the pages that 'pop' of extra color. 

I started with the Color in Markers. I used the pink marker. I scribbled a little bit of the pink marker on an acrylic stamping block, added some water and mixed it together to make a 'paint'. I painted that on my pages in certain spots and used some to make some splatters as well. If you try this technique, just keep in mind that the more 'paint' you add, the more your pages will warp. 

Next, I gathered my SRM planner stamps and the Bible background stamps. I love how the Bible background stamps just add a little more interest to the pages. I used the Coffee Plans Stamps to stamp a reminder to drink all the coffee (not that I need a reminder!!). For the weekend banner, I stamped the banner from the Travel Plans Stamps and wrote in the word weekend using the neon LePen set. The cute little apple comes from the Seasonal Plans set. That set contains so many cute icons! The word September at the top of the page also comes from that same stamp set. 


For the flowers seen on my pages, I used the Just Believe stamp set. I colored those images using the Color In Markers and Neon LePen set mentioned above. Just remember to use an archival ink when stamping images if you plan to watercolor them, that way your stamped image won't bleed. 


To decorate my pages even more, I used several of SRM's awesome stickers. SRM has stickers for all occasions.

The soccer stickers you see are from Say it with stickers-soccer and Take 2-soccer. Don't be afraid to cut down your stickers to use what you want. The adorable pink circular label is from the Labels by the Dozen Bright Blank set. Those labels are useful for so many different projects.

Do you see the adorable coffee cup, shopping cart, money sign and checklist? Those are from SRM's super cute and versatile Planner Icon Sticker Sheet!

I also added in some pink and black sticker stitches and some border stickers. After adding a few bits and pieces from my stash, my planer pages look amazing and are still functional!

Head on over to the SRM Stickers store and find all of the great products that you can use on your planner pages! 

Friday, September 15, 2017

Coffee Lover's Blog Hop - Project by Shanna Slater


Hello, Shanna here with a fun caffeinated card using SRM Stickers Coffee Plans clear stamp set.  SRM Stickers is a Super Sponsor for this year's Fall Coffee Lover's Blog Hop, be sure to "hop" over and check it out!


 I simply adore this set for it's tremendous versatility (it is a go to set for me frequently!).  In this particular project I used nearly every stamp in the set! 


I stamped all of my images using my stamp positioner for precision placement using Versamark ink


 I heat embossed all of my stamped images in a white detail embossing powder, allowing them to all stay front and center after inking over them with Distress Oxides in Vintage Photo.  The coffee cup you see in my pictures isn't just a prop...It's a TOOL too!  I watered down some walnut stain Distress ink and dipped the bottom of my cup in the ink.....stamped the "coffee ring" around my panel and again on the inside of my card to frame out my sentiment! 
 I love how the regular Distress ink and Distress Oxides collide and look.  


Everyone needs a little encouragement....and caffeine generally helps too! 


Supplies used in this project:
Versamark Ink
Distress Oxide in Vintage Photo
Distress Ink in Walnut Stain
WOW Super Bright White Detail embossing powder
Recollections Clear embossing powder
Tim Holtz Stamp platform
Miscellaneous puffy heart stickers
Coffee Washi (Recollections I think)

 As avid coffee addict drinker I love everything about this card... 
                                              What about you??  


And remember what coffee says... "You can do it"!!!

Until next time, stay happily caffeinated!!

Friday, August 18, 2017

Coffee Plans Gift Idea by Angie


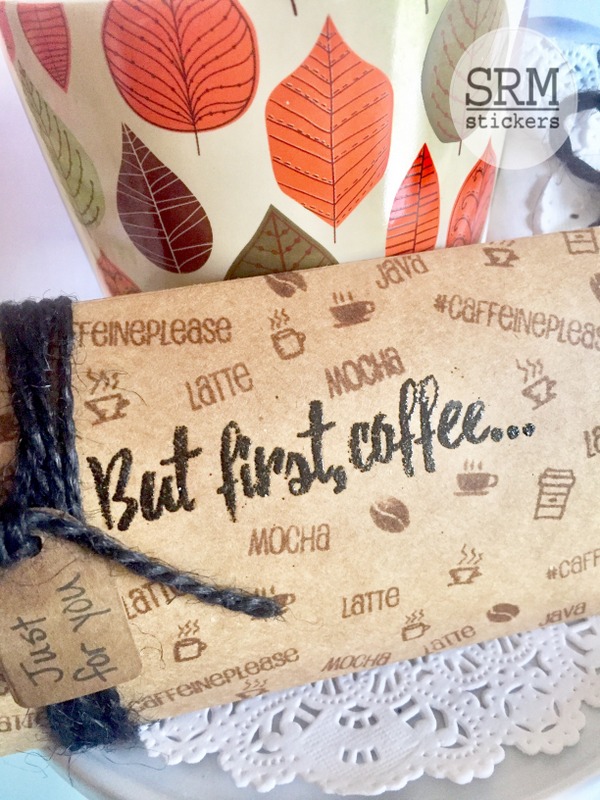
Hello SRM friends! Angie here with you today to share a cute gift card holder using the Coffee Plans stamps!


I started with the medium kraft pillow box. I used the coffee plans stamps and some brown ink to stamp different images and words all over the pillow box. I heat embossed the 'But first, coffee' sentiment using Versamark ink and black embossing powder. 


I tied some black jute twine around the end of the pillow box 
and added a tag.


I wanted to make the enclosed gift card a little more fancy, so I wrapped it in a 
doily and then added a 'Just for you' sticker and some more jute twine. 

This gift idea was so quick and easy--and it's super cute! Any coffee lover would love it!