Showing posts with label Baby. Show all posts

Wednesday, November 29, 2017

Welcome Baby Cards by Melanie


Hello, Melanie joining you today to share some baby cards. Lately we have had quite a few babies to welcome into our family and circle of friends. I love to have a handmade card to accompany the gift. Here are a couple of baby cards I made to celebrate the birth of new little ones.
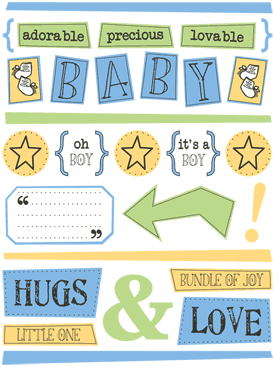
 SRM has THE best stickers for making cards! There are all kinds of sizes, fonts, shapes . . . it is awesome :) I love how they can be easily cut apart to fit exactly what you need.

For this Precious Baby card I used the Sentiment/Baby sheet as well as the We've Got Your Border/Pastel for "Hello Beautiful".


The Fancy Sentiments/Baby "Welcome Little One!" is such a sweet way to say just that. I added a bit of buttercream twine at the top of the banner piece for an extra special touch.


To finish off the look for each card, I added a border to the envelopes from We've Got Your Border/Baby Boy


Hope you enjoy these cards and are inspired to make some of your own :)
SaveSave

Monday, October 16, 2017

Baby's First Christmas Layout by Giorgia


Hello SRM friends, Giorgia here with a new layout for you.
Have you already started thinking about Christmas?
I sure am! So, to get in the Christmas mood I am scrapping some pictures from our family lunch last year.
Do you remember my lovely nice Greta?
I made a layout to remember her first Christmas: she was only a month old and she was really adorable in her cute festive dress.


To create the layout I used many SRM stickers Chrismtas themed products: check out Chrismtas category in the shop, it is full of amazing items!
I chose a background paper that perfectly matched my picture colors, and started decorating: I chose to stick with traditional Christmas colors.
I layered the picture on patterned papers and used SRM stickers to add interest to the page.


 I added some wood veners to add texture.


I adhered circles stickers on white cardstock, fussy cutted them and adhered them with foam tape to make them pop from the background and add depth. I love this technique, it is one of my go to in almost each layout!


I used small calendar numbers stickers to create the date on a sticker label, I handwrote the journal with black pen from Le Pen 4 Piece Set - Dark Colors and added the word Christmas from the Baby first year stickers sheet.


Friday, September 29, 2017

Shake It Up Baby Card by Shantaie


Hi!  I'm Shantaie and I want to share a few different ways to use SRM stickers the way you would use a stamp, patterned paper, even an envelope seal!


When we think about stickers sometimes we think about the ease of use ....and rightly so, but we can also think about the versatility and function of clear stickers. 


For my baby card I knew I wanted to make a sweet little shaker card, I cut 3 circles and used the three stars from the free style baby boy sheet as the base of my shaker, this takes the place of stamping AND coloring in one simple step! Saving me time, space, and money... yay!


I filled my windows with micro beads, sequins, and glitter. I used a double bow of jute and added a strip of white cardstock with a fancy sentiment on it, again in place of a stamped sentiment. Just below a little piece of the baby boy border.


Don't forget to add stickers to the inside of your cards to tie your sentiment or greeting together, here I have again used the baby boy we've got your border as well as the free style baby boy for the main greeting, adding both color and a fun font, SRM stickers are designed to work together, so the fonts are easy to read and are really pretty!


To create a handsome gift card holder I folded the top of this little kraft dots bag. Close to the bottom a strip of leftover patterned paper was added, and a layer of bitty stars and a strip of that we've got your border baby boy a star is born saying ties it together. 


I just love the live life baby's first year sheet and I used another circle sticker from that sheet to add color, and again a sweet dual font. 


I plan to put this in with the card as it is flat and will fit inside the embellished envelope. New parents can use a gift card to stock up on all those supplies that seem to always be needed!

I encourage you to look at SRM stickers as not just an easy way to decorate but as a really useful tool in your creative projects. 

Tuesday, September 5, 2017

Baby's First Year Mini Album by Giorgia


Hello SRM friends, Giorgia here to share a mini album of a baby: my husband cousin had a little girl almost a year ago, so I decided to make a mini album to document each month of her first year.The mini isn't finished yet, since by niece Greta is now 9 months, but I want to show you what I made so far.

This is the cover: I used some baby themed SRM stickers and glittered hearts die-cut with cutting machine.


The mini is a very small, cute, accordion mini album: to create the structure cut a 12x12" pink cardstock in 3 strips of 4"x12" and score them at every 4". Adhere together two strips, cut the other one in two identical parts and glue them to the beginning and end of the previously made accordion. This is the final result:


For the inside pages, I chose this cute patterned paper with months on it. I cut each month and adhered it onto a piece of patterned paper: this papers measures 3x8", scored in half in the long side, and they will contain the picture inside, on the bottom flap.


Adhere each paper to the structure: you will have 4 pages free from pictures, I decided to place them in the beginning to document Greta's first day of life, between month and in the back cover.

This is the first page, to document the first day of life: I used Baby plans stamps and I added handwritten dates with black pen from Le Pen 4 Piece Set - Dark Colors.


The top flap of each page is filled with SRM stickers: I used Baby's First Year-Girl stickers and Calendar Numbers/Small for the date. 


  In each page I used a lot of lovely baby themed SRM products. I didn't add dimensional parts, because I wanted the mini to stay flat once closed: I only used stickers and die-cuts:


I love the cute "milestones" stickers from Baby's first year stickers.


I adhered some of the stickers to scalloped punched pieces circles to create fun embellishments:


 Here you can see another examples of how I decorated the pages without picture.


My niece is the cutest, isn't she? I love her so much!
I already made also the gift box to contain the album: the mini perfectly fits into a kraft window box A2. I embellished it with a sticker, sequin and a jute twine bow.
I will gift it to her parents at her first birthday.


Until next time,
ciao, Giorgia


SRM products used 

Wednesday, August 9, 2017

7 Mini Calendar Stamp Projects & a VIDEO by Christine


Hi there SRM fans!  The newest stamp releases have so many possibilities and today I am going to share with you Christine joining you with 7 ideas for using the Mini Calendar Stamps from the Winter Plans, Spring Plans, Summer Plans, and Fall Plans sets.


Rather than do picture after picture - how about a video to show the 7 ideas?  I made 7 fun projects and here's a video walk-thru!


To recap here's the 7 ideas I highlighted: Baby Book, Save the Date Cards, Date Cards (Birthday, Anniversary, etc), Bible Journaling/Prayer List, Traveler's Notebook, Pocket Page, and Party Invitations.  Here's a couple closeups of the calendars on the projects.


Highlight a whole week or more in your traveler's notebook!


How about capturing all those sweet baby memories in a book and using the calendars to help document the days!?!


Are you ready to get your hands on those plans stamps!?! Head on over to the SRM Store to grab them!


Monday, April 3, 2017

Baby Layout by Christine


 I'm a pen addict, there's just no getting around it!  Christine joining you and now that we have established that I am going to focus on the new white gel pen from SRM Stickers!  I'm also going to add in some jute twine and lots of stickers and you can check all of them out up close in a process video for this baby layout!


Here's the process video for this layout:


I used the Gel Reminisce White Pen to decorate all the little rectangles along my patterned paper.


It worked beautifully for making that patterned paper have a different look and a one-of-a-kind look!  I also incorporated some Black Sticker Stitches to create a border along my layout. I tucked some light pink Jute Twine underneath the pictures to add a touch of whimsy.


I incorporated some phrases from the Express Yourself/Everyday Girl sticker set to be subtitles throughout the layout.

Thanks so much for joining us today!

Wednesday, February 15, 2017

Oh Baby Gift Bags by Shelly


Hey y'all! Shelly, here! 
Today, I'm sharing some super sweet and easy baby gift bags!


Seriously, how cute are those little white polka dots on the kraft?!!...When I was looking at them, my mind just kept thinking of baby. (and no, I'm not expecting. lol) So, baby gift bags it was! 


I started with each bag, folded the top down and added some twine. After adding my twine, I tied a bow. 


Once done, I added my 'oh baby' sticker. Which I used a circle die with some white cardstock, then added my sticker to it. 


After, I added my sticker piece to my twine using a mini clothespin. Easy peasy, right?!...

*I made up each bag with a different color of twine to show how easy it is to change things up. If it were to be for a boy, girl, etc. Also, I only added a little bit of tissue paper in my bags but you could easily fill them with treats, announcements, keepsakes, etc. All around fun, yeah?!...

Thanks so much for stopping by!
Enjoy your day and see you soon! 

SRM Stickers supplies used:

Polka Dot Kraft Bags