Showing posts with label Watercolor Pencils. Show all posts

Thursday, March 15, 2018

Spring Cards by Angie


Hello SRM friends and fans! Angie here today to share some spring card inspiration. I love using SRM's bags as envelopes and decorating them too!


One of my favorite stamp sets from SRM is the Just Believe set. I used the stamps from that set on both of my cards.  It is a religious themed stamp set but by looking at my cards, you would never know that. That is one reason why I love SRM's stamp sets--they are so versatile. 

I also used the XXX stamp from the BIG Love stamp set to give my cards a stitched look. The XXX stamp is one long strip but I cut mine down so I could have just three stamps. 


I stamped and fussy cut both butterflies, one of the flowers and the leaf stem. I also stamped one of the other flowers on the pink tag. 

To color the butterflies on the thank you card, I used the watercolor pencils. Just simply add your color and then spread it around using a water brush. 


I used SRM's awesome labels by the dozen on both cards. Those labels have so many uses. They can be used on cards, scrapbook layouts, tubes or even for labeling stuff in your kitchen!! SRM also has many colors of jute twine. I used light pink jute on both cards. 


As you can see, I also used two awesome bags from SRM as cute 'envelopes' for my cards. Have you checked out the selection of bags? Go ahead and have a look. I used the embossed chevron glassine bag and the lime green stripe bag.


I hope you enjoy the ways that I incorporated spring on my everyday type of cards.

Thanks for stopping by the SRM blog!!


Other products used:


Monday, February 5, 2018

Simple Bible Journaling with Bible Margins Stamps by Karen


Hello!  Karen here today to share a wonderful new product from SRM.  It's for non-artists and artists alike.  It's Bible Journaling made simple yet sensational! 


A little bit of color wash for the background. 
A touch of sticker stitches.
A simple sentiment in one Bible Margin panel stamp.


Bible journaling doesn't have to mean elaborate pages and tons of supplies.
Keeping it simple means more time to meditate on God's Word.
"This is the day the Lord had made. Let us rejoice and be glad in it!" Psalm 118

Thursday, January 25, 2018

Bible Margin Stamps Gift Bags by Karen


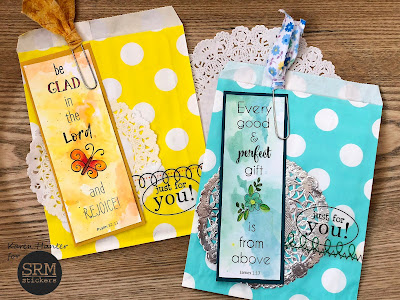
SRM's new Bible Margin stamps aren't just for Bible journaling. I used a couple of margin stamps as part of a gift bag decoration - and they double as bookmarks!


I stamped the margins on white cardstock which I had watercolored a pretty background. I used watercolor pencils to add more detail to the images. Mounting it onto a piece of colored cardstock helps it stand out against the fun patterned paper bags, doily, and sticker stitches and sentiments. 
By using a decorative clip to attach it to the bag, the recipient can easily remove it to use as a bookmark, too


For this project, I used:
Patterned bags | Bible Margins stamps RejoiceSticker Stitches | Sticker Sentiments Happy Birthday | ColorIn Watercolor Pencils

Friday, December 29, 2017

Peace on Earth by Jennifer


Hi everyone! Jenn here with a Bible journaling page that I completed to finish up the final week of Advent. This month I have been so enjoying my weekly advent studies. Here is just a little peek into what I have been learning.

In my weekly Advent study the 4th week is based around peace. I started by first sketching out my lettering and doodles with a pencil then I went back in with my black permanent fine tipped pen. Once I was satisfied with everything drawn I erased all the stray pencil lines, as those are super tough to erase after you watercolor...believe me I know from experience. I love using the water color pencils to precisely fill in the doodles

and then going back over all the color with a water brush. The vibrancy of the pencils is terrific! Any areas that need a little more color you can always touch your water brush to the tip of the pencil and pick up color and place it where needed. I love this technique and use it often just like if you had a pan of watercolor paint.

 Once the watercoloring has completely dried I go back over the line work a few times to make sketchy, imperfect lines....totally unnecessary, just my favorite style.

For the final touch I add little bits of white gel pen for highlights and to give the image more life.

Luke 2:14 "Glory to God in the highest, and on earth peace to men on whom his favor rests!" Wow this verse is so full of hope, and joy! One of the very few times an exclamation point is used...so you know it has a lot of emotion behind those words. The angels appeared to the lowest of all society, the shepherds and told them the best news ever. A Savior had been born to bring joy and peace. So this has me thinking ...what is peace? Peace is learning to trust God even in the midst of chaos. Peace is having confidence in God who loved me so much he was willing to send his son to earth as a helpless baby. Peace is saying no to the world and yes to God. That is the kind of peace that I need in my life during the chaos of Christmas and all year long. I hope and pray you hold on to this peace as we move into the new year.

SRM Supplies Used:

Wednesday, December 13, 2017

Stamped Gift Boxes by Samantha


Hello! Samantha here today to share some stamped gift boxes for cute and easy Christmas gifting. 

  
For these all you'll need are some kraft boxesSeasonal Plans Planner Stamp setwatercolor pencilsjute twine, and stamping ink. 


The kraft boxes come in lots of different sizes, perfect for wrapping up small gifts like jewelry, gift cards, and Christmas ornaments. Just simply stamp your images while the box is flat, then assemble and gift. 


 If you're creating more than one box for the same person, stack up the boxes and add a little jute to tie them all together. 


If you're like me and don't love wrapping, these sweet stamped gift boxes are a fantastic way to package up gifts without ever touching a roll of wrapping paper!

Tuesday, December 12, 2017

Count Your Blessings by Jennifer


Hello everyone, Jenn here! I am sharing a page I completed in my Bible during the Thanksgiving holiday week. I love looking back over the year on both Thanksgiving and New Years eve remembering all the many many blessings I have been given.


I love the clear stickers from SRM and I thought what better way than to use them in my Bible! What makes them so awesome is you can see text through the image...making it perfect for those concerned with covering Bible text. Before I began I knew I wanted to commemorate Thanksgiving with some festive leaves so I stamped leaves with StazOn ink. Once dry I colored them in with the Marvy ColorIn watercolor pencils. To intensify the color I went in with my water brush and activated the pigment from the pencils. This was such a fun relaxing time I was able to just sit and soak in the words God wanted to speak to me. I really took my time and journaled a lot and even included a prayer which I started with the Jesus stamp from the Daily Devotion Stamp set.


I hope and pray this reminds you to slow down during this busy chaotic holiday season and really count your blessings. Write them down in a journal or Bible and come back to this when you feel lost, defeated and overwhelmed. God is so very very good!

Supplies Used:

Monday, November 20, 2017

East & West Bible Journaling by Samantha


Hello! Samantha here to day to share some Bible journaling. Today I've got a verse from Psalms, "As far as the East is from the West, so far has He removed our transgressions from us."


For my page I used 2 SRM stamp sets; Bible Backgrounds and Heaven and EarthColorIn Watercolor Pencils, a Reminisce White Gel Pen, a LePlume Black markerSticker Stitches in white, and some stamping inks. 


I used my colored inks to sponge on a soft background of blue, purple, and orange. I then stamped the crossed arrows stamp from Bible Backgrounds with the same colored inks.


I used a mixture of stamps from the Heaven & Earth stamp set and the black LePlume marker to write the verse in the margin of my page. I used the white gel pen and watercolor pencils to color in the arrows, mountains, and words. I finished up by adding a few white stitches stickers randomly to the edges of my page.


What have you been Bible journaling lately?  

Monday, October 30, 2017

October Planner Pages by Tangii


Hey yall, Tangii here.  For today's post I did some playing with some Halloween stickers and Planner stamps (all items used are listed at the bottom of my post).   You could use this format for any month.  Just change up the stickers that you use.  This is my Daughter's planner and is actually a 1/2 sheet size, so 5 1/2" x 8".  I also used the Coloring Book Watercolor Pencils (12 pack).


My daughter struggles when Monday strolls around, and being the coffee lover that she is, I used the Coffee Plans, Clear Planner set on Mondays.  I also had some fun with the 31st, she still LOVES dressing up for Halloween, lol. 


I used Everyday Plans, Clear Planner set for Pay Day's & Date Nights.  For the cute lil Piggy & Heart I just stamped them in black and used the Coloring Book Watercolor Pencils to color them in, I did NOT add water since this is not the correct type of paper.  I also added some "List" categories for her on the far right!  Thinking I should have added a "Clean your room" under the first category! lol


Her planner also has weekly layouts, but when I decorate my Monthly views I always make sure there is still room for writing things in!  Thanks for stopping by!

Happy Crafting!

Thursday, September 7, 2017

Jesus Teach My Children by Jennifer


Hello all, Jenn here! I am excited to share with you a page from my Bible. August 7th was a very exciting day, as it was the first day of school for my Preschooler, 1st grader and 2nd grader. As a homeschool mom every year is full of a little anxiety, and excitement. I loved this verse I found in Isaiah 52:14 "All your Children shall be taught by the Lord, and great shall be the peace of your children."


To begin this page I started with the lettering I simply wrote the words and found some amazingly cute washi tape at Target for the word teach as well as the fun alphabet pictures at the top and bottom of the page. Next I pulled out the school stickers and fussy cut the apples and added them to the page to create a fun element and to keep your eye moving around the page. I thought the side of the page looked a little empty so I stamped the pencil from the Sermon Notes stamp set in a red and yellow to coordinate with the apples and fun "teacher" look of the page. 


I also pulled out the curvy arrow to help mark the verse and colored the verse with my watercolor pencils.The red and yellow border stickers were added to the top and bottom under that fun alphabet washi. After adding a very heartfelt prayer to the page and a super fun fabric paperclip the page was finished and my heart was at rest.
Supplies used:

Wednesday, August 30, 2017

Polke Dot Bag/Card Holder by Angie


Hello!! Angie here again with a fun way to give a card!


 I wanted to use the black polka dot cotton bag instead of an envelope to hold my card.


I started with a scalloped circle punch out in a teal blue color and added a 'Love You' sticker to the center. To add some embellishment to the circle, I used the small flowers from the Just Believe stamp set. I stamped them with archival ink, watercolored them using the watercolor markers and pencils and then fussy cut them. Quick, easy and so cute!!


For my card, I used some bright pink cardstock from my stash and just trimmed it down so that it would fit inside of the bag. I used another scalloped circle punch out to tie the card and bag together. This time I used the larger flower and branches along with the butterflies from the Just Believe stamp set. I watercolored them as well and cut them out. The top of my card was looking a little plain, so I used a scalloped sticker stitch to fill in the space. I placed a best wishes clear sticker at the bottom to complete my card. 

What fun a fun way to give a card instead of the traditional envelope!

Monday, August 14, 2017

Bags of Fun Mixed Media Tutorial by Emma


Greetings to you, crafty friends!  Emma here, and today I am going to share a little mixed media piece using one of these wonderful SRM linen & lace bags, enhanced with lace.  They have a wonderful texture, which is just perfect for an art journal page.


 I know that being faced with a blank page is pretty daunting when beginning a mixed media piece.  The trick is to remember that you can build layers of colour, stamps, texture and embellishments to create your page.  This type of art isn't supposed to be "perfect", as it is a reflection of your current mood, or the inspiration you found.

To start, I picked some supplies to go with the linen bag:


Here, I have 4" white lace doilies, green jute twine, 2" punched scallop circle, and two stamp sets, Big Hello and Bible Backgrounds.  I really love the images on the backgrounds stamp set, especially the clouds!


To build the colour of the background, I have used Marvy ColorIn Watercolor Pencils.  


They blend beautifully!


 Now, to use the stamps to build up other elements in the background.  I used the clouds, springs and arrows in random areas.  Then, I stamped and embossed the 'hello' using white embossing powder.


Now, I have added the linen bag (I used strong double-sided tape such as SookWang to hold it down).  Bursting from the bag are three paper doilies, that have folded into tube shapes and embellished with a little gold and copper gilding wax.  This really makes the texture in the doilies pop!  Lastly, I created a flower shape with the scalloped circle, and added petals and a bling rhinestone to the centre.  The green jute serves as a stem for the flower.


 I hope you've enjoyed my mixed media project, and that it inspires you to try something like this too!  It's so fun to let your creativity run wild.  (PS - I heard you can even use these linen bags to put things in, too!  So versatile! 😉)


Best wishes to you all! 
Emma 


Thursday, August 3, 2017

Vegas Selfie Scrapbook Layout by Angie


Today we introduce you to Angie Pond and share with you a wonderful layout she created.  Here's a bit about Angie in her own words: 

I'm Angie Pond from Princeton, North Carolina. I've been married to my high school sweetheart for almost 20 years. We have two amazing sons, one ornery cat and a cute but mischievous dog! I'm also blessed to be an aunt to the worlds most adorable brother and sister duo! I enjoy scrapbooking, taking pictures, traveling, reading and drinking coffee on my front porch!  

----------------

Hello SRM friends! Angie here with you today to share a scrapbook layout. I'm so honored to be on this amazing team and to be able to share all of  the fun products with you.

I created this scrapbook layout using the amazing flower stamps from the Just Believe stamp set. Yes, that stamp set is technically a faith stamp set but SRM's products are so versatile that you can use them on many different projects!


I stamped the flowers and the cute butterflies with archival ink. I used archival ink because I knew I wanted to watercolor the flowers and the butterflies using the watercolor in markers and pencils. I just love how easily the colors blended when I applied a little water.  After I had colored the flowers and butterflies, I hand cut them and created a beautiful border using the flowers.


I added the butterflies above my picture and hand stitched the flight paths of them as well.


I hope you enjoyed my scrapbook layout and that you will use SRM's products in new and different ways.