Showing posts with label Punched Pieces. Show all posts

Friday, June 8, 2018

Thank You Tubes by Angie


Hello SRM friends!! Angie with you today!!
I have a cute idea using SRM's clear tubes.


I used the clear tubes and filled them with wildflower seeds which would make adorable thank you gifts for a garden themed party!! 

I used several SRM stickers to embellish the tubes with and then attached the scalloped circles with twine. They were so quick and easy to make but they turned out so cute!


I hope you give these thank you gifts a try for your next party!

Other supplies used:

Thursday, April 26, 2018

"Faux" Project Life Cards by Giorgia


Hello SRM friends, Giorgia here and today I want to share with you an idea on how to use Project Life cards if you are not into Project Life.  I'm calling them "faux" Project Life cards!   
I was so lucky to win a set of Project Life cards, but I don't like to do it, so I thought of using them in my cards! 
I created a panel with them and added embellishments; as sentiment I used SRM Stickers.

Here it is the first card:


And here it is the second one: in this one I also added a sweet SRM ladybug sticker as embellishment.


Both my cards are springy and feminine and they could also be meant as a card set: you can put them in a SRM Stickers bag, or box and give them away to a friend as a little gift.

I hope to have given you an idea!
Until next time,
ciao, Giorgia.


SRM products used 


Wednesday, March 7, 2018

Make a Wish Birthday Tubes by Shelly


Hey y'all! Shelly, here.
Today, I'm sharing some fun birthday tubes with you!

I wanted to do something fun and somewhat whimsical, so I thought of a garden/flower themed birthday party. :). Perfect for Spring!


I started with my tubes which I simply added some patterned paper around. Easy, right?...After, I worked on making my tags. I used some bright yellow punched pieces and some little flower die cuts. 


For my sentiments, I used some stickers and simply added them to cardstock. Once done, I added them to my tubes and used some twine to tie it all together. Simple, yeah?!...

*Note: Since being a garden themed party, I thought the perfect treat to fill these tubes with would be those little chocolate covered sunflower seeds candies. ;) Though, you can easily fill them with anything you like! :)

Thanks so much for stopping by!
Enjoy your day! 

SRM Stickers supplies:


Friday, February 2, 2018

Birthday Gifts with SRM Tubes by Giorgia


Hello SRM friends, Giorgia here with an idea for a sweet birthday gift: many of my colleagues celebrate birthday in January, so I made them a little something.
 SRM mini tubes are my go to when I need a cute package for chocolates and sweets: how cool is that you can see through the tubes and be amazed with all the sweetness inside? It really screams open me, eat me!

I filled SRM mini tubes with chocolates and I decorated them with Stickers By The Dozen/Birthday stickers by wrapping around them different strips.
Then I embellished the tubes with jute twine and other stickers. 


I adhered clear stickers on punched pieces and on white cardstock that I cut in a banner shape. In just a few minutes I created a cute gift to brighten my colleague's day and celebrate them!


Until next time,


ciao, Giorgia


SRM products used 
SaveSave

Monday, January 29, 2018

Valentine's Banner by Angie


Hi friends! Angie here with you today to share a cute idea for Valentine's Day.


I made this  banner using just a few simple supplies.

I used the red heart doilies, white lace doilies and the scalloped punched pieces as the basis for my banner. I just layered them up and attached them together with a little glue. 


I used some chipboard letters from my stash to spell the word 'love.' I gave them a coat of black paint and added some black glitter on top of the wet paint. Once the letters were dry, I glued them in the center of the scalloped pieces.


On the two end pieces of the banner, I layered the doilies and scalloped pieces as before and then placed a heart sticker from the Valentine's themed stickers by the dozen set in the center. 


I strung the banner together using some black twine.
Give it a try!! This would make a fun project to do with your kids! 

Wednesday, January 17, 2018

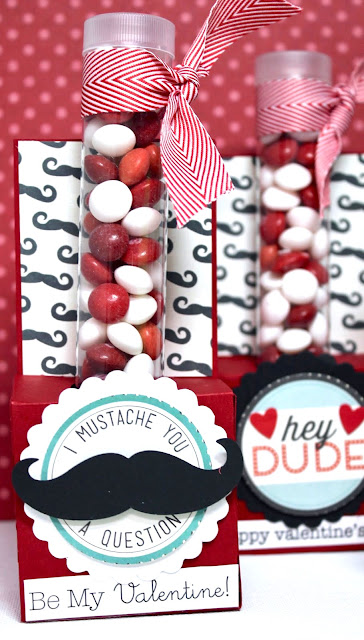
Mustache You to be my Valentine by Shantaie


Hello!  Shantaie joining you today with some Valentine treats! 
I know it's cliche' to say "I love Valentines day" but it's one of my favorite celebrations!  My girls are far beyond classmate Valentines, so I like to make little gifts for my staff to hand out as a sweet little reminder that I appreciate them.


Most of my team are college students, so I can really have fun with the style of Valentines. I think these could work for almost anyone! My focus was on a little treat using the tubes to fill with candy. For the holder I used this cut from silhouette enlarged to fill the 12x12 cutting mat. I used the base only, and added patterned paper and round prints to embellish. 


I layered onto white punched pieces with foam tape, I also added hearts from the stickers by the dozen Valentine onto white cardstock and placed in the center of the printed circles. Tp top that off I added a bit of we've got your border sentiment to a skinny strip and adhered it in the center of the heart


For the mustache version I used the sentiment from that same stickers by the dozen valentine.  I used for the hearts on the sweetheart version. To add a bit of fun a die cut mustache is popped with foam tape and would be cute with a spring wobbler too! 


I love using tubes to make favors, give treats and even to store my crafty supplies! I have used them for years and each time I give one as a gift I am always thrilled at the excited reaction to them. 


Seeing someone smile is (to me) the best part of giving a Valentine! 
XOXO 

Monday, December 18, 2017

Stocking Stuffers with the Magic Wand Tubes by Christine


Hello from Susan!  We have so many wonderful Christmas ideas that I decided to double up on blog posts so we are doing 2 posts today.  The first one was a 12:01 AM and this one is at 12:01 PM!  Still plenty of time to create this amazing idea from Christine Meyer. 

----------------

Christine joining you today with a stocking stuffer idea that anyone, young or old, is sure to love!  I've been looking at the Magic Wand Tubes for awhile and longing to fill them with skittles or M & M's - Christmas seemed like the perfect time to do just that.  


These were super easy to put together with the help of some vinyl, punched pieces, and stickers by the dozen!  


I used red vinyl and silver vinyl cut into 1/4" strips and wrapped them around the tubes to mimic the look of candy canes. 


Punched Pieces in multiple sizes and colors took the lead in decorating.  I then topped them off with Christmas Stickers by the Dozen.  Here's a video walking you thru how I put these together!


Thanks for joining me today - have fun with your holiday crafting!

Monday, November 13, 2017

Christmas Cards - Clean & Simple by Giorgia


Hello SRM friends, Giorgia here and today I want to share some cards I created for Christmas.  I love to create handmade cards, also if I really am not a cardmaker: I love easy cards, and I love clean & simple style, so even if you are a beginner you can create these with me!


SRM Stickers has a lot of Christmas products, take a look in the shop!
I gathered all my SRM Christmas stash and started creating...


To realize this card I used We've Got Your Border/ChristmasI made it clean and simple, with white cardstock base and really few embellishments - I am in love with the cute elf!
To add depth I used foam tape to adhere the elf die cut and to add texture I added 3 tiny wooden stars.


For this one, that is really tiny because I used cardstock scraps to create it, I used a sentiment and the cute Santa  from We've Got Your Sticker/Merry  sheet; on the inside I added a sticker from Freestyle Christmas stickers.


For the third card I covered the white cardstock base with patterned paper, I added a central panel of white cardstock where I adhered We've Got Your Sticker/Merry stickers. Then I glued a small green scalloped piece when I attached a decorated wooden pin. I created a bow with red jute to complete the card.


For the last card I used the same patterned paper than the previous one, but glued on green cardstock base. I adhered a sticker from Fancy Sentiment/Christmas  on a Punched Pieces - 24 Large Scalloped Circle - 2½" - Green that I attached with foam tape to the card. To decorate it I added a button with red jute twine.


In few minutes, with SRM stickers, I created four different cards!
Until next time,
ciao, Giorgia
SRM products used 

Friday, November 10, 2017

12 Days of Christmas Countdown Advent Calendar


Hello!  Shanna here again with a fun and festive Christmas project!!  

In my house we have a tradition of a countdown advent calendar... Similar to the chocolate ones you see in stores, we like to give little treats and toys as part of the fun!  I have varied in the past with a full 25 days of fun, or a simpler 12 days of counting fun.  This year, for my 5 year old's first advent calendar I chose to run with the 12 days of Christmas countdown as it will be a little more simplistic for him to follow as he is autistic and the more simplified it is, the less stressed he gets.  


I adored making this fun banner-style calendar with with fun and simple flair!


Here is what I used:
Distress Oxide inks in Lucky Clover, and Candied Apple
Mini Clothespins


I started by stamping directly onto the scallop circles the numbers 1-12 using the BIG Numbers Stamp Set.  I actually ended up embossing them in clear, but it down played the oxide colors unfortunately.  Good news is my 5 year old won't be nearly as critical of them as I am!  


Next was made easy peasy by utilizing the treat bags as the wrapping/holder for the goodies.  We keep things small and affordable.  I picked up a multi pack of trains (his fave) and some figurines from the dollar store along with a couple pencils that are helping him learn to write.  Fun stuff!!  I put candy in my older kids calendars sometimes to mix it up, but for this one I stuck with small toys. 

I folded down the bags to close them and then sealed them using one of the awesome stickers in the SRM Stickers Live Life/Christmas Stickers set!!  Super easy!  I attached my numbers to the bags with some double sided tape and then strung them on the jute twine clothesline-style.  I love how it turned out and will fit on our mantle perfectly this coming December!


What is a fun tradition you like to do in preparation for Christmas??

Until next time!!

Thursday, October 26, 2017

Over the Rainbow Party by Jenn


Hi friends, Jenn here! My oldest daughter is about to turn 7 and has asked for a bright colorful rainbow unicorn party, so today I will be sharing some fun ideas that are sure to put a great big smile on your face!

Yesterday I shared my planner pages that had lots of details about my daughter's birthday.  Today I am sharing lots of things that I created for the party.  Ready for inspiration?  Let's go!


First up lets talk about the invitations... I used a plain white cardstock and stamped the star bunting and celebrate from the birthday planner stamps in clear embossing ink then embossed with white. I noticed I had the exact number of colors in the rainbow as stars so I used the color in Le Plume markers and colored them onto a a clear acrylic stamp block and used them like watercolor with my water brush. At the bottom I added the same colors over the embossed celebrate words to make the words pop off the page and also bring more color to the invite.


I really wanted to create treat bags or favor bags for the party....I used the glassine bags and filled them with colorful skittles and tied a little bakers twine around them with a yellow scalloped circle with the words Rainbow seeds. That was it...super simple, cute and will be fun to display.


I hope I have sparked a little creativity and inspiration in you all. I love seeing what you create with the beautiful SRM sticker products so please share using #srmstickers on instagram and Facebook....looking forward to seeing what you all create!

Materials used: