Monday, April 30, 2018

Bible Bubbles Card by Michele


Good morning! Michele here with a fun Bible Bubble card! This is one of SRM's new sets and I think it is so cute! I used a stencil and inks to create a subtle background.  I stamped each bubble sentiment in black ink and gave it a bit of depth with gray Copic markers.  


I also colored the hearts with red Copic markers.  I added glossy accents to the hearts and each of the bubbles for dimension.  


For a few last minute touches, I added a few rhinestones and red twine to bring out the red in the hearts.  


Thank you so much for stopping by today!

Friday, April 27, 2018

Celebrating Autism with SRM Vinyl by Shanna


Celebrating Autism with SRM Vinyl

Hello SRM friends!  Shanna here today with a project that is very near and dear to my heart!  


April is Autism Awareness Month, a month that celebrates anyone on the ASD spectrum :)  ASD stands for Autism Spectrum Disorder, and spreads across a HUGE range of differences in the autistic community.  This is so special to me because my youngest child is on the spectrum. I wanted to celebrate him this month especially so I designed a t-shirt for him to wear!  I had trouble deciding on a single design, so I ended up combining two separate design files from the Silhouette Store to make my own design come to life.  


SRM carries Siser EasyWeed HTV and it made the project turn out better than I had ever envisioned and as you might be able to tell....my little guy loved it as well!  


Materials used:
Siser EasyWeed: 
~Mettalic Blue
~Mettalic Red
~White
Silhouette Store Design files 187441 and 9200 (edited)
Silhouette Cameo

I hope you all enjoyed my project today....Until next time!

Thursday, April 26, 2018

"Faux" Project Life Cards by Giorgia


Hello SRM friends, Giorgia here and today I want to share with you an idea on how to use Project Life cards if you are not into Project Life.  I'm calling them "faux" Project Life cards!   
I was so lucky to win a set of Project Life cards, but I don't like to do it, so I thought of using them in my cards! 
I created a panel with them and added embellishments; as sentiment I used SRM Stickers.

Here it is the first card:


And here it is the second one: in this one I also added a sweet SRM ladybug sticker as embellishment.


Both my cards are springy and feminine and they could also be meant as a card set: you can put them in a SRM Stickers bag, or box and give them away to a friend as a little gift.

I hope to have given you an idea!
Until next time,
ciao, Giorgia.


SRM products used 


Wednesday, April 25, 2018

"We Love" Card by Michele


Hello there! Michele here with a card using the Bible Margins Love stamp set.  I wanted a soft background for the sentiment so I used a stencil and dye 
inks to create the polka dots.  I used a scalloped die to cut the panel into 
two pieces.  The sentiment (which I love) was stamped in black ink directly 
over the polka dot panel.  I used a Misti to be sure I could stamp it a couple 
of times for a crisp black sentiment.  


I popped the panels over a piece of patterned paper I had laying on my desk.  
It had similar colors and I liked how they worked together.  To finish the card, 
I added a few sequins and two colors of silk ribbon. 


Thank you so much for popping by today for a visit!!

Tuesday, April 24, 2018

Stamped & Foiled Thank You Card by Emma


Hello SRM fans!  It's Emma here today to show you how to use the wonderful textile foil and your SRM clear stamps to make simple and cute cards.


For this card, I am using the BIG Thank You clear stamp set as it gives us nice large letters to foil.

The trick with foiling, is to use something heat-reactive that will cause the foil to stick to the design when passing through a laminator.  There are several options, such as cuttable adhesive sheets, heat-reactive adhesive gel, or toner from a laser printer.  You can also get toner paper sheets that can be cut into a design and then foiled.


For my card, I am going to stamp the THANKS sentiment with Decofoil Transfer Gel.
Use a sponge dauber to dab the gel onto the surface of the stamp.  Stamp the image onto your cardstock, and allow to dry for about an hour.  I know it is slightly tedious to wait, however the gel is heat-reactive so it does not help to use your heat gun to set it.  (I know, I tried!)  My advice is to stamp the same sentiment several times, in case the first one doesn't stick to the foil as well as you hoped.  (Use more transfer gel each time you stamp the image).


Now, lay the foil sheet over the stamped images, completely covering them.  I chose this funky purple holographic style, as it's so cool.


Now, fold some plain kitchen parchment paper (NOT waxpaper!) around your stamped paper and foil.  This is another good tip - I have tried using cardstock or heavier paper around my project previously, and found that it did not work.  Switch on your laminator, and once it has reached temperature, feed your project through.  My laminator is an inexpensive $35 model - I know that some craft-specific ones can run to $200 or more.  For this model, I chose the higher 5mil temperature.  Please always follow the instructions for your own machine carefully.


Here are our foiled Thank Yous!  As you can see, the foil hasn't taken fully on a couple of the images, so now I can pick the best one.  I used a rectangular die to cut my chosen image from the sheet.


Now for the background.  I decided it would be fun to use the rest of the stamp set behind the main sentiment.  So for this, I have stamped the images with embossing ink, and used clear embossing powder.  


The embossing technique creates a cool 'watermarked' effect.  You can still see it, but it doesn't overshadow the foiled main sentiment.


Here is the finished card!  I think it looks simple but effective.
I hope you enjoyed my project, and are inspired to try heat foiling with your stamps too.

Happy crafting!
~~ Emma ~~

Supplies:
  • SRM Clear Stamps - BIG Thank You
  • SRM Textile Foil
  • Decofoil Transfer Gel
  • Tim Holtz Embossing Ink
  • Close to My Heart Clear Detail Embossing Powder
  • Scotch Laminator
  • Parchment Paper
  • Craft heat gun
  • Smooth white cardstock

Monday, April 23, 2018

Planner Decal with SRM Vinyl by Shanna


Hello!  Shanna here today with a quick way to personalize and even add a little sparkle to your planner!


SRM Vinyl makes it super simple to personalize the cover of your planner with any type of picture, quote, or even your name if you want!! I love how the gold pops against the purple, and the grid transfer tape helped me keep everything aligned. I chose to put a design I found in the Silhouette Store on the front of mine as it suits my life with a family of 5 perfectly! Either I have planned or I am in a panic!!


What do you want to put on your planner?? 
Be sure to tell me in the comments below!

Until next time,

Friday, April 20, 2018

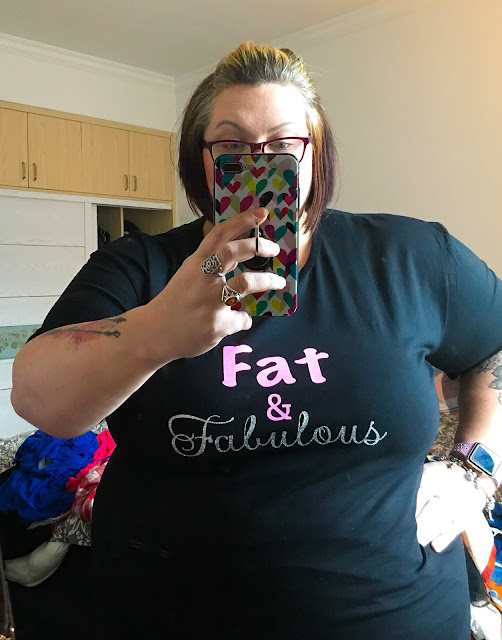
Fat & Fabulous T- Shirt by Tobi


Hello there! It's Tobi here, and I'm sharing my first heat-transfer vinyl project with you today. 
Yes, my first project... That's how easy it is! I can see how this craft is addicting (all of the tutorials I've watched say it) and now I'm looking around my house to see what else I can embellish. 


For today, I purchased: 
1) a plain black t-shirt
2) an iron (because yah... I didn't have one, haha)
3) heat-transfer vinyl in pink and silver glitter


The final product was the result of a happy accident - the "Fabulous" was originally pink, but the cut didn't cut properly, so I decided to cut it out of silver. I think it worked out perfectly! 


And here's me in my brand new shirt, wearing it loud and proud!!! 

Thanks for taking a look, and trust me, try heat-transfer vinyl!! 
So fun, so easy, and it looks amazing!

pink and silver vinyl

Thursday, April 19, 2018

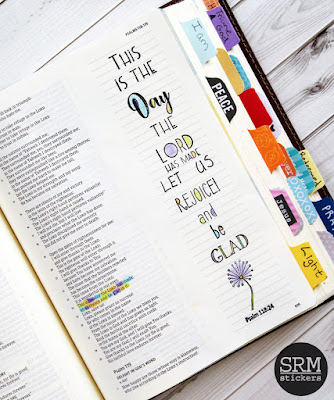
Masking Bible Journaling Stamps by Samantha


Hello! Samantha here with you today to share how masking Bible journaling stamps can add even more options to your Bible journaling. 


For this page I used Bible Margins Rejoice Stamp SetWatercolor Twist Pencils, and a black Marvy Le Plume pen. 


For this page, I wanted to use both the This is the Day stamp (the center stamp) and the words "Rejoice," "and," and "be glad" from the Be Glad stamp (the far right stamp). 


Before inking my stamp, I line it up where I want it to be. Then, I place a sticky note to cover the whole area that I don't want stamped. 


Ink your stamp, and stamp in your Bible. The post it note will mask the area that you don't want inked. 


I repeated the process until I had everything stamped. Then I used my Watercolor Twist Pencils to color in the stamped image and highlight my Bible Verse. 


Masking Bible journaling stamps will have you looking at your stamps in a whole new way! 

Wednesday, April 18, 2018

Hello! Card by Michele


Good morning! Michele here!  I am so glad to "be back!"  I recently moved into a new home and had to wait patiently while my craft room was being painted, decorated, and the zillion boxes unpacked and organized! But I am officially back now and couldn't be happier!  
I created this card with a stamp I found during my move and thought it would pair beautifully with SRM's BIG Hello stamp set!


This large bold sentiment was perfect!  I wanted to "ground" it, so I decided to stamp a few stitches using the Stamped Stitches set.  I added a bit of ribbon to finish the card.


So glad to be back!
Thank you for stopping by today!

Tuesday, April 17, 2018

Let Love Grow by Jenn


Hi friends, Jenn here! Wedding season is almost upon on us. I thought this would be a great time to show a quick favor idea if you or someone you know plans to tie the knot this summer. These are really simple favors, that are not only sweet but practical.

I used the small bags and used twine and jute to decorate the bag. Next I made a tag with directions on how to "use" these favors. I chose to fill the bags with wildflower seeds so guest could watch love bloom and remember the happy couple. I also think a sweet alternative could be vegetable seeds, and or perhaps the specific wedding flowers so guests can plant their own.


I simply attached the round labels onto white cardstock and cut around them, added a few stickers and lettering and attached them onto the bags with twine and jute. These bags would be so fun to customize to ones wedding colors and decor themes. For these three examples I chose to go simple and elegant with black and white.


I hope this idea sparks some inspiration for your wedding or even backyard get together...why not pass out sweet little bags of seeds at any party. 

Supplies Used:
Fabric Bags/small, Bakers Twine/Charcoal, Jute Twine, Le Pen, Sticker Sentiments/Love, We've Got Your Sticker/ForeverLabels by the Dozen/Black and White

Monday, April 16, 2018

Coffee Cards by Shelly


Hey y'all! Shelly, here.
Today, I'm sharing some fun and simple coffee cards with you.


I started with my background piece, which I used a die for and some patterned paper. After I used the SRM Stickers Coffee Plans clear stamp set for my coffee cups/images. I simply colored them in with colored pencils. Then added them to my squares on my card, which for one of the cups in each square I 'popped up' with foam tape on the back.


To finish my cards off I added my sentiment in the rectangle on my card. Easy peasy, right?!...


Thanks so much for stopping by!
Enjoy your day!
SRM Stickers supplies:


Friday, April 13, 2018

Project Helper with Clear Containers by Shanna


Hello SRM friends!  This is Shanna here today sharing with you an "outside the box" way to use utilize SRM's fabulous clear containers!  

I have been coloring an awful lot here lately, and I tend to get distracted or interrupted easily (a.k.a. KIDS!) and then forget which exact colors were being used on my current project.  Especially frustrating if I am wanting to duplicate a card or need to touch up a spot I had to walk away from momentarily!  

SRM to the rescue! 


I used SRM's clear mini box and Tall Thin Box to create not only a spot to hold my markers while using them on a project, but a spot for my water brush too!  YAY for organization!  I grabbed a scrap piece of SRM Vinyl in black to make some cute labels for my containers and Voila! I have a small obsession with script fonts and just loved how this turned out....the font is called "Hello Gorgeous" for my fellow font aficionados.  


I decided last minute to adhere some sticky back velcro dots to make the boxes removable from the container that holds all the colors.  I like that I can just have the little boxes on my workspace if I want, as my workspace *shrinks* the longer I create! 
  
Supplies used:
SRM Vinyl- Black
SRM Vinyl transfer paper
Silhouette Cameo
Sticky back Velcro dots


Let me know what you think!
Is there anything you could use some help organizing?  

Thursday, April 12, 2018

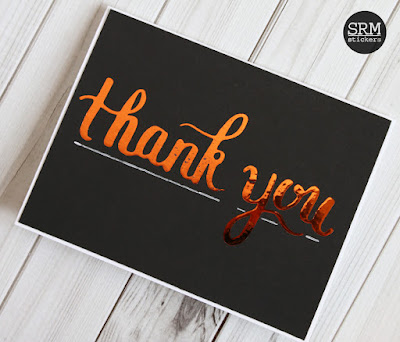
Simple Foiled Thank You Cards by Samantha


Hello! Samantha here with you today. I can never seem to have too many thank you cards in my stash. I thought I'd play around with the new Easy Weed Adhesive and Textile Foil to create some Simple Foiled thank you cards.

To create these cards you'll need card stock, Easy Weed Adhesive, Textile Foil (I used blue and copper), a laminator or heat press, and a Silhouette Cameo or similar digital die cutting machine.


You will use your Silhouette Cameo to create and cut the design you want from Easy Weed Adhesive. When working with Easy Weed Adhesive you must remember to mirror your image for cutting (cut it out backwards). 


Place the design you cut on your card stock and heat it with a heat press (only about 2 seconds is needed for Easy Weed Adhesive on paper) or run it through your laminator. Make sure to peel the backing off of your adhesive as soon as you take the heat off. Do not wait for it to cool down. 

Finally, place a piece of textile foil over your Easy Weed Adhesive design. Apply heat a second time (with a heat press or a laminator). Wait until the foil cools, peel it off, and you have a beautiful foiled design. 

My favorite thing about using foil on card stock is that it shows up beautifully on both light and dark colored card stock leaving you endless possibilities for color combinations.  

I think these simple foiled thank you cards show that simple can also be stunning.