Wednesday, November 30, 2016

Christmas Tube by Tobi


Hi there! Tobi Crawford here with an off-beat idea for Christmas gift-giving. 
I like to fill the Tubes with lots of different yummy treats, but over here in China things like Hershey's kisses and M&Ms don't exist, so I have to get creative!! 

Enter: the Trail Mix tube! 


I make my own trail mix consisting of: 

Mixed, salted nuts
Dried Pineapple
Dried Cranberries
Dried Papaya 
Mini Chocolate chips


So what's better than a couple of cute Squirrel images to go with the nuts?? 


I added a bunch of glitter and snow to make the scene super festive and it was done!What a quick and easy way to say "Merry Christmas" to your health nut friends and family!! 

Supplies used: 
Stamps: Lawn Fawn
SRM Stickers:  Tubes 
Twine: Maraschino

Tuesday, November 29, 2016

Reindeer Decor with Metallic Vinyl by Samantha


Hello! Samantha here today to share some Christmas home decor. The second I received SRM's gorgeous metallic and holographic vinyl I knew I had to use it for some Christmas decorating. I decided to combine it with a shadow box I had sitting in my stash to make this Reindeer Decor.


I like to create wall art with my Silhouette. Sometimes I design it myself, and sometimes I buy files from the Silhouette shop. There was the perfect file for what I wanted to do in the Silhouette shop, so I was able to save some time (and you know I'm always a bit short on time around Christmas) and buy the fun reindeer name cutting file instead of creating one. 


When I'm creating with multiple vinyl colors, sometimes I like to try out the colors in the Silhouette software before cutting into my vinyl. You can see above what I mean. The colors aren't a perfect representation, but it helps me visualize exactly how I want to lay things out. 


For this project I chose metallic gold vinyl, metallic silver vinyl, and red holographic vinyl. Pictures just don't do this vinyl justice. It's gorgeous and so rich looking in person. It cuts beautifully with the Silhouette Cameo, too!


This reindeer decor with metallic vinyl is a really fun but elegant way to add something handmade to my Christmas decorations. What are you crafting for Christmas this year?


Monday, November 28, 2016

December Planner Pages by Christine


If there was ever a time of year that my planner is absolutely needed it is December!  Christine joining you today with a peek into my first week of December!


I used a combination of stickers and stamps from SRM to make this week's spread. I filled it up with lots of color and fun stickers but also left a little room in each day to add more to them! My Black Le Pen was perfect for writing in my own info as it doesn't bleed thru to the back sides!


I used the School Planner Stamp as well as the Birthday Planner Stamp.  To separate activities I stamped a part of the stitch border from the Birthday set and stamped that into the time.


I still kind of prefer stickers to stamps in my planner so I went ahead and did a whole bunch of those!  I pulled out all my Christmas stickers and used a wide variety from the following list:
Live Life/Christmas - Big Red Merry Christmas
Sticker Stitches/Christmas - Stitching strips
We've Got Your Sticker/Merry - Santa/Stocking/Tree space fillers and big "Merry"

I love how stickers add color and can fill up a space that is otherwise kind of blah.  How cute are those candy borders too!?!

Friday, November 25, 2016

Give Thanks by Tenia


Hey Y'all!!!  Hope you had a wonderful Thanksgiving. 

Tenia here today to share a very fun card using SRM goodness......CHECK IT!!!!


I created this card using SRM Sentiment/Fall stickersSticker StitchesLittle Borders/Black, Red, Yellow and Watercolor Twist Pencils. I hope y'all enjoyed my card and have a wonderful day!!!

Thursday, November 24, 2016

Give Thanks! by Michele


Good morning! Michele here with one of my last fall cards of the year! I can not believe the holidays are upon us! Where the heck does the time go? ;)
I used a stencil and various inks to create my background. I drew the leaves' veins with a white gel pen.


I also adhered a few gold sequins and a bit of glossy accents.  SRM's Give Thanks sentiment from Live Life/Calendar Year, was perfect for this fall card!  I tied a sheer ribbon at the top to finish it off! 


Thank you for stopping by and have a wonderful Thanksgiving!

Wednesday, November 23, 2016

Thanksgiving Table by Shantaie


Hello!  Shantaie here with a last minute Thanksgiving project.  Thanksgiving is a time of gathering, reflection, and let's be honest some of the most delicious food we have all year!


 I especially enjoy the beautiful tables this time of year, in fact I almost love the tablescapes even more than the hazelnut pear stuffing! (almost)


I made a tag treatment added to golden pumpkins for this years place settings. I started with a simple white tag, and swiped them with a gold gelatto crayon, let dry and add a touch of gilding to each tag. A clear "give thanks" sticker was applied once dry. I attached them to a glittered acorn with a bow of jute twine, and inserted them into the pumpkin. Elegant, simple, and quick! 


Tomorrow, my family table will sparkle and shine with these gilded pumpkins and tags! 

Tuesday, November 22, 2016

Lovely Lace by Shelly


Hey y'all! Shelly, here! 
Today, I'm sharing a couple different projects with you using SRM Stickers beautiful lace! 

Now, if you've seen my projects in the past, you know I really haven't used too much of lace (if any at all). Though, after making these sweet little gifts, you may just be seeing more of it! ;) 

First I started with making some little lace stockings. Which to make my stockings I just used a stocking die that I have. Afterwards, I really had to do some thinking...long thinking! lol I mean here I sat with these pretty little stockings but what was I even making with them?!...


Well, after some trail and error, I ended up with gift card holders! I thought it worked great because it still showed off the lace stocking and I thought it be sweet to give someone. :) 

For my second project, I made a tag. 


I used some kraft cardstock for my base and then added the lace over it. Once I did that, I was stuck. Again. lol I started going through things and came across some felt flowers I had laying around and 'ding!'...I thought it worked perfectly. So I glued it on to my lace tag and added a little string of pearls. Then to finish things off, I added a little sentiment banner piece and some jute twine. Easy peasy, right?...

Thanks so much for stopping by!
Enjoy your day and see y'all soon!

SRM Stickers supplies:

Jute Twine

Monday, November 21, 2016

Bible Journaling with Karen


Hello!  Karen here today to share some of my Bible Journaling.  This passage in Proverbs recently stood out to me as I was thanking God for leaders and friends. "Iron sharpens iron, and one man sharpens another." Proverbs 27:17 As I reflected on this verse, I journaled in my bible using a combination of black pen, stamps, and watercolor pencils.


My first step was to write the key phrase in the margin. I gave it a free handed speech bubble shape and "pinned" on a small tack from the "Planner Notes to Self" Planner Stamps. I added a few more stamps from my favorite Faith stamp set, "Trust in the Lord." 

Then I grabbed my ColorIn watercolor pencils and shaded in the speech bubble and added a swatch of bright yellow on top of the crosses beneath it. It's so easy to get the smooth blending of colors with these pencils and a waterbrush. I added a bit of white to help the tack stand out and finish it off. 


Thanking God for leaders, friends, and family who have sharpened me.

For this page I used:
"Planner Notes to Self" Planner Stamps | "Trust in the Lord" Faith Stamps | ColorIn Watercolor Pencils | Waterbrush

Friday, November 18, 2016

Watercolor Background Card by Tobi


Hi there! It's Tobi here with an easy watercolor Christmas card - yes, easy!! I love watercolors because you can be creative and messy and if you plan it right, it will always turn out right!


Tape the watercolor paper down with painter's tape (or if you've run out - washi tape!!) and add a wash of pale blue. 


Continue to add darker blue colours. 


I concentrated the darkest colours at the top, finishing off with a touch of black. 


I dried the paints with a blow dryer then added white splatters. 


It's time to remove the washi tape and start stamping!!


I had the perfect stamp picked out for the top (Tim Holtz) and needed a big, bold sentiment for below the watercolors. 


Thanks for joining us today!  May all your days be 
merry & bright! 

Gansai Tambi Watercolors

Tim Holtz/Stamper's Anonymous

Thursday, November 17, 2016

Brush Lettering Bookmarks by Christine


Hello!  Christine here sharing something I made.  Last week as I was doing our homeschool routine with the kids, I realized I needed some bookmarks to help me keep track of where we were at in books.  Why not make those bookmarks inspirational!?! And why not make them myself and have fun doing it!?!  That is of course where SRM came in!  I combined a couple of the new Marker Sets and Bible Journaling stamps to create some lovely bookmarks!


I created a video showing how I made a couple of these bookmarks!


I don't talk too much about how to do the brush lettering in the video but Susan has a great video that she recently created showcasing that!


Let's take a closer look at the bookmarks I made:


This first one uses the stamp set Amazing Grace and focuses on the verse Psalm 46:10 and the flowers come from Just Believe.


This one uses an older stamp set Words of Faith and focuses on Psalm 107:1 - the butterfly stamp comes from Just Believe and the little flower comes from Amazing Grace.


Everything on this bookmark comes from the Amazing Grace stamp set and it focuses on Matthew 28:20.


Last up I used the Trust in the Lord stamp set and focuses on 1 Thessalonians 5:18

These are going to be great reminders as I go about my day to day work!

Wednesday, November 16, 2016

Textured Thank You Card by Samantha


Hello! Samantha here today to share a textured thank you card. When it comes to card making, I tend to lean towards clean and simple designs.


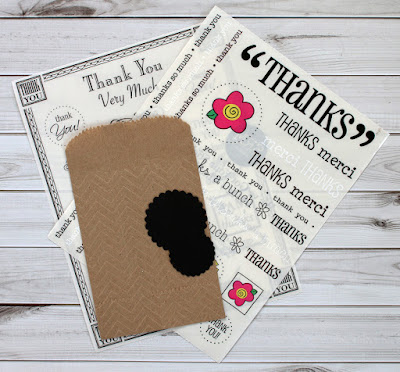
I've found that adding texture to clean and simple cards really gives them that extra WOW factor. Today I'll show how you can use SRM's embossed kraft bags to add texture to a card. 


For this card, all you need is some card stock in whatever colors you like (I chose black and aqua), an embossed kraft bag (I chose the chevron 4x6 kraft bag), We've Got Your Stickers ThanksFancy Sentiment Thanks, and scalloped circle punched pieces


All you have to do is cut an embossed bag down to the right size for your card (on my card I cut the bag to 4" x 5 1/4"). It's that simple to add beautiful texture to your card. I used a white "THANKS" sticker from We've Got Your Stickers Thanks set, and used some scalloped circle punched pieces as a background for it. 


Don't forget to add a little something special to the inside of your card with a sentiment from Fancy Sentiment Thanks sticker set. It's that easy to create a clean and simple textured thank you card!

Tuesday, November 15, 2016

Christmas Tubes by Shelly


Hey y'all! Shelly, here! 
Certainly fall is in the air, though Christmas is soon to be too! Perhaps for some it already is?! ;) 


So today I'm sharing some simple and fun Christmas tubes. You can easily fill these tubes with a number of things...from candies to money and lip gloss to stickers, the possibilities are endless! 


I started by wrapping my tubes with some SRM vinyl. Which, I simply just did a little measuring to make sure everything would wrap nicely. Afterwards, I added some fun patterned paper around the middle of the tube. And to finish things off, I used a white punched piece and added a sticker to it. Nice and easy, yeah?!...

SRM Stickers supplies used:

SRM Red Gloss Vinyl

Thanks so much for stopping by!
Enjoy your day and see y'all soon! 

Monday, November 14, 2016

Thanksgiving Decor by Melanie


Hi! Melanie with you today to share something I've made for our home.  I love Thanksgiving--for us it involves gathering with family, sharing memories and making new ones, and (of course) delicious food! 

This divided tray has been hanging out in my craft area for awhile, just patiently waiting to be put to use. The individual spaces are perfect for fitting SRM stickers! 


I started by choosing some papers with colors that reflect the Fall season here. After cutting them to size and playing with the spaces, I picked out different SRM stickers that fit Thanksgiving.  And some Burlap ribbon too!


 To bring in some texture, I filled two of the spaces with burlap. Then I added some leaves from the yard that fell from our trees and a die cut pumpkin. The tag is finished off with Gold Shimmer Twine.


A few weeks ago a friend had some cotton bolls in her kitchen. I loved the look and got some from her. They add a beautifully different look to our entryway and now the tray is the finishing touch.


It is a blessing to have so much to be thankful for. I'm looking forward to seeing this reminder each day. 

Friday, November 11, 2016

Love & Kisses by Amber


Hello everyone! Its Amber here sharing this fun watercolored Hibiscus flower card featuring a "Love & Kisses" sentiment sticker from SRM's Sentiment/Love sticker sheet. 


I started with an A2 sized cream card base and adhered a fun colorful piece of patterned paper to my card front. I die cut a circle out of some cream cardstock adhering it to the middle of my card front. I stamped two flower images around the outside edge of my die cut circle and left the center open so I could add my sentiment later. On another piece of cream cardstock I stamped the same two flower images, colored them watercolored them, and set them aside to dry. Once my images were dry I fussy cut them and adhered them right over the first set of flowers. I bent and folded the edges of the flowers upwards to give them some more dimension and added a pearl to their centers. 


To finish my card I cut apart and added the "Love & Kisses" sentiment sticker from SRM's Sentiment/Love sticker sheet to the middle of my flowers and added some black ink splatters to my card front. I hope you enjoyed my card today. Thanks for visiting!

SRM Sticker Supplies