Showing posts with label Karen Hunter. Show all posts

Thursday, June 14, 2018

Volleyball Card by Karen


Hello!  Karen with you today to share a fun card.  My daughter is soon finishing up her first year of volleyball. With the Stickers By the Dozen, Take 2 Volleyball sheet, it was easy to create a quick and customized thank you card. 


My daughter's team is yellow, so I used that as my main color. The volleyball sticker is backed on a yellow circle and popped up from the card with foam tape. The green glitter flame was cut with my Cricut. A little bit of string (like the volleyball net) tied on the side finished it up. Thanks, coaches, for a fun season!


For this card I used:

Monday, June 11, 2018

Bible Margins Journaling and Video by Karen


Hello!  Karen here today with some Bible Journaling and a video too! 


I'm loving the new Bible Margin Stamps and keep finding new ideas and ways to use them in and out of my Bible. Today I'm sharing a Bible Page using the Bible Margins - Light set. 


I've double stamped and done a bit of fussy cutting to add extra color and pattern - and reflective time - to my Bible journaling. There may be a bit of sparkle, too!


I'll walk you through my entry in this quick video.


For this entry I used these great SRM products:
Bible Margins - Light | White Gel Pen

Thursday, May 24, 2018

Hello Spring by Karen


Hello Karen joining you today.  As I write this blog post, I'm still on the look-out for spring. Winter does not want to let go quite yet. Even though spring may not have arrived on the outside, this brightly painted spring sign certainly warms up the inside and helps me "think spring."


I used a scrap piece of wood, lightly sanded for this sign. I grabbed several of my brightly colored acrylic paints and "messily" painted the board so that all the colors could be seen. After designing and sizing "Hello SPRING" in my electronic die cutting software, I cut the letters in vinyl and applied them to my (dry) sign. 
Next, I layered a cream colored paint on top of my board and the applied vinyl. I like to peel my vinyl off before the paint is quite dry. I love the variation of bright colors revealed underneath the vinyl as I peeled it off.


To finish off my sign I added some spring colored twine and a trio of buttons. Simple eye hooks and more twine made it the perfect sign to hang in a sunny spot in my home. 
Come on, spring!

For this project I used:
wood board | acrylic paints | Oracal 651 vinyl | SRM spring jute twine | buttons | eye hooks
SaveSave

Monday, May 21, 2018

Walk by Faith Bible Journaling & Card by Karen


Part of the process for me as I Bible journal is prayer. Oftentimes I have specific people in mind as I reflect on scripture and use the Word I am reflecting on as part of my prayers. That was true as I reflected on Psalm 18 and prayed for a friend who was battling cancer. After my prayer and Bible journaling time, I wanted to send a note to my friend to encourage her and let her know I was praying for her. I decided to use my Bible journaling page to create a greeting card.


For my page, I used the spear-like arrow stamp on the Walk By Faith stamp set. I think it's the perfect visual for verse 39 "For you equipped me with strength for the battle." I colored in my sketch with ColorIn Watercolor Twists.


The process is very simple. I scanned my page (you could also take a photo) and imported the file into a word processing document so that I could resize it and print it on my color printer. After that, it was simply layering cardstock on top of a 5x7 card base.


Watch this quick video to see it all come together.


For this project I used:
Watercolor Twists | Child of God Stamps | Walk By Faith Stamps

Monday, April 9, 2018

Reverse Canvas Vinyl Sign by Karen


Hello!  Karen joining you today with something I just whipped up!  Pun intended! 


This was such a fun project to create! 

The bright colors of vinyl really make it stand out against the rustic frame.


When applying vinyl to canvas, the key is to prep your canvas - either with a layer of paint or spray it with a sealer before attempting to apply your vinyl. For my project, I sprayed the canvas with a spray adhesive after removing it from the frame and before cutting my vinyl. 

I used my electronic die cutter to cut the words/letters and cupcake (3 gorgeous colors of Oracal 651). By the time I finished cutting and weeding, my canvas was ready. The vinyl easily adhered to the surface. I sprayed the whole thing again with the sealer and let it sit while I stained the frame. Once the frame was dried and ready, the last step was re-attaching the canvas to the back of the frame. A very easy project with great results!
For this project I used:


Tuesday, March 20, 2018

Textile Foil on Wood by Karen


Hello!  Karen joining you today with something very addictive! 
It's so fun when I get my box of goodies from SRM Stamps. Recently, as part of the Design Team, I was sent some textile foil. I'm new to textile foil, but was excited to discover different ways to add some shimmer and shine to my projects.


Today I'm sharing this wood plaque project using textile foil and EasyWeed Adhesive.  Watch this video to see how I created this project and what I did when it didn't turn out quite as expected. 


I love how this project turned out and I learned a lot in the process. I also love that I was able to use this wood plaque that has been sitting for quite some time, just waiting for sparkly inspiration.


For this project, I used:

Monday, March 12, 2018

Textile Foil Cards & Video Using Laser Printer and Laminator by Karen

Hello!  Karen joining you today.  I've been having a great time discovering different ways to use the new textile foils from SRM. Today I'm sharing some of my favorites. 


To make these cards, I found free online images and imported them into a (Word) document. There I resized them and recolored to make sure they would print out dark and black. I printed each image onto card stock using a laser (toner) printer. It is key that the image prints with toner ink (not an inkjet printer).   


I then ran my image with foil covering it through my personal laminator. The heat of the laminator adhered the foil only to the printed image. After a short cooling off, I simply peeled the foil away to leave the shiny image.


I'll walk you through it in this process video. But I have to warn you, though, you may become addicted to this easy and quick foil application technique!


Thanks for watching - I hope you are inspired to use textile foil in your projects!
SaveSave

Monday, February 26, 2018

Bible Bubbles Bible Journaling Page and Process Video by Karen


The new Bible Bubbles faith stamp set is so cute and perfect for faith planners, cards, quick notes, and the margins of your Bible. 


After putting down a thin layer of acrylic paint for some background color, I used several of the stamps on this page in the book of Joel. 


 Mirroring the stamps, I then drew a larger bubble for my journaling.


I really like how they look clustered together on my page.
The crosses featured on the page are from another new set called Bread of Life.
Watch this process video to see more of these stamp sets and how this page came together for me.


For this project, I used the following SRM products:

Monday, February 5, 2018

Simple Bible Journaling with Bible Margins Stamps by Karen


Hello!  Karen here today to share a wonderful new product from SRM.  It's for non-artists and artists alike.  It's Bible Journaling made simple yet sensational! 


A little bit of color wash for the background. 
A touch of sticker stitches.
A simple sentiment in one Bible Margin panel stamp.


Bible journaling doesn't have to mean elaborate pages and tons of supplies.
Keeping it simple means more time to meditate on God's Word.
"This is the day the Lord had made. Let us rejoice and be glad in it!" Psalm 118

Thursday, January 25, 2018

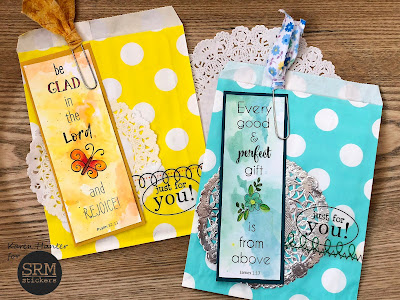
Bible Margin Stamps Gift Bags by Karen


SRM's new Bible Margin stamps aren't just for Bible journaling. I used a couple of margin stamps as part of a gift bag decoration - and they double as bookmarks!


I stamped the margins on white cardstock which I had watercolored a pretty background. I used watercolor pencils to add more detail to the images. Mounting it onto a piece of colored cardstock helps it stand out against the fun patterned paper bags, doily, and sticker stitches and sentiments. 
By using a decorative clip to attach it to the bag, the recipient can easily remove it to use as a bookmark, too


For this project, I used:
Patterned bags | Bible Margins stamps RejoiceSticker Stitches | Sticker Sentiments Happy Birthday | ColorIn Watercolor Pencils

Tuesday, December 26, 2017

Bible Journaling Worship & Praise by Karen


One of the main reason I Bible journal is because it gives me the time to meditate on specific words of scripture. While I am coloring or painting or stamping, I am repeating scripture in my mind and contemplating the meaning of these precious words. The creative process draws me in and allows me to linger longer in the Word. 


My page today gave me the chance to target specific words and think about the many reasons to worship and praise our amazing God.


Psalm 29 is a psalm of worship and praise. It wasn't difficult to find many of the words used in this psalm in stamp form on SRM's two "wordfetti-style" faith stamp sets - Daily Devotion and Scripture Notes. These two sets contain multiple words that can be used in a variety of ways. 


After lettering "worship" and coloring it in with marker and watercolor twists, I added several word stamps to emphasize some of the words in the Psalm. I also added a star stamp from another set, Child of God. I created the background using the watercolor twists and a water brush. Then, I added a few highlights with my white pen. I really like how this page turned out and am grateful for the time to worship and praise God through Bible journaling. Be blessed!

For this project I used:

Thursday, December 14, 2017

Bible Journaling Worship & Praise by Karen


Hello!  Karen here today to share some of my Bible Journaling with you. 


One of the main reason I Bible journal is because it gives me the time to meditate on specific words of scripture. While I am coloring or painting or stamping, I am repeating scripture in my mind and contemplating the meaning of these precious words. The creative process draws me in and allows me to linger longer in the Word. My page today gave me the chance to target specific words and think about the many reasons to worship and praise our amazing God.


Psalm 29 is a psalm of worship and praise. It wasn't difficult to find many of the words used in this psalm in stamp form on SRM's two "wordfetti-style" faith stamp sets - Daily Devotion and Scripture Notes. These two sets contain multiple words that can be used in a variety of ways. 


After lettering "worship" and coloring it in with marker and watercolor twists, I added several word stamps to emphasize some of the words in the Psalm. I also added a star stamp from another set, Child of God. I created the background using the watercolor twists and a water brush. Then, I added a few highlights with my white pen. I really like how this page turned out and am grateful for the time to worship and praise God through Bible journaling. Be blessed!

For this project I used:
Friday, December 8, 2017

Festive Thank You Card Gift Set by Karen


A set of cute thank you notes is a great gift for teachers or friends. I'm still a believer in sending personalized thank you notes and I know there are others out there who appreciate those handwritten notes, too. Using SRM's stickers makes producing several sets really easy. My cards have a cute Christmas theme and will be given to my daughter's teachers. I think they will appreciate them!


I found a bright striped paper in my holiday stash and used it as the main background for this card set. I think layers add so much to cards, especially when you want to keep it simple like these. A layer of black behind the white center makes it pop! I incorporated the cute star / list stamp from the School Days Planner set and added traditional Christmas colors behind the clear stickers to match the theme. The Thank You sentiment is from a non-holiday Stickers By the Dozen set and the cute gingerbread man is from the Stickers By the Dozen Gingerbread Man set. I also grabbed my pre-cut scalloped circle shapes from my stash. You could use a punch or a die cut to make these quickly, too. 


A set of 7-10 cards plus envelopes fit nicely in an A7 size clear box. I added red and silver crinkly paper to my box, too, which really makes it look festive. Nothing more is needed but a bit of twine to tie it all together.


For this project I used:

Wednesday, November 8, 2017

Thanksgiving Table by Karen


Hello!  Karen here today sharing some ideas and a video!


Thanksgiving is such a sweet time to spend with friends and family. It's fun to make the decor and table settings extra special. Here's a quick and easy idea for you to try. Tuck your fancy silverware in a small dotted pouch marked with the initial of each guest in vinyl. Don't forget to add a small card at each place setting for guests to record what they are most thankful for. Later, these cards make great additions in a planner or scrapbook with photos of the day's festivities and a record of Thanksgiving.


Watch it come together in this quick video.


For this project, I used:

Tuesday, October 17, 2017

Lettering Technique with Bible Background Stamps by Karen


Hello!  Karen here today with some techniques and a video too! 


Today I'm sharing several ways I utilized SRM's Bible Backgrounds stamp set this week. My favorite technique was using the "amen" Bible background to dress up plain white letters. 

After cutting the letters from plain white cardstock in my die cut machine (you could use your white or light-colored stickers), I randomly stamped on top of them before removing them from the cutting mat. Next, I added a bit of marker wash to give them colors that coordinated with my faith planner layout for the week. 

To watch me complete this technique and to see a few more ideas using the Bible Backgrounds stamps, watch my process video below!


Here's a close-up of my letters in my planner.


For this project I used:

Thursday, September 21, 2017

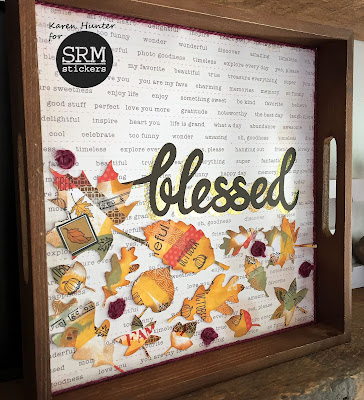
Mixed Media Fall Decor & Video by Karen


Hello!  Karen here today with a mixed media project and a video too.  


I love fall and can't help creating a project or two featuring fall's rich colors. Today I'm sharing a fun mixed media project with lots of layers! 
Watch this video to see this project come together.


The finished project with all its yummy layers, including: paper, paint, washi tape, clear stickers, stamps, vinyl, and jute twine.


I'm ready to decorate for fall. Are you, too?


For this project, I used: