Showing posts with label Card Making. Show all posts

Friday, April 6, 2018

Spring Cards in Gift Box by Angie


Hello SRM friends! Angie here with you again today to share some spring cards and a cute box to gift them in!!


I made all three cards using stamps from the Just Believe stamp set. For the blue card in the middle, I stamped the flowers and leaves on vellum. Then I used watercolor markers and water to give them the watercolor look. Then I just fussy cut them out. I placed the flowers and stems vertically down the card and used foam under the smaller flowers to add some dimension. 


I made the blue background by using distress oxides and water to give it the bleached look. I added some gold and pink ink mist splatters as well. 


The word 'spring' is from the Seasonal Plans stamp set.


For the front of this pink and white card, I added this fun doodle stamp from the Stamped Stitches set. I love how it adds so much to the card will such little effort!! I stamped and fussy cut the flower and stems and gave the card a fun edge by using a punch to make the scalloped border. 


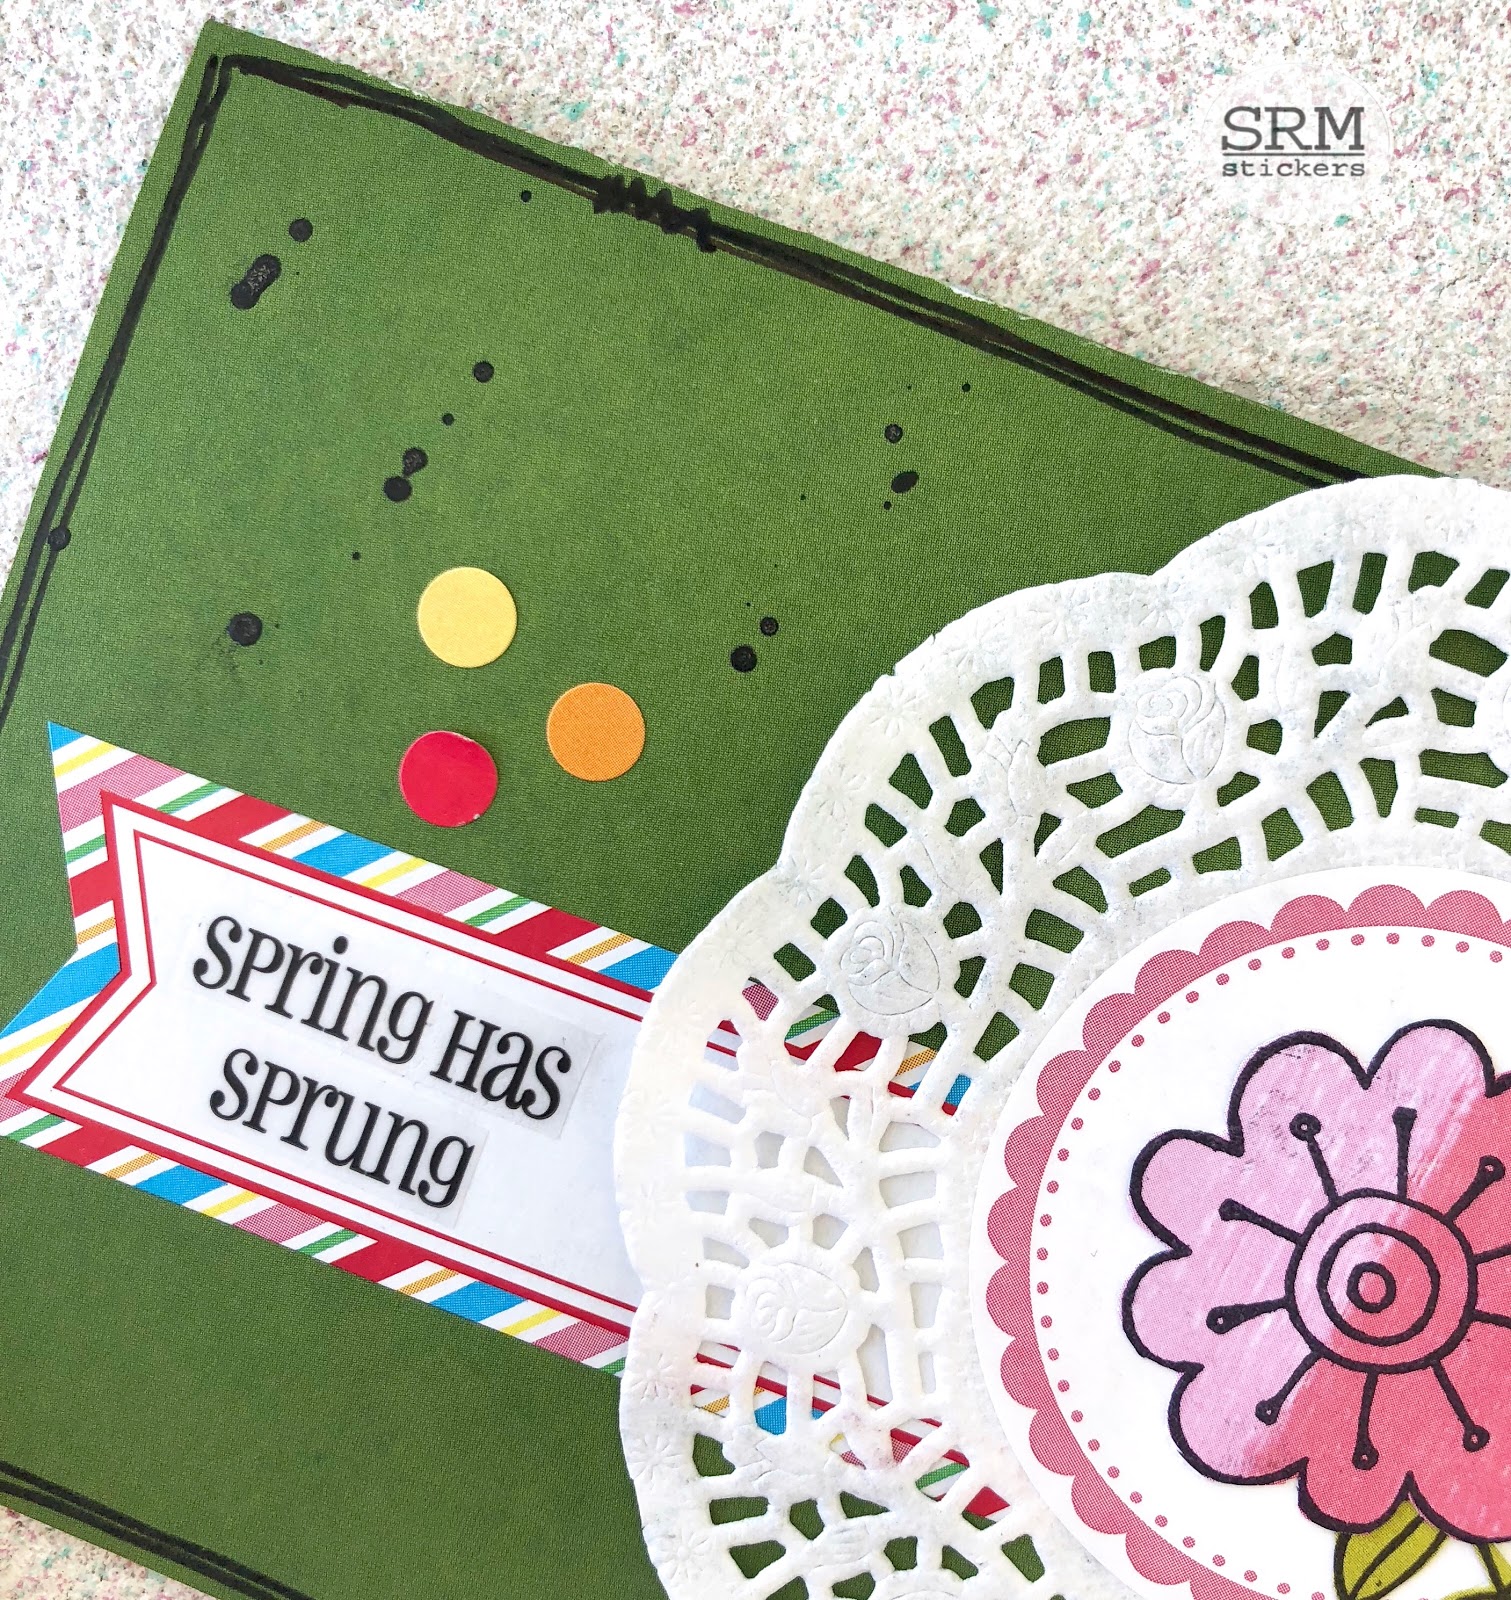
The green card uses lots of fun SRM products such as the small lace doiliesbright blank labels by the dozen and the Easter Express Yourself stickers. 


For the gift box, I used the A2 Clear Card Box. I punched two holes in the top and simply threaded the twine through the holes and made a bow. SRM has lots of twine to choose from. The flower borders on the box are from the Thank You Stickers by the Dozen set and the green label in the middle is another Labels by the Dozen sticker. I added another fussy cut flower, stem and a bird to finish off the box. 

Thank you for visiting the blog today. I hope my project gives you some inspiration to create your own!!

Monday, March 26, 2018

Watercolor Spring Bouquet Card by Emma


Hello there!  Emma here today to share a sweet and easy Spring card using SRM supplies.

After a long hard winter here in southern Ontario, I'm sure I'm not alone in looking forward to Spring!  (As I'm typing this, it's actually snowing outside again, so yes, REALLY would like to see the end of that as soon as possible..)


So to start this card, I stamped some flowers onto watercolor paper from the SRM "Just Believe" stamp set.  As some stamping ink reacts with water, I recommend a waterproof ink such as Versafine or Ranger Archival.  I wanted to use a colored ink, so for this I used "Warm Sunshine" crisp ink by Altenew.


To color the flowers, I used the Watercolor Twist pencils by Marvy, and a waterbrush.  It makes it so easy to get a nice soft watercolor effect.


Once this was dry, I fussy-cut the flowers out of the paper and set aside.  I adhered a couple of pieces of co-ordinating patterned paper on a white card base, then used a Kraft embossed paper bag.

Inside the top of the bag, I cut freehand some green 'leaves' and arranged them.  I then adhered my watercolor flowers on top of the leaves to make a Spring bouquet!  I tied some jute string around the bag for an extra fun element.

As finishing touches, I added 'Hooray!' from Sticker Sentiments "Thinking of You" and 'Spring' from Express Yourself "Easter" stickers.


So there you have it, a very cute card to send to a friend who is happy that Spring is here (or almost..)!
Happy crafting,

~~ Emma ~~


Supplies:
White watercolor paper
White cardstock
Green cardstock
Patterned paper
Glue dots / liquid adhesive


Thursday, March 1, 2018

Lucky in Love Card by Angie


Hello SRM friends! Angie here with you today to share a non-traditional St. Patrick's Day card.

I made a loved themed card but tied St. Patrick's Day in as well. This card would be perfect for the person you are lucky to be in love with!!


I used white cardstock for the base of my card. I added some ink splatters using some watered down Distress Oxide ink in Lucky Clover (how appropriate, right??). 

The clover paper is from my stash and since I knew I wanted to use the gold doily on the top of the card, I stamped and heat embossed gold clovers on the green cardstock.  I cut those papers into banner shapes, added the doilie  and then tied some green jute twine around it. 


For the stamping, I used the word 'love' from the BIG Love stamp set. I used the word 'in' from the Walk By Faith stamp set. SRM's stamps are so versatile and can be used in so many different projects. I used a stamp from my stash for the word 'lucky'. I used gold heat embossing on 'lucky' and 'love' to tie in that gold theme. 

I hope you enjoyed my card!!

Thursday, February 22, 2018

No Heat Foil Faith Cards by Shelly


Hey y'all! Shelly, here.
Today, I'm sharing a set of foil faith cards with you. And did I mention, I used no heat and no fancy machine for the foiling!?! :)


I started with my stamps. I did some masking with the images and the rest I just stamped in black ink. Now for my images, I used a paintbrush with glue and 'painted' it on my images and then stamped it on my card with the sentiment piece. (Note: a stamping platform works great for this, so everything lines up.)


Once having my image stamped on my card, I cut a piece of foil to fit over it. Then pressed it down my my fingers and simply ran it through my die cutting machine. After, I peeled off the foil and....ta-da! A foiled image! 


To finish my cards off, I used a black pen and added a simple line around the card. I usually prefer my lines to be straight but I really liked the 'freehand' of a little bit straight and a little bit not so straight. ;) 

Thanks so much for stopping by!
Enjoy your day!

SRM Stickers supplies:

Foil

Thursday, February 15, 2018

Lucky Cards by Shelly


Hey ya'll! Shelly, here.
Today I'm swinging in to share a couple of fun and luckycards with you! 


I started with my background, which I used a clover stamp with and spritzed it with water and then stamped it on my card base. After I let it dry. I then used some gold glitter cardstock for my rainbows and some gold sequins for 'gold'. 


I added some foam tape on the back of my rainbows before adding them to my cards. Then glued on my gold sequins for a 'pot of gold' at the end of the rainbow. Lastly, some washi tape with a sticker sentiment on it and then some green twine. Fun and easy, right?!...

Thanks so much for stopping by!
Enjoy your day!

SRM Stickers supplies:


Tuesday, January 30, 2018

Be Mine, Be Mine! by Shantaie

Shantaie here with more Valentine goodness.  I'm a lover of all thing Valentines!

I find that my most used crafty items tend to rotate to the top of my desk and lately my collection of we've got your border stickers are the star of my favorites stack! For this card I have used the Valentines we've got your border as my sentiment and an accent along the length of my card to help tie the colors together. I love that I can use them in so many ways!


A really busy card can be pulled together quickly with a sentiment strip trimmed from one of the borders. Here I have blended inks, embossing, a die cut and sequins, a little sentiment is sweet perfection!


A double wrapped bow of bakers twine in blossom and stone softens the look and adds another pretty texture, I love having a textile element to touch on my cards! 

Anytime you have a need for just a little touch, reach for your border stickers for that perfect little saying, stitching or swirl of color!

Wednesday, January 24, 2018

Love You Valentine Cards by Shelly


Hey y'all! Shelly, here.
Today, I'm swinging in to share couple simple 'love you' Valentine cards with you! 


Hello!  Shelly here today to share some love! 
I started with my base card, which I centered my arrow in the the middle in my card. Then stamped it with a light grey ink. After I added my 'you' on top of my arrow using black ink. Next, I added 'love' slightly overlapping my 'you' using a red ink. 


To finish things off, I added a touch of black twine and thought it would be sweet to slip them each into a patterned bag. Simple, yeah?!...

Thanks so much for stopping by!
Enjoy your day!

SRM Stickers products:

BIG Congrats stamp set (for the 'YOU')
Walk by Faith stamp set (for the 'arrow' and 'love')

Monday, December 25, 2017

Holiday Cheer by Michele


Good morning!  
Michele here! It is hard to believe that Christmas already here! 
I stamped this card and colored it with Copics. I added some fun details with a White Gel Reminisce Pen! I drew stripes on the present and cute polka dots on the little girl's dress. 

This card would be fun to give to anyone during the holiday season.  There's 
still time to create it! :).


I added a bit of glitter too for some holiday sparkle!
I tied pink/white twine vertically with a couple of matching jingle bells.  As a final touch I adhered a sentiment from the Stickers by the Dozen/Gingerbread Man.  


Thank you for stopping by today!!  And have a very merry Christmas from all of us at SRM Stickers.  

Wednesday, December 20, 2017

Quick Christmas Cards by Tobi


Hi there! It's Tobi Crawford here, and I'm all-in when it comes to Christmas! 

I usually make 40-50 cards for friends and family and I try to never duplicate a design (I get bored), so one trick I use is pairing SRM Sentiment Stickers with die cuts and patterned papers!! 


I think we all have dies and paper, and using stickers for your sentiment is a really quick and easy way to add the right sentiment for the right person! 


This sentiment was adhered to vellum because I wanted the background to peek through. 
Supplies: 


Friday, December 8, 2017

Festive Thank You Card Gift Set by Karen


A set of cute thank you notes is a great gift for teachers or friends. I'm still a believer in sending personalized thank you notes and I know there are others out there who appreciate those handwritten notes, too. Using SRM's stickers makes producing several sets really easy. My cards have a cute Christmas theme and will be given to my daughter's teachers. I think they will appreciate them!


I found a bright striped paper in my holiday stash and used it as the main background for this card set. I think layers add so much to cards, especially when you want to keep it simple like these. A layer of black behind the white center makes it pop! I incorporated the cute star / list stamp from the School Days Planner set and added traditional Christmas colors behind the clear stickers to match the theme. The Thank You sentiment is from a non-holiday Stickers By the Dozen set and the cute gingerbread man is from the Stickers By the Dozen Gingerbread Man set. I also grabbed my pre-cut scalloped circle shapes from my stash. You could use a punch or a die cut to make these quickly, too. 


A set of 7-10 cards plus envelopes fit nicely in an A7 size clear box. I added red and silver crinkly paper to my box, too, which really makes it look festive. Nothing more is needed but a bit of twine to tie it all together.


For this project I used:

Friday, December 1, 2017

Happy Holidays Jute Twine Card by Shantaie


Hello!  Shantaie joining you today with a non-traditional colors Christmas card. 


You may not immediately imagine the color black when you think of Christmas, but when you add a white banner across the front of a black card it really pops! I was inspired by all things tartan this holiday season, and those scrumptious reds and greens almost always intersect with black!

 To really make this stamped card bright I added a red jute twine bow front and center of the banner and added that sweet little sentiment found on the we've got your border Christmas sheet, several sparkly dots fill in as berries and I used a white gel pen to fill in any areas that didn't get stamped clearly a great tool to have on hand when stamping in white!

I so often find life too busy to mass produce cards, and when I do I love using clear stickers to add the perfect sentiment in a snap!!

Thursday, November 30, 2017

Merry Christmas by Shelly


Hey y'all! Shelly, here.
Today I'm swinging in to share a fun Christmas card with you! 


I started with my base, which I chose kraft cardstock for. After I did a little cutting with some snowflakes and white cardstock. Easy peasy, right?!...Once done I simply arranged them on my card and then glued them down. 


Next, I added a strip of red cardstock with a 'Merry Christmas' sticker on it. Then added some foam squares on the back and added it to my card base. To top things off, I added a touch of jute twine. Simple and sweet, yeah?!...

Thanks so much for stopping by!
Enjoy your day!

SRM Stickers supplies:

Jute Twine

Friday, October 13, 2017

But First Coffee....by Michele


Good morning crafty friends!  
I will be the first to admit that I am a bit addicted in love with coffee!
I love everything about it....the smell, the taste, the comfort it provides.
I know I can't be alone in this sentiment.....please tell me I am not alone! ;)
I used SRM's Coffee Plans set for my card today.

I used my Silhouette to cut the word coffee.  I stamped the coffee bean in a light brown on cream colored card stock.  I adhered the die cut.  I stamped the words, but first and #caffeine please, using my Mini Misti for proper alignment. 


I added little red punched hearts and adhered tiny flowers to the centers using glossy accents.  I also added glossy accents to the sentiment. Once it was dry, I used a bit of black dimensional accents around the hearts. 


Thank you for stopping by today!
Michele

Tuesday, October 10, 2017

House Warming Card and Gift Bag by Michele


Good morning! Michele here with a couple of cards and gift bags that I thought would be perfect for enclosing a gift card for a new home owner or a recent college grad! 
I used my Silhouette to cut the silhouettes! I adhered a dream sticker from the Everyday Life collection.
I added a few sequins and some glitter glue to the heart. 


I am in love with these cute striped bags!  I added a silhouette and a sentiment from the Everyday Life collection. I wanted the word, Life to stand out, so I colored it with a pink Copic marker. 


I am loving the colors here of mint green, turquoise, and hot pink! 


I did the same set but used the pink polka dot bags instead and a slightly different color combination. I used the same sticker for the bag and again colored it with a pink Copic marker.  


Pink and baby blue....doesn't get much sweeter!


Thank you so much for stopping by today!!