Wednesday, February 29, 2012

Baby Tube and Tag by Jan


Jan Tatomir is here with a precious pair of baby boy items. They'd be great as a party favor, shower gift, and more!


Jen cut the top part of the tube top with a craft knife and inserted a baby bottle nipple. SRM Baby Boy Border Stickers add the perfect touch...


Jan used our new skinny tube which you can find HERE. Have you done something fun with our TUBES? Be sure to add it to our Gallery!

Tuesday, February 28, 2012

Easter Cards


If you enjoy creating your own Easter greeting cards, you'll love these ideas from our Designers!

Valerie Mangan had this to say about her adorable Easter chick card; The little chick from the Quick Cards - Easter set was the perfect addition to this big flower. The flower, made from a die rescued from a clearance bin, is made with a line of coordinating papers to take out the 'pattern matching' guess work. To give the flower some extra dimension I sewed around the edges of each layer and also added some dimensional adhesive here and there. I stuck the chick sticker down to white cardstock, ran it through the die cutting machine then stitched around that as well."


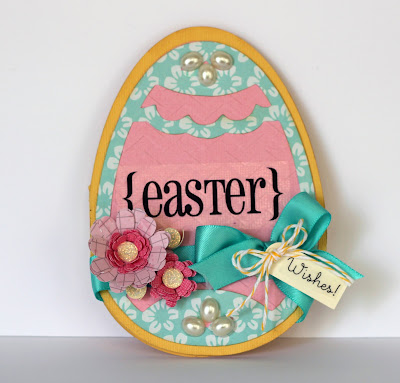
Shantaie Fowler explains how she created a fun egg-shaped card; "I just adore shaped cards, they often convey a big part of the message all on their own. Pair a shaped card with a fabulous sentiment and you have a winning combination! I used my Cricut to cut the egg shaped card, and embossed the pink layer with a chevron patterned cuttlebug folder. Classic Easter! Easter is my absolute favorite holiday, I just swoon over all the gorgeous spring colors! I really like the way the Easter sticker parades across the egg shaped card to fill in that open space. By trimming the the word "wishes" and adding it to the tag, I have a complete greeting that finishes the card."


And here's Christine Ousley with a step by step tutorial on created this gem! "Here is a quick Easter card that you can make in 5 minutes or less. All you will need is some scrap pieces of patterned paper, some twine, a couple of punches and of course some SRM Stickers."

1. Cut a piece of light pink cardstock 4 1/8 x 5 3/8 inches.
2. Cut a piece of patterned paper for your background 4 x 5 1/4 inches. Adhere these paper together.
3. Cut two pieces of coordinating patterned paper 1 x 3 1/4 inches. Corner round bottom right corner on one piece and top right corner on the other.
4. Cut one piece of coordinating patterned paper 1 1/4 x 3 1/4 inches. This will be placed in the middle as shown.
5. Adhere patterned paper pieces.
6. Wrap twine around card base twice and tie bow.
7. Place SRM Sticker on white cardstock and punch out with a 1 1/4 inch circle punch.
8. Layer on 1 3/8 inch circle punched from light pink cardstock. Then adhere to punched scalloped circle.
9. Adhere to card layers on top of twine with foam dots.
10. Adhere card layers to card base.
11. Place SRM sentiment stickers onto card.


Take a look at our Easter products, HERE!

Monday, February 27, 2012

Make a Wish


Welcome back! Today's project is a layout using our new border stickers by Valerie Mangan. Valerie explains how she worked with the border stickers to create dimension and added interest on her page;

"When I work on a light background I like to either stitch all the way around the border to frame the page or add some kind of other border. For this one I incorporated the border stickers into a little patterned paper frame, but just at the corners. The stickers form the inside layers. I also worked in a sentiment border across my photo and some zig zags to mimic stitching if a few places. My favorite piece by far is the aqua scalloped border sticker – such a great color and shape to add a little pop. In addition to the borders, I added the #7 and “make a wish” stickers under page pebbles. (I think SRM stickers and page pebbles might be my new favorite combo!)"


We carry 4 border sticker styles that you can take a look at HERE. Valerie used our 'Thanks' collection for this sweet birthday layout.


Friday, February 24, 2012

St. Patrick's Day Projects

We have a special treat today as four of our Designers are here to share St. Patrick's Day projects!

Christine Ousley created a coordinating card and tube...gotta love the lips!


Clare Buswell created a greeting card along with St. Patrick's Day badges. Clare says; "On St.Patrick's Day in Ireland, all you will see are these three colors; green, white and orange, the colors of the Irish flag. Parades are held in almost every city, town and village across the country. Everyone makes the effort to wear a little bit of green. Many wear real shamrocks but lots of the children wear rosette badges. So, I made some detachable felt rosette badges to decorate my St.Patrick's Day tubes."


Shantaie Fowler created an adorable layout... Shantaie says; "Who didn't dream of finding the pot o' gold at the end of the rainbow as a child? This layout features bright colors and bright smiles for St. Patrick's Day. I used the Cricut Expression Machine to cute the large sweeping rainbow, the pot o' gold and the shamrocks. I just had to make the pot of gold the anchoring element as soon as I saw the sticker, and knew it would be a perfect tag!"


Amy Duff created a St. Patrick's Day door hanger. Amy says; "Feeling lucky? This shamrock project is a fun way to say Happy St. Patrick's day! I die cut two felt shamrocks and hand stitched them together leaving a little opening on the top left if you want to include a special treat or note. I attached a piece of grosgrain ribbon so you can hang this from any place you see you fit."


Have a great weekend! We're back next week with a mix of paper crafts including brand new Easter projects!

Thursday, February 23, 2012

Party in a Bag by Tracey


Tracey Taylor is here today to share a party invitation set she created for her daughter's upcoming birthday. Love the border strip along the tube, card, AND coordinating envelope!


To see more Party in a Bag ideas, click HERE. To view all of our Party in a Bag collections, click HERE.

Wednesday, February 22, 2012

Border Sticker Projects by Liz


Liz Weber used our new border stickers for a few fun projects. Liz says; "I created a display box for the tubes and had lots of fun using the border stickers to decorate both the front of the display box and the tubes, which are filled with candy. On the card, I had more fun using the border stickers to decorate the top of the card and I also used the stickers to create the background piece behind the "make a wish" sentiment. I did this by applying the stickers to a 3" x 2 1/2" piece of white cardstock and then using Spellbinders Labels Eighteen to cut out the shape."


Liz also created a gift bag out of an envelope, and decorated it with more border stickers;


Liz used the gift bag to store a gift card holder -- with more border stickers!


Check out our border stickers, HERE. You'll find so many uses for these handy, colorful sticker strips.  My personal favorite from our CHA release.  :)

Tuesday, February 21, 2012

St. Patrick's Day Projects by Shannon!

We love Shannon Morgan's colorful style.  She shows it off wonderfully with a few St. Pat's projects including a coordinating tube/card and fun altered canvas;


Take a look at our selection of St. Patrick's Day stickers HERE!


Monday, February 20, 2012

Easter Card & Tube by Jamie


Welcome back! We have some adorable Easter projects from our Designers -- we'll be showcasing them over the next several weeks. Here's Jamie Cripps with an Easter card and candy-filled tube using SRM Stickers in a unique way.

Jamie says; "I used a variety of sentiments, words, and decorative stickers from the Easter sticker collections to create a 'subway-like' print for the front of my card. For the tube, I created a paper wrap and topped it with yellow ribbon and then used twine to tie on the "Easter Wishes" sentiment."


Check out our Easter product HERE, and stock up! You can purchase our tubes HERE.

Friday, February 17, 2012

Easter Card & Tube by Carolyn


It's approaching that time of year -- Easter projects! Here's Carolyn King with a coordinating Easter card and tube. Carolyn says, "Here is an Easter card and tube featuring the new Quick Cards-Easter stickers from SRM! I altered a Skinny Tube to match the card. I think my favorite part is that I was able to use the We've Got Your Border-Baby Girl stickers to add a bit of "faux" stitching to the card and I also wrapped a border around the bottom of the tube to dress it up a bit more."


You can view our Easter products HERE, along with our brand new Quick Card - order now! Have a great weekend, we'll see you all next week with more...

Thursday, February 16, 2012

Teacher Card


For those of us with school-aged children, SRM's {teacher} Quick Card is so handy! Jamie Cripps used it to create a Teacher card showcasing a handmade heart crayon. The crayon idea came from this tutorial;
Click to view larger.


Such a creative way to say thank-you!


You can view/purchase our entire collection of Quick Card stickers HERE.

Wednesday, February 15, 2012

Party in a Bag by Rae


It's Rae Barthel's turn to show us what she did with our new product, Party in a Bag! Rae created 4 party invitations along with decorative gift bags/tube holders. So festive!


We loved Rae's work in 2011, she really made SRM Stickers shine. Here's what Rae had to say about her time on the 2011 Design Team; What a TREAT this past year has been! I have loved every minute of being a part of this SRM Stickers design team!! I am so honored to have worked along with such amazing designers, who continually wowed and inspired me with their creations. I love the range of SRM Stickers, there is literally a sticker for any and all occasions!! And don't get me started about the Fancy Stickers.... swoon.... just my style!!! It was such a fun surprise learning what each month's assignments would be, loved designing within those specific parameters. Susan is such a sweetheart, always taking time to comment on our work, a simple gesture that is greatly appreciated!Thank you both Susan, and Jenyfur, for providing me with this opportunity to design with such great product!! I am greatly looking forward to seeing what the new design team creates this year, I know you will inspire us all!

Tuesday, February 14, 2012

Happy Valentine's Day!


Happy Valentine's Day! Shannon Morgan is treating us to a Valentine banner. Can you count how many SRM Stickers Shannon used to embellish her banner - so fun! Twine, trim, and ribbon finish it off perfectly;


We hope you have a special day, thanks for stopping by. :)

Monday, February 13, 2012

Sympathy Cards by Amy


Welcome back to the SRM Stickers Blog. We have a full week of Designer projects ahead - stay close by! For today's project, Amy Duff created a pair of sympathy cards for a friend;


Amy used our "Wishing you Well" Sticker Sentiments -- such a handy set for card making!


Join us tomorrow as we celebrate Valentine's Day with an adorable banner!

Friday, February 10, 2012

Tubular Birthday with Carolyn

Looking for a fun and unique birthday party invitation? Check out this idea by Carolyn King!

Carolyn says; I thought it would be fun to design a birthday party invitation using a Tube. Who wouldn't want to receive a candy invitation? I used a Silhouette file to create the birthday cake invitation and I decorated it using We've Got Your Border - Birthday and We've Got Your Invite - Birthday. I also used some of the border stickers to decorate the tube.


The invitation is attached to the tube using baker's twine. When you remove the invitation, you are left with a fun party treat. Note: The Party in a Bag - Birthday kit comes with all of the supplies you need to create these invitations or you can purchase all the tubes and stickers separately.


Have a great weekend, thanks for visiting with us! We're back next week with more brand new projects from our 2012 Design Team.

Thursday, February 9, 2012

Valentines by Valerie


Valerie Mangan assembled a pair of pretty Valentines with a bit of an office feel. As she says, the stickers just blend right in!


You'll love Carolyn's Tubular Birthday tomorrow, be sure to stop by!

Wednesday, February 8, 2012

Valentine Crate by Michelle

Michelle Bertuzzi recycled a wooden crate that was given to her as a present. It was filled with candles. Michelle used it to create a centerpiece of candy-filled tubes. She adhered the "Valentine" sticker to white cardstock then matted it on a red banner.


To view all of our Designer Valentine projects, click HERE. So many ideas!


Tuesday, February 7, 2012

Valentine Pail by Jan


Jan Tatomir found a Valentine pail in the dollar section at Target and knew just what to do! Jan filled it with kisses and embellished it with SRM Stickers for a quick and easy teacher gift;


Jan placed a sticker on the pail handle, and as she says, that's something you can't do with a stamp or rub-on!


We have more Valentine projects this week, stay tuned!

Monday, February 6, 2012

The Little Things


Welcome back to the SRM Stickers Blog. We'd like to welcome to our new Design Team as we begin showcasing their talents using SRM Stickers. Jamie Cripps is up first with a lovely Valentine layout;


Jaime cut the long sentiment sticker into three parts so that she could layer them on her photo, giving the sticker a whole new look!


SUPPLIES: Quick Cards #52005 Love and Sticker Sentiments #51014 Life is Good.