Showing posts with label We've Got Your Sticker PLUS. Show all posts

Monday, May 28, 2018

Bags & Bookmarks by Giorgia


Hello SRM friends, Giorgia here again and today I have for you an idea for an handmade gift and how to package it.  I love to create handmade bookmarks to give away to friends and family, they are easy to make, cute and always put a smile on who receive them! I used a bookmark template to trace the bookmark shape on heavy white cardstock, then I created a panel with patterned paper. I added SRM Stickers and a sequin, then I laminated the bookmarks with my laminate machine to make them more resistant, I added twine and a charm to decorate.  If you want to see the tutorial on how to make them, you find it here on my blog.


To package them I used SRM bags: they come in many different type (patterned, glassine, kraft, embossed...), sizes and colors, so you can always find the one that suits for your needs!
I chose kraft bags: I closed them with a SRM paper doily and I added a banner made with patterned paper, a butterfly and a sticker. Then I used SRM stitched Stickers to decorate.


I am in love with these bags: they are perfect for packing little gifts!

Until next time,

ciao, Giorgia

SRM products used 

Thursday, April 26, 2018

"Faux" Project Life Cards by Giorgia


Hello SRM friends, Giorgia here and today I want to share with you an idea on how to use Project Life cards if you are not into Project Life.  I'm calling them "faux" Project Life cards!   
I was so lucky to win a set of Project Life cards, but I don't like to do it, so I thought of using them in my cards! 
I created a panel with them and added embellishments; as sentiment I used SRM Stickers.

Here it is the first card:


And here it is the second one: in this one I also added a sweet SRM ladybug sticker as embellishment.


Both my cards are springy and feminine and they could also be meant as a card set: you can put them in a SRM Stickers bag, or box and give them away to a friend as a little gift.

I hope to have given you an idea!
Until next time,
ciao, Giorgia.


SRM products used 


Tuesday, March 13, 2018

Easter Mason Jar Centerpiece by Jenn


Hello, Jenn back again! This time with an Easter centerpiece/gift idea using everyones favorite (well at least mine)...mason jars! These are quick cute centerpieces that can be made in next to no time with just a few SRM sticker essentials.


To start I am using a quart sized mason jar, I filled mine with Easter grass, jelly beans, and a chocolate bunny. Now comes the fun part...I chose to decorate with a scrap of fabric to cover the lid, and a sweet bow out of jute twine. Using a few Easter stickers I decorated the outside of the jar. I also though it would not only make a cute centerpiece but also a gift to give, so I created a tag using SRM stickers and markers.


I hope you enjoy this sweet festive idea may it bring a little joy to your Easter table. Till next time stay creative and keep sharing your fantastic ideas over on social media using #srmstickers #srmpress. Follow me on Instagram @creativegurl85 for more creative ideas

SRM products used:
SaveSave

Friday, February 2, 2018

Birthday Gifts with SRM Tubes by Giorgia


Hello SRM friends, Giorgia here with an idea for a sweet birthday gift: many of my colleagues celebrate birthday in January, so I made them a little something.
 SRM mini tubes are my go to when I need a cute package for chocolates and sweets: how cool is that you can see through the tubes and be amazed with all the sweetness inside? It really screams open me, eat me!

I filled SRM mini tubes with chocolates and I decorated them with Stickers By The Dozen/Birthday stickers by wrapping around them different strips.
Then I embellished the tubes with jute twine and other stickers. 


I adhered clear stickers on punched pieces and on white cardstock that I cut in a banner shape. In just a few minutes I created a cute gift to brighten my colleague's day and celebrate them!


Until next time,


ciao, Giorgia


SRM products used 
SaveSave

Wednesday, January 3, 2018

Christmas Layout by Karen


Hello!  Karen here today to share a special layout 
Christmas to document my family's special time together at this most wonderful time of year.   


I love to preserve our Christmas memories in our scrapbooks. This layout came together so quickly, which is a must in this busy season. 


Two patterned bags provide not just a fun background, but a convenient spot to slip in extra photos and my daughter's letter to Santa. 


Lots of layering of SRM's clear holiday stickers bring this layout to life.

For this project I used:

Wednesday, December 20, 2017

Quick Christmas Cards by Tobi


Hi there! It's Tobi Crawford here, and I'm all-in when it comes to Christmas! 

I usually make 40-50 cards for friends and family and I try to never duplicate a design (I get bored), so one trick I use is pairing SRM Sentiment Stickers with die cuts and patterned papers!! 


I think we all have dies and paper, and using stickers for your sentiment is a really quick and easy way to add the right sentiment for the right person! 


This sentiment was adhered to vellum because I wanted the background to peek through. 
Supplies: 


Wednesday, October 25, 2017

Rainbow Birthday Week by Jenn


Hello friends, Jenn here! I am very eager to show you a very special week in my planner this month, my daughter's 7th birthday.  Bring on the confetti, cake, rainbows and sunshine and lets jump on into this super bright cheerful spread.


I began by pulling out my planner stamps, rainbow washi, birthday stickers, and a little fun rainbow scrapbook paper cut to the boxes of my erin condren planner (1.5"x2"). I really like having a weekend banner in my planner spreads, so I chose this adorable star garland from 'Birthday Plans'. To color in the stars I used my le plume II markers colored onto an acrylic block picking up the color with my waterin blending brush. I used this same technique to color in the coffee cup on my Friday. One more quick technique ...if you love the look of patterns and no whitespace planning try using small stamps to create patterns. Washi tape is my secret to clean lines and perfect looking boxes...just be very very careful when removing and repositioning the tape it is very easy to pull the top layer off the paper.


I hope this gives you a little inspiration and perhaps a new technique or two to try. Be blessed sweet friends as you plan your beautiful life...each day is a gift spend and share it wisely.


Products Used:

Friday, September 8, 2017

Birthday Card Set by Karen


Hello!  Karen here today with a fun birthday card ideas!


Do you still send out birthday cards to friends and family? I'm not always perfect at it, but I do enjoy sending out handmade birthday greetings. Last week I dug into my stash to look for a birthday card and discovered I was out (sorry to all those early August b-days).

When I need to make a lot of cards, I settle on one design that I can duplicate easily. For this set of birthday cards, I used my die-cut machine to cut and assemble several cupcakes. I find it easier to do several images at the same time and make a sort of assembly line process. To fancy up these cupcakes, I even added some glitter at their final stage.

Once all the cupcakes were assembled and dry, the cards were super easy and quick to put together. I used plain white cardstock for the base and two layers of patterned cardstock on the front. Then I added one or more cupcakes and a clear sentiment sticker or two. There are so many to choose from in SRM's collections.


As seen in the first photo, I packaged up a few to share. Five cards plus envelopes easily fit into a flat glassine bag touched simply with a ribbon, "just for you" sentiment, and a green stripe at the bottom.

Do you need more SRM Birthday stickers?
Check out the birthday section of the SRM Store!  

For this project, I used:

Friday, August 25, 2017

Life is Pure Adventure Layout by Giorgia


Hello SRM friends, Giorgia here and today I am sharing a layout with you.
 I love making layouts.  It is my favorite way to preserve memories.


I scrapped this picture of my hubby in front of a mural.  The picture had great colors and I matched them with papers and SRM stickers. I adhered some of them on white cardstock and then fussy cut them, to make them pop from the background. Use foam tape to adhere to give an extra pop! 


 I adhered one sticker directly on the picture: I love the subtle transparency of SRM stickers!


One of my favorite SRM products are We've got your border stickers. I added a lot of them! 

Until next time,

ciao, Giorgia
SRM products used 

Wednesday, March 8, 2017

March Planner by Melanie


Hello from Melanie!  Spring is in the air and it is time for some March Planner pages!  I started off with some of SRM sticker sheets, LePens, and mint jute.


SRM stickers add such great color to my planner pages. I appreciate how easy it is to coordinate stickers from different sheets and themes.


The Planner sticker sheet has great icons to use to indicate important things to remember--from doctor appointments to Daylight Savings to meeting with friends.


 Here's to a fun-filled March!

SRM Products used:
Sticker Sentiments Spring
Freestyle Stickers Spring
Year of Memories Sticker 2017
Calendar Companion
Planner Icon Stickers
We've Got Your Sticker Plus/Thanks
We've Got Your Border Bright
LePen 4-Pen Neon Color
Jute Twine Mint

Tuesday, December 13, 2016

Holiday Treat Containers by Samantha and Melanie


Today we have a special treat!  Actually 2 special treats!  Samantha Taylor and Melanie Jarocki both have ideas for last minute treat projects.  You will have plenty of time to create them!  

Let's take a look at Samantha's project first...

Hello! Samantha here with you today sharing a holiday treat container with a surprise. Years ago we started to find unique and sometimes silly ways to give my nephews money for birthdays and Christmas. Today I'm sharing how I used some fun SRM containers to come up with this year's Christmas gift. 


These may look like simple candy containers made from the Small Clear Take Out Box and the Clear Rectangular Box, but they hold a secret inside. 


I put their Christmas money in a Tiny Tube...


then I nestled it inside one of the clear boxes and filled in all the space around the tube with their favorite candy. 


I finished off my treat boxes with stickers from We've Got Your Sticker MerryWe've Got Your Sticker Plus Christmas, and We've Got Your Border Christmas. I really love the seamless look of the clear stickers on the clear boxes! 


I put the finishing touches on the boxes by creating tags from Labels By The Dozen Christmas Greetings. I think this holiday treat container with a surprise is going to be a really memorable gift this year. How do you like to make giving money a fun surprise?

And now here is Melanie's project....


(To the tune of Jingle Bells . . . ) “Oh what fun it is to craft with S-R-M stickers!”


Seriously, when I was introduced to SRM stickers over 5 years ago, it felt like I held the winning lottery ticket to crafting. I love that I can sit down to make a project--clean and simple, embellished, or artistic--and it turns out looking great. 


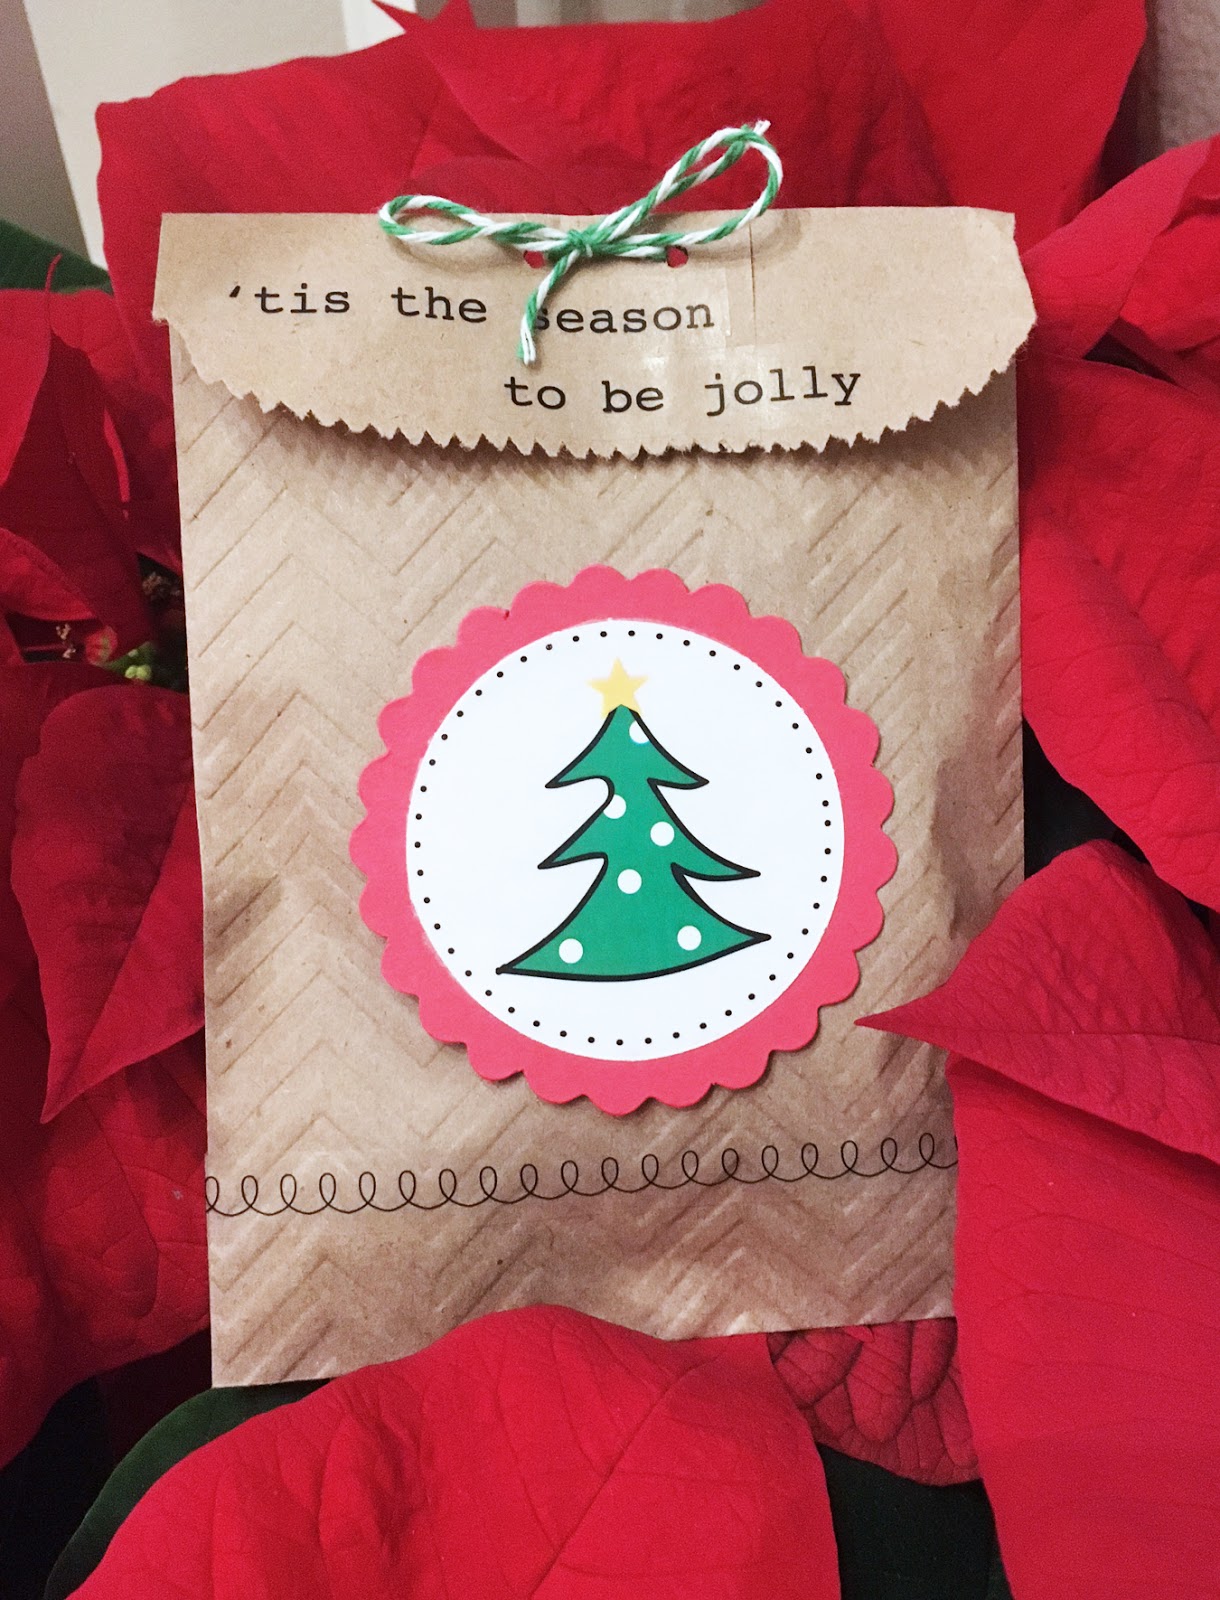
These Christmas treat bags were pretty quick to make and are a festive way to share holiday cheer. I used one sheet of stickers, embossed kraft bags, punched scallop circles, and twine.


The Christmas Tree stickers are a 1-¾” circle and fit perfectly inside the 2” punched scallop circles. The clear stickers are seamless on the chevron embossed bags. I love how well-thought-out these products are :)  Securing the treat bags closed with twine is a nice finishing touch.


What a sweet way to share treats during the holidays!

Products used: