Showing posts with label Clear Box. Show all posts

Thursday, November 9, 2017

Christmas Presents! by Shelly


Hey y'all! Shelly, here.
Today I'm sharing some cute little Christmas presents with you!


How about that wrapping paper?!...I used one of the patterned SRM Sticker bag for my gift wrapping! I started with a large bag and simply cut it open to lay flat. Which in return gave me enough paper to wrap two little presents. Simple, yeah?!


To finish my presents off, I stacked them and used some jute twine to hold everything together. After, I used some fun and festive stickers (which I did a little fussy cutting with) to embellish my presents and tag. Sweet, yeah?!...

Thanks so much for stopping by!
Enjoy your day!

SRM Stickers supplies:

Red Jute Twine

Wednesday, October 18, 2017

Pumpkin Candy Boxes! by Michele


Good morning!
Michele here with some fall treats!
I think these little clear boxes are so dang cute!
I took a piece of burlap and adhered it to the outside of the box.


I cut a bunch of pumpkins with my Silhouette. I inked the edges and layered them using Crafty Foam Tape.   I did a bit of Copic coloring on the leaves and layered everything on to the top of the box.  I added a sentiment from the Express Yourself Halloween Sticker set  I even cut out the teeny candy corn and adhered it to a clear button. 


I tied the black and white twine and tucked the sentiment underneath and glued the button/candy corn to the top.  


My boxes are all ready for my co-workers to receive, for a little sweet pick me up!! 

Have a great day!

Thursday, July 13, 2017

Memory Verse Card Holder and Video by Karen


Hello!  Karen here today to share a project I made for my daughter. 


Memorizing scripture is important in our home. To keep track of the verses we've memorized this summer, I created a magnetic holder using a small clear box from SRM. It's a perfect size for holding 3x4 cards. It was super easy to create with some scrap paper and SRM's faith stamps and stickers.


For the step-by-step process, check out the video below.


For this project I used:

Monday, July 3, 2017

Water Balloon Kit by Samantha


Hello! Samantha here with you today to share a fun summer gift. Today I'm using some SRM stickers and a pillow box to create a water balloon kit. 


For the container I used a Large Clear Pillow Box. This size will hold a full package of water balloons and one of the nozzles that you can use to fill water balloons. 


 I used a combination of the Live Life Calendar Year and We've Got Your Border Bright stickers to decorate the container and make it bright and summery. 

In our house summer means water balloon games so these kits will make a fun surprise for my kids...but I also think they'd make a great little gift for the kid at heart. 


Thanks for joining me today!  
SaveSave

Friday, March 24, 2017

Springtime Clear Box by Shelly


Hey y'all! Shelly, here!
Today, I'm sharing a fun 'springtime' clear box with you.


Anyone else ready for Spring?!...All the flowers blooming and the sweet breezes...everything's so fresh and pretty! 

So I thought a nice little springtime box would certainly make someone smile. :)


I started with a large doily and then a used some kraft cardstock with a die. After, I added some fun little embellishments to my kraft die cut piece. In this case, I chose a little pink deer, a white flower, and some banners that I made using patterned paper and some SRM Stickers. Once done, I finished things off with a little bit of jute twine and clear sequins. Fun and sweet, yeah?!...

Thanks so much for stopping by!
Enjoy your day!

SRM Stickers supplies:


Thursday, October 20, 2016

Birthday Wishes by Amber


Hello everyone! It's Amber here, today I thought it would be fun to share this Birthday watercolor card set I created for a friend. 


I started by gathering all my supplies, cardstock, watercolor paper, stamps, stickers, watercolor pencils, embossing folder, thread, and sewing machine and started assembling my cards. I created four cards in total using the same layout for each one to save time.

I started with a plain white card base and adhered a pink piece of distressed, embossed, and stitched cardstock right to the center of my card front. For the focal point of my card I stamped this beautiful floral postage stamp from Penny Black that I've had setting in my collection waiting to be used for some time now onto some Ranger Distress Watercolor Cardstock. I cut the image out, distressed the edges and quickly water colored the entire image with some Marvy Watercolor pencil and a water brush. After my stamped image dried I adhered to my card front with some foam adhesive and attached my sentiment. I used the Birthday Wishes sticker from SRM's Fancy Sentiment/Birthday sheet and adhered it to the bottom left to complete my card front.


I thought it would be fun to dress up the envelopes included in my card set so I stamped all four of them to match my cards. I stamped each one with the fun border stamp and large Hello sentiment from SRM's Big Hello Clear Stamp in some lime green ink. 


Once I had all my cards assembled I put together a clear A2 Card Box from the SRM Stickers shop, filled it with some white tissue paper, and added all four of my cards and matching envelopes. For the outside of my clear container I used some burlap ribbon, lime green ribbon, and a matching tag. I used the same watercolor cardstock, stamp, and sentiment sticker that I used for my cards to create my gift tag. I hope you enjoyed my card set today. Thanks for visiting!

SRM Stickers Supplies
Burlap Ribbon

Friday, August 26, 2016

Thank You Gift Set by Amber


Hello everyone! It's Amber here, with a new card and cute little matching gift box. I wanted to have fun with this gift set and decided to go a little crazy with my color choices. I really love how the bright pink pops against the green and the multi colored patterned paper I added to the bottom ties everything together.


I started with a 5 1/2" x 4" white card base and layered my two pieces of patterned paper, I added the green patterned piece to the top half and the striped patterned piece to the bottom half. Once I had my patterned paper adhered to my card base I rounded the two top corners of my card and added a green scalloped border sticker from the We've Got Your Border- Halloween sticker sheet between my two pieces patterned paper. On a separate piece of white cardstock I stamped my large blossom in some tuxedo black Memento Ink, colored it with some markers, fussy cut it, and adhered it to the upper half of my card base. For my sentiment I adhered one of the clear thank you stickers from the We've Got Your Stickers- Thanks sheet to a 1½" pink scalloped circle and added it to the bottom right of my card base.


I just love these little clear square boxes, don't you? They are quick and easy to assemble and are the perfect size for little treats. I folded my clear little box and added a square piece of green pattered paper and added some colorful little candies to the inside. I quickly decorated the front of my little box with a ripped piece of  patterned paper, a 1½" pink scalloped circle, a thank you sticker, and some ribbon. Super easy and the perfect little addition to any card. 


Thanks for visiting!

SRM Supplies


SaveSave

Tuesday, August 16, 2016

Oh Baby! by Tanya


Hi there everyone! This is Tanya stopping by to share a simple, inexpensive, but oh so sweet baby gift with you today.


Just so you  know, the travel size bottles of baby lotion, baby wash and baby shampoo fit perfectly into a Clear Rectangle Box.  And, of course, these clear boxes are perfect to decorate for any occasion.

I used several pretty stickers from the Take 2: Stickers By the Dozen/Baby sticker sheet to dress up my clear box and bottle of hand sanitizer.  I also used the Birthday Plans clear stamp set to create a sweet tag for the gift box. The tag is attached to the bow with a bit of Baker's Twine in Blossom.

 And, there you go...simple, but oh so sweet!
Thanks so much for dropping by today - see you soon.

Monday, December 7, 2015

Clear Container Christmas Ornament by Juliana


Hello SRM Fans, it's Juliana here and today I'm sharing a fun and festive Christmas ornament that you can easily create using some of your favorite SRM Stickers Clear Containers. As you will see, gift boxes aren't just for gifts!

To create this ornament, I selected the Box Rectangle Clear Container. I then poked a hole in the center of the lid and tied a piece of twine to use for hanging the ornament after I was finished decorating it.


Next, I placed a small bottle brush tree inside the box and glued it to the bottom of the box. To give it a more festive feel, I added some faux snow and glitter.


After closing the box, I added a couple of border stickers from the We've Got Your Border / Christmas set. The final touch was the addition of a red bow to the top of the box.


I always love creating Christmas ornaments. They make wonderful gifts that both family and friends can treasure for years to come!

Merry Christmas!

Monday, July 6, 2015

Mini Baby Box by Lorena


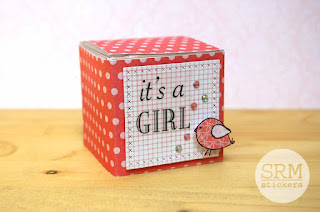
Hello, SRM friends! It's Lorena today. While I type this post, I wait for the arrival of my second child, a baby girl that will be here this week. Eeeek! So you won't be surprised about this project's theme :)
These days I'm very attracted to all things tiny, and that includes the adorable square clear gift boxes in their smaller size, which is two inches. Do you know what fits perfectly in there? Yeah!!! A newborn sized pacifier!

SRM Stickers Blog - Mini Baby Box by Lorena - #clearbox #giftbox #baby #janesdoodles #babyjungle #fancysentiments

I started covering the box with patterned paper, and used a stitched die cut square as the base for the focal point. SRM has lots of super cute baby themed stickers, so it was hard to decide on which one to use for this project! I ended up using Fancy Sentiment/Baby.

SRM Stickers Blog - Mini Baby Box by Lorena - #clearbox #giftbox #baby #janesdoodles #babyjungle #fancysentiments

Of course, I can't imagine a baby project without a cute little animal in it, so I turned to my trusty stamps to find the perfect one to use on this box. I chose the little peep from Baby Jungle stamp set and paper pieced it in different shades of pink. Paper piecing is always so relaxing!!! I finished the gift box with a few scattered rhinestones and that was it.

SRM Stickers Blog - Mini Baby Box by Lorena - #clearbox #giftbox #baby #janesdoodles #babyjungle #fancysentiments

Here's a closeup of the little bird.  It was the perfect image for my baby box.

SRM Stickers Blog - Mini Baby Box by Lorena - #clearbox #giftbox #baby #janesdoodles #babyjungle #fancysentiments


And that's what I have for you today! Happy crafting and will see you in  a couple of months, once the baby is here and the routine has been settled. Wish me luck ;)

Wednesday, October 15, 2014

Mini Birthday Box with Tags by Cathy H.


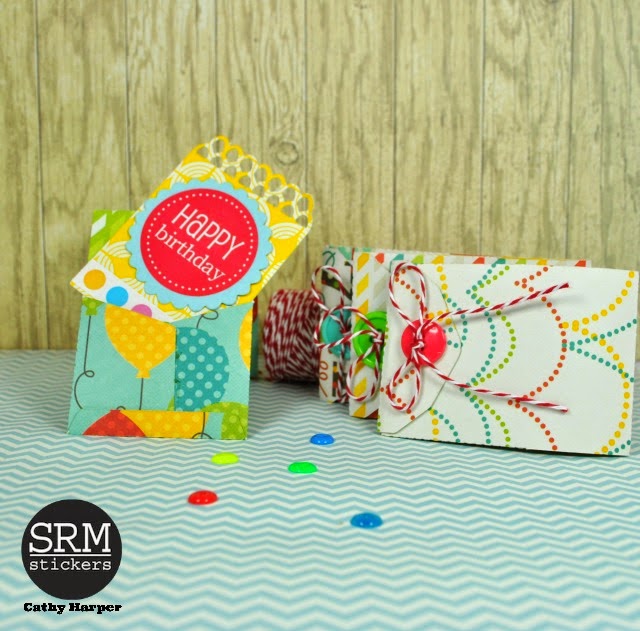
Hello from Cathy Harper!  I have a fun little box full of Birthday Tags to share with you today.  I created this little gift to add to a friend's Birthday Box.  It's a way for her to have Birthday tags to add to presents right at her fingertips.  I used SRM's Clear Rectangle Box to hold my tags and decorated it with Birthday Take 2 StickersBlack Sticker Stitches, and a medium teal Punched Piece.  I just adhered the stickers around the bottom of the box and added a bit of yellow washi tape for more color.  Next, I created a paper bow using my Silhouette Cameo and tied it together with Maraschino Baker's Twine and added the scalloped punch tag!

SRM Stickers Blog - by Cathy Harper - #stickers #birthday #box #cards

Adorable! Next up, I created all the little tags and envelopes to fill my box, again using my Silhouette Cameo.

SRM Stickers Blog - by Cathy Harper - #stickers #birthday #box #cards

I made a set of six tags to go inside, all using the same tag and envelope.  I just alternated patterned papers!  All of the tags are decorated with Birthday Take 2 stickers and Medium Scalloped Punched Pieces in different coordinating colors.

SRM Stickers Blog - by Cathy Harper - #stickers #birthday #box #cards

Once my tags were all tucked inside the mini envelopes, I added a button with a Maraschino Baker's Twine bow to each envelope! Before I filled the little box I added some yellow crinkle paper for a pop more color.  Now my friend has a stash of Birthday tags to add to her gifts.  

SRM Stickers Blog - by Cathy Harper - #stickers #birthday #box #cards

I love how this little gift turned out and I might even make her a set of Christmas Tags.  

SRM Stickers Blog - by Cathy Harper - #stickers #birthday #box #cards

Wouldn't it be fun to have a whole row of these little boxes, full of tags for all of your gift giving occasions?  Thanks for stopping by and be sure to come back again soon for lots more SRM inspiration!

Wednesday, September 17, 2014

Bitty Birthday Box by Shantaie


Ever wished so very much that you could be with someone to celebrate their birthday but it's just not possible? What if you could send them a mini birthday party all wrapped up from you to show them how much they mean to you?!   Shantaie here with you today to show you something fun!  It's a Bitty Birthday Box packed with crafty goodness!

SRM Stickers Blog - Bitty Birthday Box by Shantaie - #birthday #gift #container #clear #A-2 #doily #stickers #twine #shimmer

Think about our Service men and women, kids who are off to college, family members who moved or are away for work, could have a festive little celebration that is sure to bring cheer and make them feel loved!  

SRM Stickers Blog - Bitty Birthday Box by Shantaie - #birthday #gift #container #clear #A-2 #doily #stickers #twine #shimmer

Of course each one can be customized, but here are the basics and what I used to fill my SRM Clear A2 box:

Birthday candles to make that all important birthday wish, I punched two holes through the large white punched piece and tied 3 candles with green shimmer bakers twine bow from the twinery. I added a round wish sticker at the top allowing just a bit to overlap that area was used to anchor the candles near the top of the box liner I created with patterned paper.

SRM Stickers Blog - Bitty Birthday Box by Shantaie - #birthday #gift #container #clear #A-2 #doily #stickers #twine #shimmer

Next is a fun party horn, you can use a blower, or any kind of little noisemaker ..try a kazoo! 

SRM Stickers Blog - Bitty Birthday Box by Shantaie - #birthday #gift #container #clear #A-2 #doily #stickers #twine #shimmer

My favorite part of this little box is the glassine bag of confetti! I punched little circles, and flower shaped confetti from patterned paper, and filled it with multicolored sequins. I folded the glassine bag over and tied a bow with green shimmer twine and sealed it with a Bright blank label.  I added the cupcake sticker to a yellow small punched piece and attached it with a mini clothespin. 

SRM Stickers Blog - Bitty Birthday Box by Shantaie - #birthday #gift #container #clear #A-2 #doily #stickers #twine #shimmer

A party popper was given a makeover with patterned paper and sequins! Add a SRM sentiment from We've Got Your Sticker Happy and its ready to thrill! 

SRM Stickers Blog - Bitty Birthday Box by Shantaie - #birthday #gift #container #clear #A-2 #doily #stickers #twine #shimmer

The last item in my kit is an itty bitty banner made from the Bright Blank Labels folded over a length of white cotton string.  It's quick, easy and adorable! 

SRM Stickers Blog - Bitty Birthday Box by Shantaie - #birthday #gift #container #clear #A-2 #doily #stickers #twine #shimmer

Fill up the box and decorate it with a bit of patterned paper, a SRM doily, a birthday border banner sticker and a bow! 

SRM Stickers Blog - Bitty Birthday Box by Shantaie - #birthday #gift #container #clear #A-2 #doily #stickers #twine #shimmer

Now it's your turn!  Send someone a bitty birthday party and know that a part of you is celebrating along with them!  Happy creating!