Thursday, September 29, 2016

Pumpkin Patch Fall card by Shantaie


Hello!  Shantaie here today with a fun Fall card. 


I'm in awe thats is fall, and we have all things fall to look forward to! I'm having fun with watercolor paper and stamps, all the beautiful fall hues melting into the paper! The Autumn Blessings stamp set is one of my favorites and tends to be the first one I reach for when I think fall!


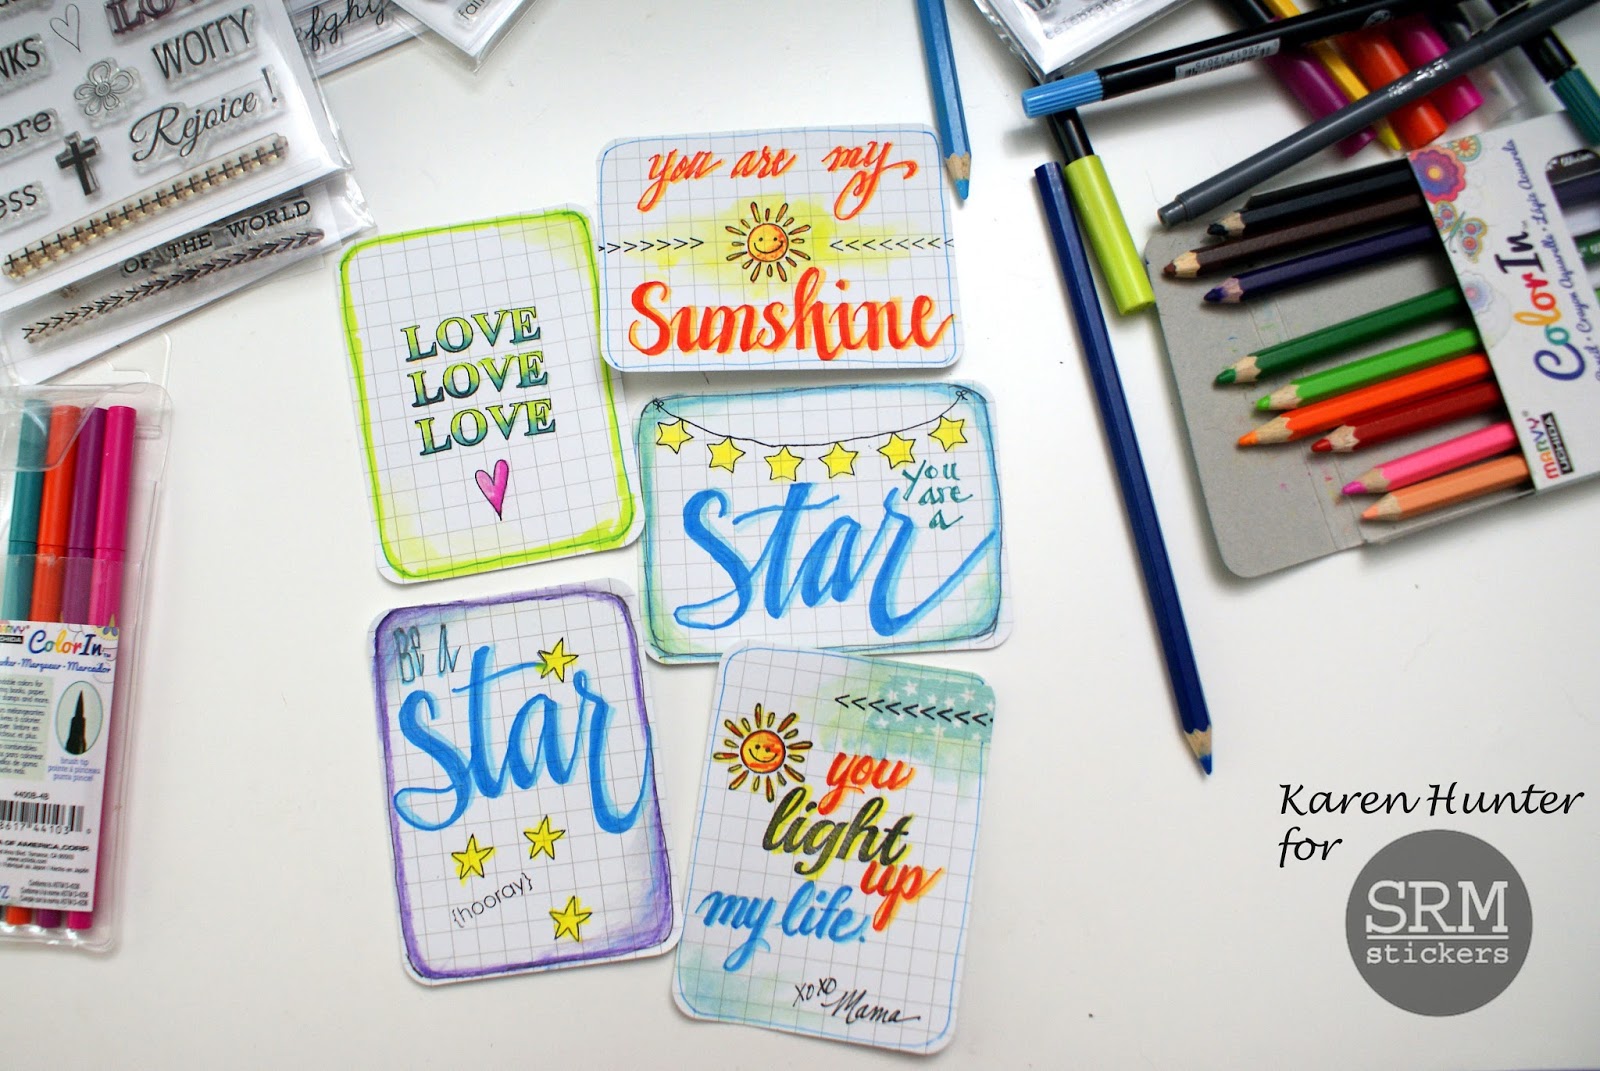
I used a watercolor paper, and a slightly wet brush to "smudge" the leaves in the background, I added a few accents with Marvy Color In Watercolor Pencils for the pumpkin stems and leaf edges. So easy to feel like a real artist! A simple bow made from cream cord, adds just the right amount of softness and texture to finish the card. 
Now to enjoy all things Pumpkin spice! 

SaveSave

Wednesday, September 28, 2016

Happy Halloween by Shelly


Hey y'all! Shelly, here! 

Can you believe how fast time just keeps going on by?!...Before we know it, it'll be fall and you know what that means...Halloween! Heehee. :)

So, today I'm sharing a fun Halloween treat container. 


You can easily fill it with whatever you like! Candies, little spider rings, mini glow sticks, etc. The possibilities are endless! ;) 
*Confession: I would have filled my container with some chocolates...though, they have seemed to 'disappear'. lol*


I decided on doing something nice and easy. Especially since things can be a little hectic around this time of year. I started with adding my sentiment stickers to different colored cardstock and patterned paper. Afterwards, I cut them into little banners. (For my big 'Happy Halloween' sticker, I simply stuck it onto one of SRM Stickers large punched pieces.)  After, I assembled everything together and then added it to my container. 
Easy peasy, right?!...

Thanks so much for stopping by!
Enjoy your day!

SRM Stickers supplies used:

Tuesday, September 27, 2016

Simple Brush Lettering & Lunch Box Notes by Karen


Hello!  Karen here today to share a little treat that I made for my daughter.  I love stashing little notes into my daughter's lunch bag. Sometimes it's just a quick little message scribbled on a scrap of paper, but I also like to pre-make cute notes to tuck in for her to discover and let her know I'm thinking about her and think she's amazing.


My SRM Faith and Planner stamps are giving me great inspiration for these notes. I used several stamps, brush markers (LePlumeII) and my ColorIn watercolor pencils to create a set for next week.


I've gotten lots of comments complementing my lettering on my Bible journaling pages. I'm no expert and I have to admit to having trouble achieving the look I want with just a brush marker. However - the dual tipped markers give me a great "cheater strategy" in getting the brush lettering look I like. Take a look at my simple brush lettering technique using Marvy Uchida LePlume II dual tipped markers in this video.


Now you can make your own little notes - for lunchboxes, the bathroom mirror, to send in the mail, or leave one for a coworker to find. Enjoy!


For this project I used:
SaveSaveSaveSaveSaveSave
SaveSave

Monday, September 26, 2016

Just Believe by Michele


Good morning! Michele here with a water colored card using SRM's Just Believe stamp set. 


I stamped it the flowers with Versamark and embossed it in white.  I water colored the image using Color in Watercolor Twist Markers from Marvy. After it was all dry, I stamped the sentiment using my Misti to be sure everything was straight.  I added some white gel pen highlights and adhered a few sequins. I kept the card fairly simple with a bit of layering at the bottom using an edge punch, and a white string at the top.


Thank you so much for stopping by today!

SaveSave

Friday, September 23, 2016

Heartfelt Wishes by Tobi


Hi there, it's Tobi from Tobi's Place here and I'm excited to be a SRM DT member for 2016-17!!! I'm currently living in China and I've been on vacation for the past two months. I've brought with me very limited supplies, but I hope to show you that you don't need lots of stuff to pull off a great project! 


I treated myself to some watercolor mediums so that's all I brought on my trip - it forced me to use them!   For this card I used a combo of Distress Crayons and Zig Clean Color markers (both reactive with water) to colour inside and outside the images. I'm looking forward to trying out the new Watercolor Twist Pencils from SRM.  
Love watercolor!


The images were stamped with Versamark ink and heat embossed with white EP. When I coloured outside the flowers I squeezed the water pen so water would drip out and drip down the cardstock. 


The SRM clear sentiment was mounted on vellum so the subtle colours in the background could still peek though. A touch of Twinery Twine finished the card off!


SRM Supplies:
Heartfelt Wishes sentiment: Fancy Sentiment: Love

SaveSave

Thursday, September 22, 2016

Planner Stamps :) by Melanie


Hello! Happy September! Melanie here to share one of my week's in September, as well as some cards I made using the Planner Stamps.

For this week in September I used the following planner stamp sets:
Birthday Plans
School Days Planner
Planner Notes to Self


They were perfect for including several different phrases and images that cover things in my life. The Tiny Sport Ball stickers made another appearance this month. They come in so handy since we have sports just about every night of the week :)


The LePen Fine Point Bright set gives me the option to keep track of my kids' events, color-coding for each one.  And to top off the page, I used the border stamp from Planner Notes to Self.


I put the School Days Planner stamp set to work again on this set of First Day of School cards for my elementary kids' teachers. I tucked a gift card into each one as a way to help them get through that first day :)  But they could also be used any time throughout the year to say thank you to teachers.

 The clear stamps are great for layering different stamps. I stamped the smiley face list first on white cardstock. Then put the word stamps (word down) on each line. Then I placed my block on top of the words to keep them in those places. That way I could stamp the words on each of the three images in the same places!


I finished off the cards with the LePen Bright set and some Orchid twine. I also added a border around the edges with the Sticker Stitches stamp set.

Enjoy your day!

Wednesday, September 21, 2016

Trick or Treat by Amber


Hello everyone! I'ts Amber here, today I'm sharing this fun Halloween themed card and matching candy filled tube. I also have a quick bonus project at the end of this post for you to check out.


I started by folding an 8 1/2" x 5 1/2" piece of light green cardstock in half to create a 5 1/2" by 4 1/4" card base. Once my card base was folded I took the largest die from Avery Elle's Double Pierced Rectangles Elle-Ments Die and die cut a large rectangle out of some colorful striped  patterned paper, adhered it to my light green card base, and set it aside to work on my stamped photo frame. 


For the next part of my card, the photo frame I traced a die cut photo frame I had in my stash onto some orange pattered paper and cut it out. I stamped my cute little Halloween image in some black Memento Ink onto some white cardstock and colored it with some Spectrum Noir Markers. A quick little trick for you, I like to pick my patterned paper in the beginning of my card making process. Ding this ensures the entire card will match and it makes it so much easier to choose colors to color your images. I added my colored image behind my orange photo frame, added a Trick-Or-Treat sentiment from SRM's Stickers By The Dozen/Halloween sticker sheet, added some twine with a mini black safety pen, and attached the entire finished photo frame to my card base at an angle.


I'm always looking for fun new ways to package up fun little classic treats like these lemon drops. Since my card featured a little boy dressed as a dragon I thought it would be fun to fill one of The Original Tubes with some yellow lemon drops and label it with a little tag that read Dragon Spots. Fun right?  If you don't have any clear tubes on hand or if your looking for a quick way to mass produce more then one gift another fun way to package up some treats is with a bag.


I quickly decorated this 5" x 7.5" Embossed Chevron Kraft Bag with some matching patterned paper, clear stickers from the Sentiment/Halloween sticker sheet, a mini black clothespin, and some twine. This was super easy to make and can quickly be made while you still have all your supplies out. I hope you enjoyed my card, tube, and gift bag today! Thanks for visiting!

SRM Supplies

Tuesday, September 20, 2016

Bountiful Blessings by Shelly


Hey y'all! Shelly, here! 

Today, I'm sharing a simple and sweet fall themed card with you! 


I did some simple die cutting for my leaves, which I used with some fall colored cardstock. After, I somewhat rolled and gathered together a little bit of burlap ribbon and jute twine. Then added a mini wood clothespin to hold it all together. Once done, I added some patterned paper to my card base, then my rolled bunched of burlap and jute along with my leaves and sentiment piece. 


Simple and sweet, yeah?!...

Thanks so much for stopping by!
Enjoy your day! 


SRM Stickers supplies used:

Monday, September 19, 2016

Back to School Watercolor Printable by Samantha


Hello! Samantha here with you today. It's that time of year, so I'm sharing a Back to School Watercolor Printable. I'm going to be honest with you; I love watercolor art, but I absolutely cannot draw to save my life. Since I can't draw, I like to find ways to create watercolor art for my walls that don't require me to draw. Today I'll show you just how I created watercolor art for my walls with SRM's Color In Watercolor Pencils, a water brush, my printer, and absolutely no drawing!


Instead of drawing my design, I created it in a PDF file (which you can download for free at the end of this post). I let my computer do all the work of "drawing" for me. I found a cute pencil font and modified it a bit to fit my needs. To really give the finished product a painted feel, I printed my design out on watercolor paper instead of standard card stock. Then, I started to color in my design. I primarily used the new Marvy Color In Watercolor Twist Pencils, but I did use a Marvy Color In Watercolor Pencil for the peachy color of the pencil erasers and wood tips.


I wanted you to be able to see the difference blending the pencils with water makes, so I colored my whole design and took the picture above. You can see that, basically, the letters look colored in (no big deal, but not the look I'm going for).


In this photo, I've now blended the watercolor pencils with the Marvy Color In Water Brush. My letters now have a smooth, blended look. In person they look more like they've been painted than like they've been colored. 

Oh how I love the Watercolor Twist Pencils and Blender Brushes!


I have a frame in my house that I swap out seasonal printables for display, so I popped my finished Back to school Watercolor Printable in there. If you love the look of watercolor, but can't draw, grab the printable PDF and some Marvy Color In Watercolor Pencils and try out this fun technique!


Have a crafty day!

Friday, September 16, 2016

Psalm 39:7 by Tenia


Hey Y'all!!!

Tenia here today showing y'all some Bible Lettering.....CHECK IT!!!


I love doing brush stroke lettering and this Bible Journaling card was so very fun to create!!! I used the following SRM goodness: 

 Words of Faith stamp set 

Here's a closeup of all the details.


Thanks for stopping by and have a great day!!!

-t
SaveSave

Thursday, September 15, 2016

Make a Wish Wands by Tanya


Hi there, this is Tanya and I have a fun, happy project to share with you today!

Have you ever wished for a Fairy Godmother to grant your every wish? Wouldn't that be awesome (especially on laundry day)?  While I know it's wishful thinking, if I did have a Fairy Godmother, I would want her to have a Magic Wand just as pretty and colorful as these.


Aren't these fun? And, they were so easy to make!  I started with the Magic Wand Tubes and filled them with some colorful candies.  Next, I cut out some pretty, pastel stars on my Silhouette and decorated them with a gold gel pen and sequins.


Using a die and some glittery gold cardstock, I created a base for the beautiful "Make A Wish" sentiment from the Fancy Sentiment/Birthday sticker sheet.


 Some pretty curling ribbon finished up these wands perfectly.
Now, if only that Fairy Godmother would show up on laundry day!

Thanks for stopping by and have a wonderful day!

Wednesday, September 14, 2016

Trick or Treat Layout by Karen


We aren't big into the scary parts of Halloween at our house, but we are all about the candy! SRM's clear stickers are perfect for us and it was fun to mix and match the iconic jack-o-lanterns, spiders, and candy corn, as well as lots of phrases and border stitches in this fun layout.


My daughter wanted to apply her own make-up when it was time to get ready to trick or treat, so I just watched and took some adorable photos. Behind my 5x7 photo are plenty of borders from various SRM sticker sheets. I also added a little bit of black acrylic paint for a bit of boldness and to tie in with the scalloped borders. Titling my layout was easy with another phrase from the clear stickers on a cardstock flag above the photo. I just trimmed it out with a few more sticker stitches.


I cut out a few different sized white cardstock circles for the round stickers and popped them off my page with foam dots. To add more dimenstion and interest, I added the small candy corn stickers and then drew in black dots with a sharpie pen to round off the "confetti" look to my layout.


I had one lone spider that I hadn't used on my layout, so I grabbed a small kraft pillow box, more sticker stitches, and a bit of twine to make a quick treat holder - perfect for a couple of chocolates or a handful of yummy candy corn.

For this layout I used: