Showing posts with label Textile Foil. Show all posts

Tuesday, April 24, 2018

Stamped & Foiled Thank You Card by Emma


Hello SRM fans!  It's Emma here today to show you how to use the wonderful textile foil and your SRM clear stamps to make simple and cute cards.


For this card, I am using the BIG Thank You clear stamp set as it gives us nice large letters to foil.

The trick with foiling, is to use something heat-reactive that will cause the foil to stick to the design when passing through a laminator.  There are several options, such as cuttable adhesive sheets, heat-reactive adhesive gel, or toner from a laser printer.  You can also get toner paper sheets that can be cut into a design and then foiled.


For my card, I am going to stamp the THANKS sentiment with Decofoil Transfer Gel.
Use a sponge dauber to dab the gel onto the surface of the stamp.  Stamp the image onto your cardstock, and allow to dry for about an hour.  I know it is slightly tedious to wait, however the gel is heat-reactive so it does not help to use your heat gun to set it.  (I know, I tried!)  My advice is to stamp the same sentiment several times, in case the first one doesn't stick to the foil as well as you hoped.  (Use more transfer gel each time you stamp the image).


Now, lay the foil sheet over the stamped images, completely covering them.  I chose this funky purple holographic style, as it's so cool.


Now, fold some plain kitchen parchment paper (NOT waxpaper!) around your stamped paper and foil.  This is another good tip - I have tried using cardstock or heavier paper around my project previously, and found that it did not work.  Switch on your laminator, and once it has reached temperature, feed your project through.  My laminator is an inexpensive $35 model - I know that some craft-specific ones can run to $200 or more.  For this model, I chose the higher 5mil temperature.  Please always follow the instructions for your own machine carefully.


Here are our foiled Thank Yous!  As you can see, the foil hasn't taken fully on a couple of the images, so now I can pick the best one.  I used a rectangular die to cut my chosen image from the sheet.


Now for the background.  I decided it would be fun to use the rest of the stamp set behind the main sentiment.  So for this, I have stamped the images with embossing ink, and used clear embossing powder.  


The embossing technique creates a cool 'watermarked' effect.  You can still see it, but it doesn't overshadow the foiled main sentiment.


Here is the finished card!  I think it looks simple but effective.
I hope you enjoyed my project, and are inspired to try heat foiling with your stamps too.

Happy crafting!
~~ Emma ~~

Supplies:
  • SRM Clear Stamps - BIG Thank You
  • SRM Textile Foil
  • Decofoil Transfer Gel
  • Tim Holtz Embossing Ink
  • Close to My Heart Clear Detail Embossing Powder
  • Scotch Laminator
  • Parchment Paper
  • Craft heat gun
  • Smooth white cardstock

Thursday, April 12, 2018

Simple Foiled Thank You Cards by Samantha


Hello! Samantha here with you today. I can never seem to have too many thank you cards in my stash. I thought I'd play around with the new Easy Weed Adhesive and Textile Foil to create some Simple Foiled thank you cards.

To create these cards you'll need card stock, Easy Weed Adhesive, Textile Foil (I used blue and copper), a laminator or heat press, and a Silhouette Cameo or similar digital die cutting machine.


You will use your Silhouette Cameo to create and cut the design you want from Easy Weed Adhesive. When working with Easy Weed Adhesive you must remember to mirror your image for cutting (cut it out backwards). 


Place the design you cut on your card stock and heat it with a heat press (only about 2 seconds is needed for Easy Weed Adhesive on paper) or run it through your laminator. Make sure to peel the backing off of your adhesive as soon as you take the heat off. Do not wait for it to cool down. 

Finally, place a piece of textile foil over your Easy Weed Adhesive design. Apply heat a second time (with a heat press or a laminator). Wait until the foil cools, peel it off, and you have a beautiful foiled design. 

My favorite thing about using foil on card stock is that it shows up beautifully on both light and dark colored card stock leaving you endless possibilities for color combinations.  

I think these simple foiled thank you cards show that simple can also be stunning. 

Tuesday, March 20, 2018

Textile Foil on Wood by Karen


Hello!  Karen joining you today with something very addictive! 
It's so fun when I get my box of goodies from SRM Stamps. Recently, as part of the Design Team, I was sent some textile foil. I'm new to textile foil, but was excited to discover different ways to add some shimmer and shine to my projects.


Today I'm sharing this wood plaque project using textile foil and EasyWeed Adhesive.  Watch this video to see how I created this project and what I did when it didn't turn out quite as expected. 


I love how this project turned out and I learned a lot in the process. I also love that I was able to use this wood plaque that has been sitting for quite some time, just waiting for sparkly inspiration.


For this project, I used:

Monday, March 12, 2018

Textile Foil Cards & Video Using Laser Printer and Laminator by Karen

Hello!  Karen joining you today.  I've been having a great time discovering different ways to use the new textile foils from SRM. Today I'm sharing some of my favorites. 


To make these cards, I found free online images and imported them into a (Word) document. There I resized them and recolored to make sure they would print out dark and black. I printed each image onto card stock using a laser (toner) printer. It is key that the image prints with toner ink (not an inkjet printer).   


I then ran my image with foil covering it through my personal laminator. The heat of the laminator adhered the foil only to the printed image. After a short cooling off, I simply peeled the foil away to leave the shiny image.


I'll walk you through it in this process video. But I have to warn you, though, you may become addicted to this easy and quick foil application technique!


Thanks for watching - I hope you are inspired to use textile foil in your projects!
SaveSave

Thursday, March 8, 2018

Textile Foil Tank Top by Samantha


Hello! Samantha here today, and I'm so excited to be sharing my latest obsession with you: DIY t-shirts. SRM released a lot of new heat transfer material (including foil and glitter) last month and I am having so much fun creating with it. Today I have this textile foil tank top to share.


If you have a digital die cutting machine (like a Cricut or a Silhouette Cameo) the possibilities are endless! Since I coach my son's baseball team, I went with RV (the abbreviation our city) and Baseball, but Baseball Mom would be really cute, too!


The textile foil is a 2 step process. First, you heat apply your image to your shirt with Easy Weed Adhesive, which gives you a clear glue print of your image on your shirt. Second, you heat apply your Textile Foil in one of 18 colors over your adhesive image. 


 Textile foil not only gives your image a cool metallic shine, but also a flecked vintage look. I can't wait to rock this shirt come baseball season! 
What sport do you need a custom shirt for?

Monday, March 5, 2018

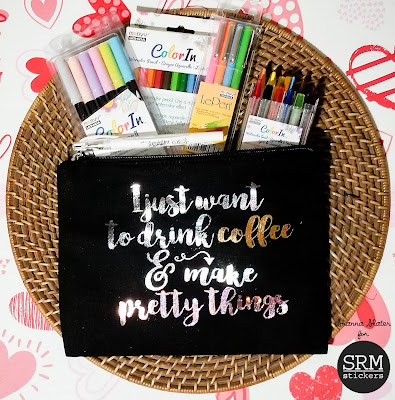
Textile Foil Zipper Pouch by Shanna


Hello again SRM friends!  Shanna here today to show you my newest addiction project!  Have you seen SRM's fabulous new textile foils they debuted recently?!?  Oh my goodness are they sparkly and fun!  I had the pleasure of playing with them, and let me tell you.....I couldn't stop!  I keep looking at something and thinking "hmmm....that would be better foiled"! It's bad in the best of ways! 
 

To get back on track, take a look at the zipper pouch I made for my coloring supplies when I am away from home.  I couldn't just pick one design (see above reasoning!) and ended up putting a different design on each side!  Double the SPARKLE, double the FUN!


Here is a close up of the copper textile foil....I am a sucker for metals!


Here is a close up of the pink floral textile foil.  LOVE this shade of pink, and the flowers are sweet, although hard to see in a thin design like the script


The mirror textile foil is almost rainbow to me...The "prism" colors look amazing in person


It was my very first time working with textile foils, so if I can do it...trust me....You can too!  I took a couple pics along the way, but will have to work out a tutorial if anyone has any questions because I just got too distracted by the shiny goodness revealing itself to remember to take more pics of the process!  

Here is a before picture when I just had weeded the Siser EasyWeed adhesive. 


I thought the after picture of the copper sheet was kinda fun....The foil only sticks to the adhesive, so the negative image appears magically when lifting the foil off after it cools!  


I am NOT known as a "patient person"....so I couldn't help but take a picture of some of the goodies I plan on stowing away in this amazing pouch!  I like to bring coloring projects with me when I am away from home, and this will be perfect to bring my markers, colored pencils, gel pens, and any other little goodies I might toss in!  SRM carries a wide assortment of awesome coloring supplies, be are to check them out!


Supplies used:
SRM Vinyl - copper textile foil
SRM Vinyl - Pink flowers textile foil
SRM Vinyl - Mirrored textile foil
SRM Vinyl - Siser EasyWeed adhesive
SRM Vinyl - Teflon sheet
Black canvas zipper pouch 
Iron
Silhouette Cameo
Silhouette design store file #143045
Silhouette design store file #171550

I am already thinking ahead to what I will "foil" next...What needs a little sparkle and shine in your life??  


Until next time!

Thursday, February 22, 2018

No Heat Foil Faith Cards by Shelly


Hey y'all! Shelly, here.
Today, I'm sharing a set of foil faith cards with you. And did I mention, I used no heat and no fancy machine for the foiling!?! :)


I started with my stamps. I did some masking with the images and the rest I just stamped in black ink. Now for my images, I used a paintbrush with glue and 'painted' it on my images and then stamped it on my card with the sentiment piece. (Note: a stamping platform works great for this, so everything lines up.)


Once having my image stamped on my card, I cut a piece of foil to fit over it. Then pressed it down my my fingers and simply ran it through my die cutting machine. After, I peeled off the foil and....ta-da! A foiled image! 


To finish my cards off, I used a black pen and added a simple line around the card. I usually prefer my lines to be straight but I really liked the 'freehand' of a little bit straight and a little bit not so straight. ;) 

Thanks so much for stopping by!
Enjoy your day!

SRM Stickers supplies:

Foil

Wednesday, January 10, 2018

New Product Introduction: Textile Foil and Easyweed Adhesive


SRM now offers a very fun new heat transfer type of material.  It's called Textile Foil and it is amazing!  It comes in a wide array of 18 delicious colors.


You apply it using Easyweed Adhesive. 


And create beautiful, delicate projects like this one!  Thanks to Annette Allen for playing with Textile Foil vinyl.  She loves it!  She used SRM's cotton muslin bags and gold Textile foil for these beauties.  


To create with textile foil follow these easy instructions:
Cut adhesive on your home cutter, apply to fabric, cover with foil,
press at 305 degrees or less, with medium pressure for 8-15 seconds.
Or use specialty glue to write a word or name, let dry, apply Textile Foil and press down thoroughly and remove.

And check out the beautiful colors!


Use it on fabrics to make your projects dazzle!

Join us tomorrow for more vinyl fun!