Welcome to day #2 of our new Design Team introduction. Today we feature Samantha Taylor who has been a longtime fan of SRM. We are so excited to have her on our team. Sit back and relax and enjoy this wonderful project that Samantha created using SRM's Vinyl.
Here's a little bit about Samantha in her own words:
My name is Samantha Taylor and I have a passion for combining crafting and creativity to beautify life. I live in a small town in rural Iowa with my husband and 2 boys. I'm a paper crafting fanatic who also loves photography. I enjoy making layouts, cards, mini albums, home decor items, party decorations, and Bible journaling. I love that crafting has allowed me to share what I love with people all over the world who also love creating pretty things and preserving memories. You can find more from me at www.taylorstamped.blogspot.com. I am so excited to share with you my love for the amazing products from SRM!
----------------------------
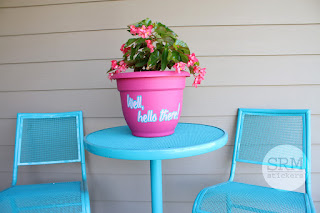
Hello! Samantha with you today. I'm sharing a little project that really brightened up my front porch. Decorating a flower pot with vinyl is a fun and easy way to dress up a space!
For this project all you'll need is a flower pot (mine is plastic, but metal or ceramic will work too), 2 colors of SRM vinyl (I used teal and pink striped), and your digital cutting machine.
I used my Silhouette to create the words, "Well, hello there!" and cut them from pink and white vinyl. To make the words pop more, I cut a shadow from turquoise vinyl to overlay the words onto. I used transfer tape to place the pink striped words onto the turquoise shadow, and then used that same transfer tape to place the whole thing onto my flower pot.
I have a little tip for adhering vinyl onto a curved surface. Take your image on the the transfer tape, and fold it in half. Start to adhere it to your curved surface from the center and work your way out. Press the vinyl onto the curved surface first, and then press the transfer tape around the image. The bubbles and wrinkles you tend to get from working on a curved surface will be in the transfer tape instead of the vinyl when you use this technique.
Remove the transfer tape, and you have a fun little flower pot to sit by your front door.
I recently picked up this little bistro table set to sit outside my front door. You can see where I pulled my inspiration to mix the pink vinyl with the turquoise vinyl.
Decorating a flower pot with vinyl is such a great way to personalize a flower pot for yourself or for a gift. What are you going to put on your flower pot?


3 comments:
This is sooo cute!
This is such a cool idea. I love the pink and bright blue together.
Thanks Amber! The colors are even more vibrant in person.
Post a Comment