Hi there! Glad you stopped by today! It's Tanis here, and I'm going to share a tutorial with you today. I decided to make a bookmark, walk you through the steps, and show you a little "trick" for dealing with loose ends of your machine-stitched threads. Let's get started!

Supply List:
Finished project measures 7 3/4 x 2 1/8"
2 colors of card stock
an old dictionary, book, or text paper
stamps (using a tall image works best)
SRM stickers: SCHOOL
Pigment Inks
Sewing machine
Ribbon scrap
Mod Podge
old paint brush
1. Cut a piece of text paper to the size that best fits your image, allowing space on the bottom for the sentiment stickers. I tore one edge of my text paper for an aged look. Stamp your images.

2. Trim card stock to mat the text paper. Adhere text paper to card stock.

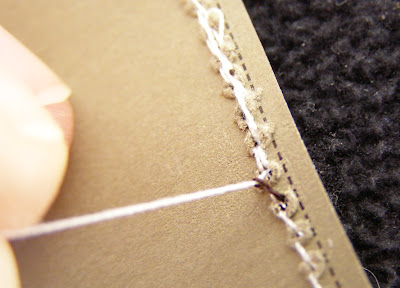
3. Stitch edges of text paper with machine. Pull ends of thread to the back of the text panel. Pull the thread end on the back side, so the front stitch loosens. Grab this loosened thread with your fingers and pull until the front thread end comes all the way through to the back, as shown in the photos.


4. Adhere stickers to card stock. Cut into strips. Adhere to front of bookmark. Stitch and pull thread ends through. Paint entire panel with a coat of mod podge. Allow to dry. Stitch ribbon tag to top.

5. Trim Card stock base slightly larger than text panel. Trim threads and adhere panel to base, making sure threads are completely tucked in.


Hope you enjoyed this and it has inspired you to create! Leave any questions you might have in the comment section and I'll answer them for you! Thanks again for coming to look!
tanis


16 comments:
Tanis, this is fabulous and makes me want to pull out my machine again. Do you always use two colors of thread when you sew?
oh my goodness, tanis!!
this is SO lovely!!
vintage & botanical & just my kind of thing. LOVE it ~ must go make one... :)
What a great tutorial, Tanis!! Love this bookmark, too! I've always wanted to try Modge Podge - now I must go buy some!! Beautiful!
GREAT bookmark Tanis . . . and what a AWESOME tutorial! :)
Hehe, I never really thought to look at the colours of my thread!! I never really care what's in my bobbin case - WAY too much trouble to change it up everytime...so YES, my threads are often mixy matchy!!
LOL!
But for the sake of the tutorial, I guess it worked out good to see the 2 different threads, huh? Hehe.
FABULOUS tutorial by a great artist! LOVE this and definately need to try this out when I get my sewing machine working!
What a great idea and so beautifully done! Thanks Tanis for sharing.
What a fantastic tutorial Tanis. The pictures are so clear and your directions are so precise and I love how you showed to pull the thread through. I love the book mark and you certainly have inspired ME! Thank YOU
So pretty, Tanis! Such a great tutorial, too! :-)
Great tutorial Tanis!
Soooo awesome Tanis! Thanks so much for the tutorial! I got a sewing machine for Christmas....yea! Still haven't used it!! You make it look "sew" easy!! :) Thanks! Just beautiful!
Love love love this ... I never think of breaking out the Modge Podge ... it makes me want to go hunting through the used book store again.
this is gorgeous Tanis! Thanks for the amazing tutorial. I am going to have to try this.
This is amazing, Tanis. I love all the stitching and vintage feel to it.
I love the step by step photo and they are so good!! How do you take your photos Tanis? Do you have a tripod?
What a great tutorial, Tanis!! Love this bookmark,
home jobs india
Post a Comment