Friday, September 10, 2010

Everyday Girl

As you may know, I featured our Everyday Boy sticker set yesterday with several Design Team projects. Today it's time for the girls! A few of our Designers went to work with this fabulous new sheet, Everyday Girl;


by Jing-Jing:


by Nina:


by Becky:


by Amy:


Remember, you have until the end of the weekend to leave a comment on today's and yesterday's posts for a chance to win our new Everyday Boy and Everyday Girl sticker sets! I'll be back on Monday, have a crafty weekend...


jenyfur


Thursday, September 9, 2010

Everyday Boy

It's an exciting day at SRM as we introduce you to one of our new releases, Everyday Boy, and treat you to what our Designers have done with it!


by Tobi:


by Tania:


by Norma:


by Jen M.:


You have until the end of the weekend to leave a comment on this post for a chance to win our new Everyday Boy and Everyday Girl stickers! Winners will be announced on Tuesday. Join me tomorrow for our Everyday Girl feature, and another chance to win!


jenyfur

Wednesday, September 8, 2010

Tania's Cupcake Tutorial


You asked for it, here it is...Tania's Cupcake Card, step by step. To get started, you'll need to print off the template sheet. Just right click on the template image, choose "open in new window", and print;


Supplies:
SRM Quick Card Sticker 52015 Party
kraft colored cardstock
textured paper (may sub. patterned paper)
small brads, gems &/or buttons
medium red button
templates (provided)

Tools:
pencil
scissors
paper piercer
paper crimper (optional)
adhesive


Card measures approximately 4 ½”W x 5 ½”H

1. Print templates, transfer to heavier material (i.e. cardstock or chipboard) and label for future use.
2. Cut kraft colored cardstock to 6” x 12”, fold in half.
3. Lay card base template against the fold where noted and trace onto card base. Cut out leaving the fold intact.
4. Trace cupcake liner onto brown or kraft cardstock, and cupcake icing template onto textured paper.
5. Add texture to cupcake liner (kraft cardstock) using a paper-crimping tool.


6. Embellish cupcake icing with brads or buttons. I like to use a variety of sizes of brads and then adhere a red button to the top to look like a cherry.


7. Adhere liner piece to card front, then adhere the icing piece.

8. Sometimes if you don't have exact placement or you don't cut exactly on the lines, your pieces might be slightly smaller than the card base. In this case just trim excess edges that show.

9. Add {Party} sticker from SRM Quick Card Sticker Sheet 52015.


10. Embellish inside of card as desired using the remaining stickers from the Quick Card sheet.


Thank you, Tania! Tomorrow begins our two-part showcase of our new Everyday Girl and Everyday Boy Stickers! Be sure to stop by to soak up the inspiration and make a comment for a chance to win our new stickers!


jenyfur

Tuesday, September 7, 2010

Birthday Cards by Tanis


Tanis has a trio of delicious birthday cards for us today...


Stitching and eyelets are just about all this card needs to set off the supersized SRM cupcake.


Love the collage of SRM sentiments in different fonts!


Such a clever use of a SRM sticker strip, embellished with scallops!


Tanis used a variety of our BIRTHDAY STICKERS. Click over to our online store and check them out!


You do not want to miss tomorrow's post - a Cupcake Tutorial by Tania! See you then, have a terrific Tuesday.


jenyfur

Monday, September 6, 2010

Guest Designer, Tanya Tahir!


We are so excited to feature our September Guest Designer, Tanya Tahir. Her style is beautiful & bold, and she did amazing things with new SRM Stickers. Here's Tanya!


My name is Tanya Tahir and I live in Perth, Western Australia with my husband and our two beautiful little boys. I started papercrafting in 2005. In the past two years I have become very passionate about card making and scrapbooking and usually do something scrap-related every day! I love layering, 3 dimensional and stitching, and you will find at least one of these on each project that I create. I love bold brights, but I also dabble in vintage and pretty soft colours, it all depends on my mood and inspiration. In my "spare" time I enjoy photography, traveling, reading and spending time with my family. I am so thrilled to be guest designing for SRM Stickers for September!

I absolutely ADORE using SRM Stickers. The quality is fantastic, they blend so well into patterned paper and cardstock. I also love the versatility of each design – they can be used on layouts as well as cards. The possibilities are endless!

You can view more of Tanya's work at her Blog, Sweet About Me.


Wow! Jaw-dropping work, Tanya! Thank you so much for Designing with us this month! Ok, so, you may want to know what's on tap for the rest of the week. Let me tell you, AWESOME stuff...I'll be posting a few features this week, using our new Everyday Girl and Everyday Boy stickers, along with Tania's now-famous Cupcake Tutorial on Wednesday. You don't want to miss it - we've received several requests for it!


jenyfur


Friday, September 3, 2010

Triangle Box by Carole


Happy Friday! Carole is here today, sharing a quick and fun trinket box tutorial. Carole used our Thanksgiving stickers, but you can just imagine the many themes and uses for this lovely little keepsake.


Here's Carole!

I have made this particular type of box lots & lots of times, for many occasions. What I like about these boxes is that they are beautifully simple to make, and the unusual shape is very impressive to family & friends. And variations? Oh, my. There are so many variations to try.

Though you may use any size of paper you wish, for these Thanksgiving table treats, I have chosen a size which will give me three boxes per single sheet of 8-1/2 x 11" cardstock. I started with a piece of cardstock 3-1/2 x 8-1/2" long. No matter what size of paper you start out with, the basic steps are the same.

Step 1: Score your paper in the centre on the long side: for my sample, at 4-1/4" on the 8-1/2" side.


Step 2: Flip your cardstock and mark the centre point on both of your short sides. here, at 1-3/4 inches on each 3-1/2" side.


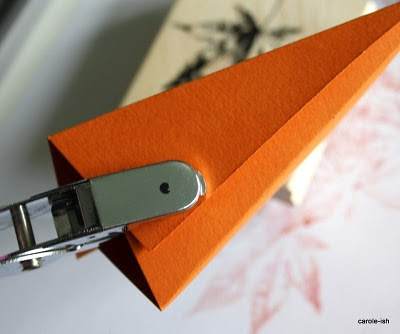
Step 3: Score your cardstock from the outer edge of that middle line to the marked centre point on your short side. Repeat with the other side of your paper. You will end up with a scored triangle, with your base being the middle of your cardstock, and the tip being the centre point on the short edge.


Make a second scored triangle on the bottom half of your cardstock, like so...


Step 4: If you wish, you can stamp an all-over pattern on your cardstock before folding and assembling your box. I stamped a sugar-maple leaf in both pumpkin and pomegranate coloured ink, for a rich, all-natural, Autumn-is-awesome effect.


Step 5: Punch holes in the top of your box on both sides, thread with ribbon, fill with candies, and embellish.


You can make these as party favours for baby showers, birthdays & weddings, for Valentine's Day, Easter & Halloween. I have even created a set 24 Christmas ornaments for my girls to hang on the tree, as a fun little count down to December 25th. I've started a new set here, to give you a general idea of how fun & festive they can look. Of course you can embellish these as simply or as elaborately as you wish! Mine are clean & simple, and show off our new "We've Got Your Number" stickers...


Fantastic tutorial, Carole, thank you! Makes me want to grab my trimmer, cardstock, and stickers -- a must-try! Have a great weekend, I'll back for another jam-packed week of new SRM Stickers projects from our amazing Design Team.


jenyfur


Thursday, September 2, 2010

Pixie-Licious Thank Yous by Tania


Tania calls these, "whatever cards", I call them spectacular! She mixed up Cosmo Cricket's Pixie-Licious with SRM Thank You Sentiment Stickers for a set of cards to have on hand.


Here's the sticker sheet Tania used -- she got 5 cards from it and has *plenty* of sentiments left over.


Be sure to pop by tomorrow for a Fall tutorial by Carole!


jenyfur

Wednesday, September 1, 2010

World Card Making Day, a Preview


Will you be one of the thousands of card makers participating in the various World Card Making Day events? We hope you'll make SRM Stickers a frequent stop as we have so much in store for you! I'll be featuring amazing cards created by the SRM Designers using SRM Stickers and Penny Black stamps! If you're a stamper, Penny Black fan, card maker, or you just want to win some new SRM, stop by frequently throughout the day, on October 2nd. There will be something inspiring to view, and something fabulous to win, every hour on the hour all day long. I know I'll be in a generous mood because WCMD happens to be my birthday as well!

Here's a look at a Fall card using SRM and Penny Black...I used stickers from our new Fall Sticker Sentiments;


I matted 3 stickers and used them as a collage sentiment on my card;


I used colored pencils and mineral spirits to color my Penny Black image. I also added crystal lacquer to certain areas, along with glitter.


Here's a little background on World Card Making Day;

World Card Making Day began in 2006 as National Card Making Day. Founded by Paper Crafts magazine to bring card makers together at the beginning of the busiest card-making season of the year, it was first held on October 7, 2006. The initial celebration involved the Paper Crafts magazine audience only; however, due to the positive response it received and the worldwide popularity of card making, the holiday became known as World Card Making Day from then on.

Celebrating its fifth year in 2010, World Card Making Day is celebrated annually on the first Saturday in October. It's a day for the card-making community -- hobbyists, retailers, and manufacturers -- to unite and celebrate the connection and creativity that is the heart of card making.


So, mark your calendar -- Saturday, October 2nd, and join us as we celebrate World Card Making Day.


jenyfur