
Happy Friday! Carole is here today, sharing a quick and fun trinket box tutorial. Carole used our Thanksgiving stickers, but you can just imagine the many themes and uses for this lovely little keepsake.

Here's Carole!
I have made this particular type of box lots & lots of times, for many occasions. What I like about these boxes is that they are beautifully simple to make, and the unusual shape is very impressive to family & friends. And variations? Oh, my. There are so many variations to try.
Though you may use any size of paper you wish, for these Thanksgiving table treats, I have chosen a size which will give me three boxes per single sheet of 8-1/2 x 11" cardstock. I started with a piece of cardstock 3-1/2 x 8-1/2" long. No matter what size of paper you start out with, the basic steps are the same.
Step 1: Score your paper in the centre on the long side: for my sample, at 4-1/4" on the 8-1/2" side.

Step 2: Flip your cardstock and mark the centre point on both of your short sides. here, at 1-3/4 inches on each 3-1/2" side.

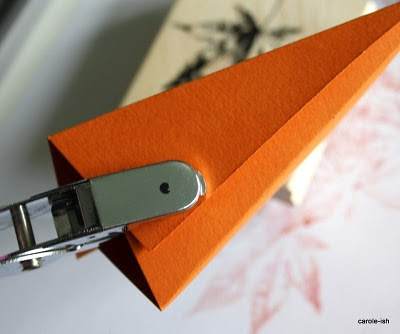
Step 3: Score your cardstock from the outer edge of that middle line to the marked centre point on your short side. Repeat with the other side of your paper. You will end up with a scored triangle, with your base being the middle of your cardstock, and the tip being the centre point on the short edge.

Make a second scored triangle on the bottom half of your cardstock, like so...

Step 4: If you wish, you can stamp an all-over pattern on your cardstock before folding and assembling your box. I stamped a sugar-maple leaf in both pumpkin and pomegranate coloured ink, for a rich, all-natural, Autumn-is-awesome effect.

Step 5: Punch holes in the top of your box on both sides, thread with ribbon, fill with candies, and embellish.


You can make these as party favours for baby showers, birthdays & weddings, for Valentine's Day, Easter & Halloween. I have even created a set 24 Christmas ornaments for my girls to hang on the tree, as a fun little count down to December 25th. I've started a new set here, to give you a general idea of how fun & festive they can look. Of course you can embellish these as simply or as elaborately as you wish! Mine are clean & simple, and show off our new "We've Got Your Number" stickers...

Fantastic tutorial, Carole, thank you! Makes me want to grab my trimmer, cardstock, and stickers -- a must-try! Have a great weekend, I'll back for another jam-packed week of new SRM Stickers projects from our amazing Design Team.
jenyfur

6 comments:
Fantastic tutorial, Carole!! Love it!! Can't wait to try it!
very fun - thanks for sharing the details on how to do it.
Barb Housner
Chic and beautiful! Very inspiring work, Carole!
Awesome tutorial and I am going to have to lift this idea. So beautiful and elegant too!!
That is just TOO DARN CUTE, Carole! I will definitely be giving it a try! :-)
Amazing!!! Love it all!
Post a Comment