Showing posts with label Michele Kovack. Show all posts

Monday, June 4, 2018

Love is Patient by Michele


Good morning! Michele here with a card using the new Bible Margin's Love stamp set
I truly love this verse......there is so much truth to these words. 

I used a stencil to create a soft wood grain texture to the background. 
I stamped directly over it using black ink and my Mini Misti.  I stamped it 3 times to get a crisp, black impression. I added a bit of color using my Copic markers. 


I added a couple of strips of blue card stock and added cream colored twine and a couple of pink posies. Lastly, I added a few pink gems scattered about the card. 


Thank you so much for stopping by today!

Monday, May 28, 2018

Faith Card by Michele


Good morning friends! Michele here with a card using the new Bible Margin's Love stamp set.  I stamped the sentiment with Versamark ink and heat embossed it in gold.  I added a bit of color to the hearts with Copic Markers.  I inked up the panel with a bit of soft blue and pink.  I went a bit glitter crazy and added it to the edges of my sentiment. 


The card itself was a cut from Silhouette.  I added more glitter to it and pink gemstones. I love how soft and feminine it turned out. 


Thank you for spending a bit of time with me today!

Monday, April 30, 2018

Bible Bubbles Card by Michele


Good morning! Michele here with a fun Bible Bubble card! This is one of SRM's new sets and I think it is so cute! I used a stencil and inks to create a subtle background.  I stamped each bubble sentiment in black ink and gave it a bit of depth with gray Copic markers.  


I also colored the hearts with red Copic markers.  I added glossy accents to the hearts and each of the bubbles for dimension.  


For a few last minute touches, I added a few rhinestones and red twine to bring out the red in the hearts.  


Thank you so much for stopping by today!

Wednesday, April 25, 2018

"We Love" Card by Michele


Hello there! Michele here with a card using the Bible Margins Love stamp set.  I wanted a soft background for the sentiment so I used a stencil and dye 
inks to create the polka dots.  I used a scalloped die to cut the panel into 
two pieces.  The sentiment (which I love) was stamped in black ink directly 
over the polka dot panel.  I used a Misti to be sure I could stamp it a couple 
of times for a crisp black sentiment.  


I popped the panels over a piece of patterned paper I had laying on my desk.  
It had similar colors and I liked how they worked together.  To finish the card, 
I added a few sequins and two colors of silk ribbon. 


Thank you so much for popping by today for a visit!!

Wednesday, April 18, 2018

Hello! Card by Michele


Good morning! Michele here!  I am so glad to "be back!"  I recently moved into a new home and had to wait patiently while my craft room was being painted, decorated, and the zillion boxes unpacked and organized! But I am officially back now and couldn't be happier!  
I created this card with a stamp I found during my move and thought it would pair beautifully with SRM's BIG Hello stamp set!


This large bold sentiment was perfect!  I wanted to "ground" it, so I decided to stamp a few stitches using the Stamped Stitches set.  I added a bit of ribbon to finish the card.


So glad to be back!
Thank you for stopping by today!

Thursday, February 1, 2018

Water Color Thank You by Michele


Good morning friends!  Michele joining you today with a fun card today that was a result of just playing around with water color twist pencils.  I "smooshed" a bit of the water color pencil on to an acrylic block and mixed it with water.  I used the wet on wet technique, meaning the paper was also wet.  This gives a lot of movement to the colors, which I like a lot! Once all of my various pieces were dry, I cut them into diamond shapes and placed them on the edge of the card. I cut the excess off.   


I added glossy accents to the diamonds and set aside to dry.  Once it was dry, I added a strip of silver sparkly paper and SRM's thank you sticker.  I adhered a few rhinestones and a simple knotted ribbon.  


Thank you so much for stopping by today!

Friday, December 29, 2017

Holiday Cheer by Michele


Michele Kovack is so glad she participated in the recent Coffee Lover's Blog Hop!   She used this cute little Coffee Plans stamp set from SRM Stickers!


For her card, she wanted to create a background using the coffee cup.  She stamped it in a brown ink and used Prisma Colored pencils.  Then added a sentiment from the Stickers by the Dozen collection across the front.  She tucked a red die cut leaf behind it.  (After the leaf had been given a coating of glossy accents and glitter!)


Michele added a bit of rustic twine tied into a bow.  She scattered several gems and stars to the front. 


Michele rounded the back panel's edges on two sides and adhered the entire front to a kraft card.


Thank you all for stopping by!  We appreciate your visits!

Monday, December 25, 2017

Holiday Cheer by Michele


Good morning!  
Michele here! It is hard to believe that Christmas already here! 
I stamped this card and colored it with Copics. I added some fun details with a White Gel Reminisce Pen! I drew stripes on the present and cute polka dots on the little girl's dress. 

This card would be fun to give to anyone during the holiday season.  There's 
still time to create it! :).


I added a bit of glitter too for some holiday sparkle!
I tied pink/white twine vertically with a couple of matching jingle bells.  As a final touch I adhered a sentiment from the Stickers by the Dozen/Gingerbread Man.  


Thank you for stopping by today!!  And have a very merry Christmas from all of us at SRM Stickers.  

Tuesday, December 19, 2017

Last Minute Gifts! by Michele


Good morning! Michele here with a quick gift idea! I am a school teacher and I like to get all of my coworkers a little "somethin', somethin," without breaking the bank.  And immediately my mind goes to food.  Because who doesn't love food?  I have a basement piled high with alterable items, so I grabbed a bunch of these mini glass jars. 


I put two strips of double sided tape and sprinkled them with glitter.  I used my Silhouette to cut the bows and adhere them to the top of the jar.  I placed this cute gingerbread sticker from Stickers by the Dozen, on a piece of vellum and cut it out with a circle punch.  I tucked it under the bow, adhered it in place, and voila!  Easy peasy, lemon squeezie! (I have been teaching 9 year olds a very, very long time!)  

Thank you for stopping by!!

Tuesday, October 31, 2017

Shaker Christmas Ornament by Michele


Good morning my crafty friends!  I know today is Halloween but it's beginning to feel a lot like tie to make some Christmas crafts.   Michele here with something fun for the holidays!  It is hard to believe how fast this year is flying by!  Christmas is just around the corner!

Every year I make ornaments.  Some I give away and one of them I keep.  My tree is full of ornaments I've made...along with my kids's ornaments from when they were little!

I created this ornament with 2 dies with an oval cut out of the window.  I used the Fancy Sentiments Sticker to place right over my acetate window and trimmed the excess off. 


The ornament was cut using water color paper and given a coating of Tim Holtz inks.  I spritzed it with water for a fun effect! I topped it with a poinsettia colored with Copic markers, leaves, silver jingle bells, and silver twine. 


So glad you stopped by today!
Have a great day!

Wednesday, October 18, 2017

Pumpkin Candy Boxes! by Michele


Good morning!
Michele here with some fall treats!
I think these little clear boxes are so dang cute!
I took a piece of burlap and adhered it to the outside of the box.


I cut a bunch of pumpkins with my Silhouette. I inked the edges and layered them using Crafty Foam Tape.   I did a bit of Copic coloring on the leaves and layered everything on to the top of the box.  I added a sentiment from the Express Yourself Halloween Sticker set  I even cut out the teeny candy corn and adhered it to a clear button. 


I tied the black and white twine and tucked the sentiment underneath and glued the button/candy corn to the top.  


My boxes are all ready for my co-workers to receive, for a little sweet pick me up!! 

Have a great day!

Friday, October 13, 2017

But First Coffee....by Michele


Good morning crafty friends!  
I will be the first to admit that I am a bit addicted in love with coffee!
I love everything about it....the smell, the taste, the comfort it provides.
I know I can't be alone in this sentiment.....please tell me I am not alone! ;)
I used SRM's Coffee Plans set for my card today.

I used my Silhouette to cut the word coffee.  I stamped the coffee bean in a light brown on cream colored card stock.  I adhered the die cut.  I stamped the words, but first and #caffeine please, using my Mini Misti for proper alignment. 


I added little red punched hearts and adhered tiny flowers to the centers using glossy accents.  I also added glossy accents to the sentiment. Once it was dry, I used a bit of black dimensional accents around the hearts. 


Thank you for stopping by today!
Michele

Tuesday, October 10, 2017

House Warming Card and Gift Bag by Michele


Good morning! Michele here with a couple of cards and gift bags that I thought would be perfect for enclosing a gift card for a new home owner or a recent college grad! 
I used my Silhouette to cut the silhouettes! I adhered a dream sticker from the Everyday Life collection.
I added a few sequins and some glitter glue to the heart. 


I am in love with these cute striped bags!  I added a silhouette and a sentiment from the Everyday Life collection. I wanted the word, Life to stand out, so I colored it with a pink Copic marker. 


I am loving the colors here of mint green, turquoise, and hot pink! 


I did the same set but used the pink polka dot bags instead and a slightly different color combination. I used the same sticker for the bag and again colored it with a pink Copic marker.  


Pink and baby blue....doesn't get much sweeter!


Thank you so much for stopping by today!!

Tuesday, September 26, 2017

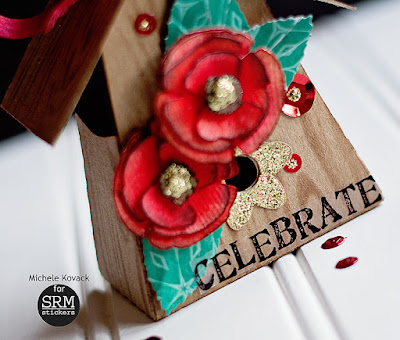
Birdhouse Gift Box by Michele


 Good morning my friends! Michele here with a bird house shaped box!
Every now and then I love to dust off the ole' Silhouette and do something "outside" the box!  (Sorry, I couldn't resist!) ;)


I cut the bird house out of kraft card stock.  I stamped it with a wood grain texture and assembled it.  I added flowers, leaves and a few sequins. I decided to finish it off with an SRM sticker!  Mine is from the Happy Birthday Sticker Sentiments, which is no longer available, but you can find a very similar sticker in the Sentiment/Congratulations sticker sheet!


Here is one last look at my bird house in all of its glittered glory! 


Have a wonderful day my friends! Thank you for stopping by!

Wednesday, September 6, 2017

Winter Treat Bags (A Bit Early!) by Michele


It's never too early to get a jump on your holiday projects right?  
I always find it funny when I am creating for Christmas and I am in shorts, AC, and it's 95 degrees outside! ;)
I am totally in love with these new linen bags!
I decided to add a dot of Silver Stickles to the center of each dot for added sparkle. 


The flowers and snowflakes were cut using my die cut machine. 
I added more Stickles to the centers of the flowers.  


I stamped the word "WINTER" on a tag and embossed it in white.  I stamped the snowflake in a pale pink on a circle and then adhered it to the tag.  I added silver STickles to the center of the snowflake. 


I added silver jingle bells, silver string and tinsel and glued it underneath my snowflake/flower combo. 


Thank you for stopping by today! 

Thursday, August 17, 2017

Back to School! (Already?) by Michele


It is hard to believe that back to school is right around the corner! Which means this gal right here is back to work soon! ;)  I used the new Fall Plans Clear Planner Stamp to create this card for my son. 
I stamped the checks  in a horizontal pattern.


I broke up the checks with my sentiment, the row of apples, and the glittery strips.  I used my Mini Misti to line my apples up.  (Otherwise they definitely would have looked wonky!)  I added black  jute at the top and 3 epoxy circles to balance the card.  


To create a bit more interest, I added glossy accents to each apple. I also used a white gel pen to add the highlight. 


Thank you so much for stopping by today!!

Monday, August 7, 2017

Linen Bags! by Michele


Good morning friends, Michele here with a fun holiday project!  I am totally loving these new linen bags! The polka dots totally slay me!  I often pull inspiration from the stuff collected on my desk from other projects, like these red flowers. This was my starting point. 


I decided to punch a black tag and stamp and emboss the little cup and sentiment from the Fall Plans Planner stamp set.   I loved the little checkerboard pattern and stamped that between them for a bit of interest.  I dabbed my finger in a bit of white ink and ran it over the edges to give a chalk board effect.  ( A technique I hadn't used in a LONG while!) ;) 


I added green glittery leaves and gold twine nestled under the flower. 


For the holidays I will slip a few packets of hot cocoa in each bag and leave it 
on one of my co-workers' desks to brighten their day!