Showing posts with label Take 2 - Stickers by the Dozen. Show all posts

Thursday, June 14, 2018

Volleyball Card by Karen


Hello!  Karen with you today to share a fun card.  My daughter is soon finishing up her first year of volleyball. With the Stickers By the Dozen, Take 2 Volleyball sheet, it was easy to create a quick and customized thank you card. 


My daughter's team is yellow, so I used that as my main color. The volleyball sticker is backed on a yellow circle and popped up from the card with foam tape. The green glitter flame was cut with my Cricut. A little bit of string (like the volleyball net) tied on the side finished it up. Thanks, coaches, for a fun season!


For this card I used:

Friday, June 8, 2018

Thank You Tubes by Angie


Hello SRM friends!! Angie with you today!!
I have a cute idea using SRM's clear tubes.


I used the clear tubes and filled them with wildflower seeds which would make adorable thank you gifts for a garden themed party!! 

I used several SRM stickers to embellish the tubes with and then attached the scalloped circles with twine. They were so quick and easy to make but they turned out so cute!


I hope you give these thank you gifts a try for your next party!

Other supplies used:

Tuesday, May 15, 2018

Love is card by Shelly


Hey y'all! Shelly, here.
Today, I'm sharing a sweet and simple love card with you.


I started with my background panel, which instead of leaving it plain, I used a floral embossing folder with it. (I apologize that my photo did not capture the embossing.) After, I added some white lace at the bottom part of my embossed panel and then a strip of washi tape as well as my sticker sentiment. For both my washi tape and sticker sentiment I added them on a piece of white cardstock and then added foam tape on the backside. 


To finish my card off, I added my panel piece to a soft stone cardstock base and then added a wood button and some twine. Simple, yeah?!...

SRM Stickers supplies:
Twine

Thursday, May 3, 2018

Grad Card Season by Shanna


Hi SRM family!  Shanna here today to show you a couple creative cards to celebrate that special graduate in your life!  My oldest is about to finish her junior year in high school...so NO graduating this year (this mama can't even!) but she does have a few good friends who will be graduating.  I took the opportunity to create a couple cards utilizing her school colors, black and purple, but they could be easily modified to whatever color scheme needed. 


 I discovered I don't own many graduation stamps, but I really wanted to stamp on these cards. So I sifted through my SRM stamps and came across my Birthday Plans set...BINGO!  This set worked perfectly to create some backgrounds to die cut out for my cards!  I first stamped out "panels" of the images I intended to die cut, and then ran them through the big shot with my die of choice.  I grabbed my Take 2 Stickers by the dozen/Graduation stickers for my medallion sentiments and my cards were complete!
 I used the celebrate border stamp, hooray, and the balloon icon to make a total of 3 panels.


Take a look and let me know what you think!


I really wanted a bolder splash of color, so I chose to watercolor the balloons purple with my watercolor twist pencils.  Easy peasy and just what I had envisioned!
Supplies used:
Miscellaneous purple twine
Versafine Black ink

Thanks for stopping by!
Until next time,


Tuesday, May 1, 2018

Graduation Shaker Tag & Gift by Shelly


Hey y'all! Shelly, here.
Today, I'm sharing a fun and simple graduation gift with you.


I started with my gift box. I used a SRM Stickers kraft box and a large SRM Stickers patterned bag for 'wrapping paper'. Simply cut the patterned bag on the sides and lay flat. Then wrap your box. Easy peasy, right?!...


Next, I made a shaker tag. I used a fun die along with some silver glitter cardstock and some sequins. Once I done with my shaker part, I added a simple SRM Stickers 'grad' sticker. Which I placed on a piece of cardstock underneath along with some foam tape and then placed it on my tag. After I added it to my gift. Fun and simple, yeah?!...

Thanks so much for stopping by!
Enjoy your day!

SRM Stickers supplies:
Large Patterned Bag-Striped Black and White

Friday, February 2, 2018

Birthday Gifts with SRM Tubes by Giorgia


Hello SRM friends, Giorgia here with an idea for a sweet birthday gift: many of my colleagues celebrate birthday in January, so I made them a little something.
 SRM mini tubes are my go to when I need a cute package for chocolates and sweets: how cool is that you can see through the tubes and be amazed with all the sweetness inside? It really screams open me, eat me!

I filled SRM mini tubes with chocolates and I decorated them with Stickers By The Dozen/Birthday stickers by wrapping around them different strips.
Then I embellished the tubes with jute twine and other stickers. 


I adhered clear stickers on punched pieces and on white cardstock that I cut in a banner shape. In just a few minutes I created a cute gift to brighten my colleague's day and celebrate them!


Until next time,


ciao, Giorgia


SRM products used 
SaveSave

Wednesday, January 3, 2018

Christmas Layout by Karen


Hello!  Karen here today to share a special layout 
Christmas to document my family's special time together at this most wonderful time of year.   


I love to preserve our Christmas memories in our scrapbooks. This layout came together so quickly, which is a must in this busy season. 


Two patterned bags provide not just a fun background, but a convenient spot to slip in extra photos and my daughter's letter to Santa. 


Lots of layering of SRM's clear holiday stickers bring this layout to life.

For this project I used:

Monday, January 1, 2018

Hello 2018 by Shantaie


Shantaie with you today to help ring in the New Year!


I'm that person. The one that inevitably forgot to send at least one person a Christmas card, or that received a few cards from friends and family but never got around to sending one to them. I find sending a New Year's card to be a great way to stay in touch when Christmas slipped past me! 
I also love making New Year's cards because they give me the opportunity to send a year full of wishes while using as much sparkle as my heart desires! 

This card uses this cut from the Silhouette store, and was used as a shaker design filled with sequins and shimmer confetti. I added a star border from take 2 stickers by the dozen graduation ( I love using stickers in more than one way!) and the sentiment from express yourself new years was added to a white strip of cardstock and popped up with foam tape. 


This card will fit in a business size envelope and is surprisingly quick to put together making multiples a snap!
Happy 2018 to you!

Thursday, December 21, 2017

Christmas Kraft Gift Bags by Giorgia


Hello from Susan!  We have so many wonderful Christmas ideas that I decided to double up on blog posts so we are doing 2 posts today.  The first one was a 12:01 AM and this one is at 12:01 PM!  Still plenty of time to create this fun idea from Giorgia Rossini! 


----------------

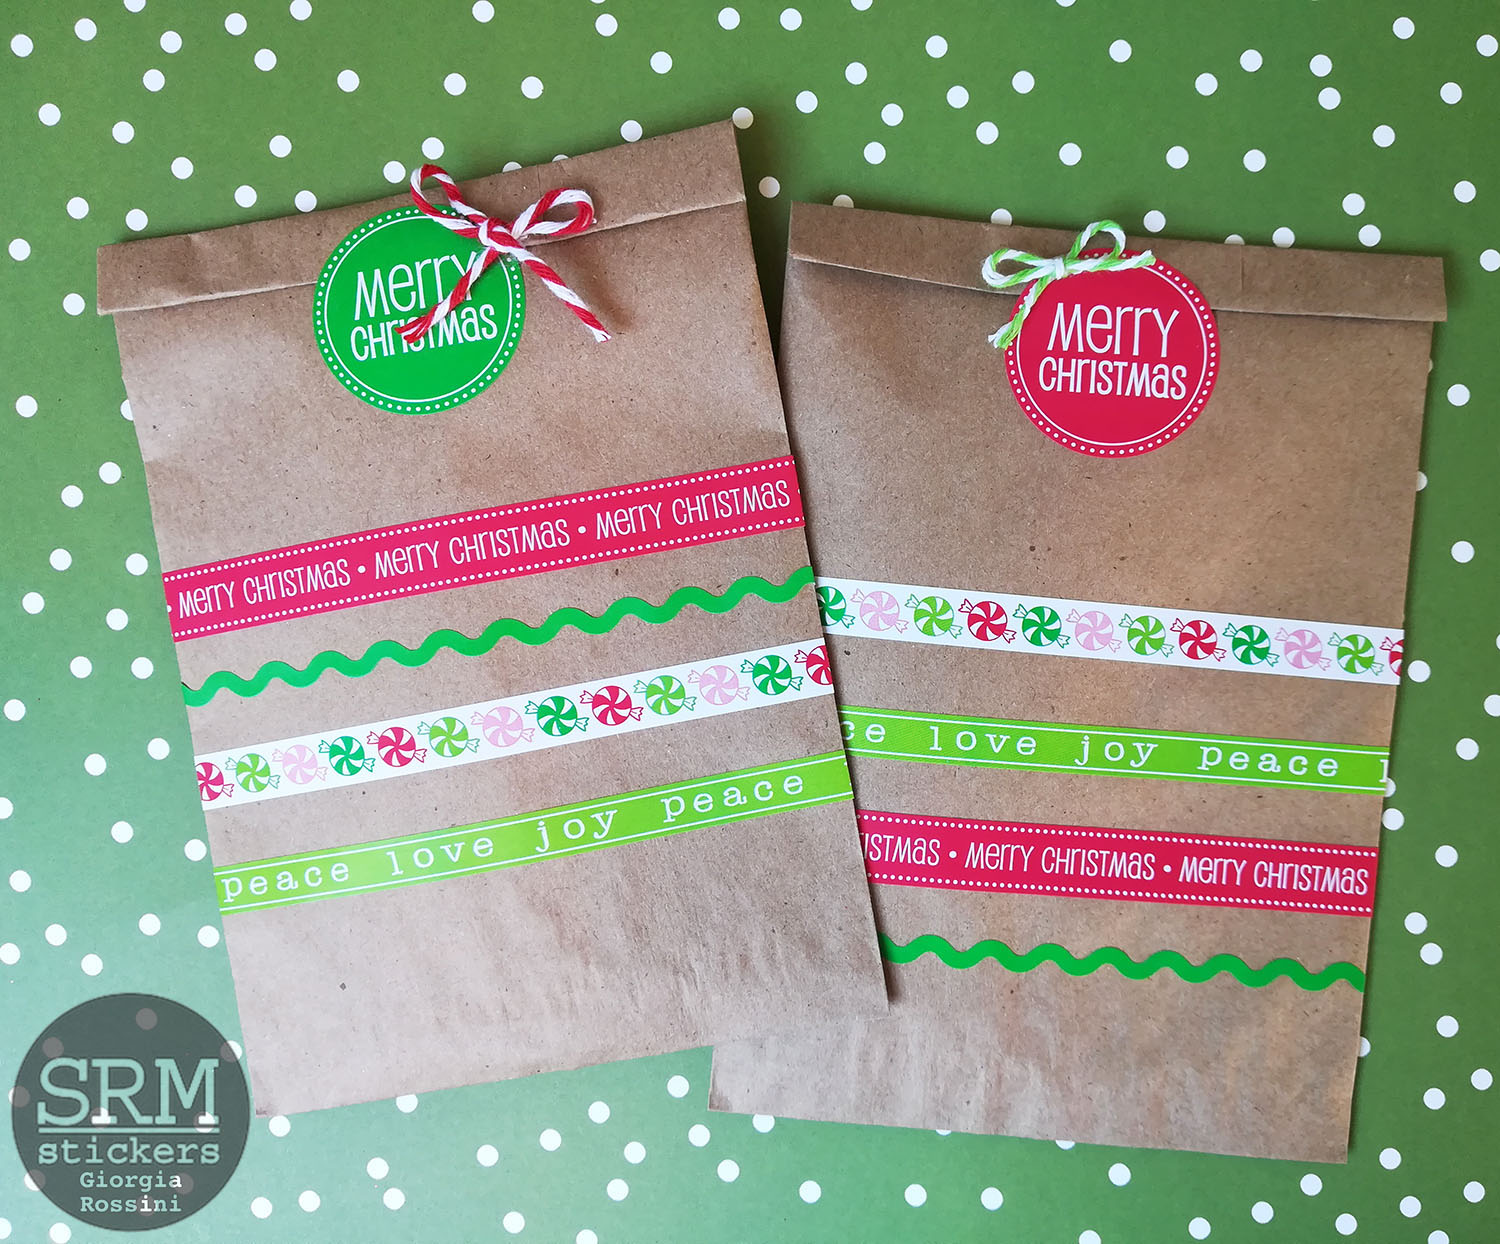
Hello SRM friends, Giorgia here today with you to share a Christmas packaging that's perfect for last minute gift wrapping. I love to create handmade packaging and with SRM bags and stickers it is really quick and easy.  I love SRM kraft bags, they are so versatile and you can decorate them in so many different ways!


Here you can see my gifts: handmade bookmarks (with SRM Stickers!) - I will tell you soon in another post how to make them too, so stay tuned for it - and a mini candy cane. These are for my colleagues.I gathered all my SRM Christmas themed supplies and started having fun! 


I decided to use Stickers By The Dozen/Christmas. I wrapped the strips of stickers all around the bag creating a decoration. To close the bag I fold the top and add the round stickers. I decorated the stickers with a twine bow.
I created two similar bags: by changing the position and colors of stickers and twine here they are two cute bags. 


And you? How do you wrap your small Christmas presents? I would love to see it!
Until next time,
ciao, Giorgia


SRM products used 

Thursday, November 2, 2017

Die Cut Background Christmas Card by Tobi


Hello there! It's Tobi Crawford here with a colourful and cheery holiday card!
It's never too early to get started on making Christmas cards.  I love this idea.


This was made using a few basics from around the ol' craft room:

Patterned Paper
Die Cuts (Tim Holtz by Sizzix)
Cardstock
Glitter Glue


I die cut the words from three different colours of cardstock and left some letters in, and let others fall out. I like that kind of haphazard look! 


PRO TIP:


If you want to use glitter paper as a background to your design, CUT OUT THE MIDDLE!! That glitter paper is precious, am I right? I used a pen-knife to cut out the middle and now I have another good-sized piece for the future! 

Thanks for stopping by.  

Thursday, October 12, 2017

Soccer Champ Layout by Emma


Hello SRM fans!  Emma here today to share a quick and easy soccer-themed scrapbook page with you.  You may have read in my bio that I am originally from England, having moved here to Ontario, Canada over 10 years ago.  Soccer (or football as we prefer to call it) is a huge part of a lot of British people's lives, as the most popular sport.  It's fair to say I am a big fan, and have followed my London-based team, West Ham United, for over 35 years.  They aren't the most successful team (to put it mildly), but I can't imagine supporting anyone else.  Luckily the TV channels here show a lot of the games, so I don't miss out as often as I did when we first emigrated.
Canada is very focused on ice hockey, but they do also have a lot of kids' soccer programs which is ideal for our family.  My son has played for the past 2 years, and really loves it.  

SRM has some terrific soccer-themed items, so for this project I chose the Stickers By the Dozen pack, and the Express Yourself Everyday Boy set to make my scrapbook page of this year's soccer pictures.


I used a plain blue cardstock background, and some patterned paper from Fancy Pants Designs to complete the page.  The date was stamped using the SRM Today, Tomorrow, To Do clear stamp set.


This was such a quick project to make, all thanks to SRM's products!  Scrapbooking in a jiffy, as we would say in England.  As a Mom, I am hoping for the day I can scrap pictures of my son playing for my beloved West Ham, or indeed for England.  He could even choose to play for Canada if he wanted to, thanks to our dual citizenship!  

I hope you've enjoyed my project, and thanks so much for visiting 
with us today.
Happy crafting,
Emma 


Thursday, September 14, 2017

Mixed Media Halloween by Tobi


Hi there, it's Tobi Crawford here with some mixed media fun! Halloween is a great reason to get a little messy with your projects, and it's fun to let loose and experiment a little.

I used a 3x3x3 Kraft box as my base. Before I assembled it, I did some stencilling, and misting and created a fun little background for the vampire (Sizzix). 


(For all of the stencilling I used Tim Holtz Distress Oxide Inks)

Once all of the sides were decorated, I folded the box into place and added the sentiment and vampire!


Thanks for stopping by! 

Friday, September 8, 2017

Birthday Card Set by Karen


Hello!  Karen here today with a fun birthday card ideas!


Do you still send out birthday cards to friends and family? I'm not always perfect at it, but I do enjoy sending out handmade birthday greetings. Last week I dug into my stash to look for a birthday card and discovered I was out (sorry to all those early August b-days).

When I need to make a lot of cards, I settle on one design that I can duplicate easily. For this set of birthday cards, I used my die-cut machine to cut and assemble several cupcakes. I find it easier to do several images at the same time and make a sort of assembly line process. To fancy up these cupcakes, I even added some glitter at their final stage.

Once all the cupcakes were assembled and dry, the cards were super easy and quick to put together. I used plain white cardstock for the base and two layers of patterned cardstock on the front. Then I added one or more cupcakes and a clear sentiment sticker or two. There are so many to choose from in SRM's collections.


As seen in the first photo, I packaged up a few to share. Five cards plus envelopes easily fit into a flat glassine bag touched simply with a ribbon, "just for you" sentiment, and a green stripe at the bottom.

Do you need more SRM Birthday stickers?
Check out the birthday section of the SRM Store!  

For this project, I used:

Monday, September 4, 2017

Summer Baseball Layout by Samantha


Hello! Samantha here today to share a summer baseball layout with you. I'm just using some SRM stickers and creatively cut card stock for this layout. 


I love mixing and matching patterned papers, so I thought I'd give myself a bit of a challenge and create a layout without any patterned paper. It was a bit hard for me, but a lot of fun, and a great way to let my SRM stickers really pop on the page. To add some interest to the plain card stock, I used a Silhouette Cameo to cut some designs. 

Then, I let my stickers, photo, and journaling tell the story. The grungy 2017 from the Year of Memories Sticker set was a great fit for this post game photo.  


The big baseball sticker and baseball themed words from Take 2: Stickers By the Dozen Baseball leave no question as to what sport this layout is all about, and they match perfectly with the color theme of our team's uniforms! 


Finally, I added a "LOVE" sticker from Love Sentiments, because coaching my son's 3 grade baseball team this year has been so very much fun, and I've loved every minute of it. 


Next time you're telling a story on your layout, reach for a few SRM stickers to help you tell it, just like I did with this summer baseball layout! 
SaveSave