Virginia Lu created a tutorial with a simple and fun formula; Diecut + Coffee Sleeves = Personalized Chipboard!
Gather the supplies and chose the diecut shape that you want to use;
![](https://blogger.googleusercontent.com/img/b/R29vZ2xl/AVvXsEiARYtPs9a8vYs2Y69fMzFcPLovOXzj-OWGsv9yyMq0mK0sBN6wfUi0eouLprsI4j9IM2tpgZu6i71pCyyBXhqYh2UGdoxSHeaQhpgZOPUID-1-j893uyhLadTpge5Riq30ia24tK-52k8/s400/1)
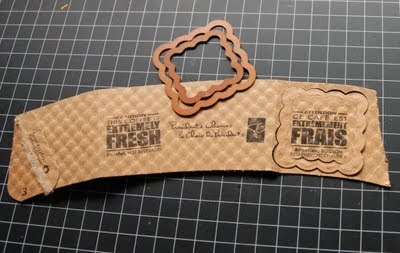
Run the Cuttlebug/Big Shot like you normally die cut the pieces (bottom-A plate, middle-C plate, diecut piece facing up, coffee sleeves, B plate on top);
![](https://blogger.googleusercontent.com/img/b/R29vZ2xl/AVvXsEhV6pnST-qA3uLBqXEnq8VdFD4XduI631Grf9gzXNocqGG-bulwoILAOrwGjtq6LIYTE_KYCh-9xJ2m9QBTNu7BPJvqpcz3gerkG4behRT0UYMBZBufpgluJFnwaYVBYBCQGVnRXjblO6c/s400/2)
After cutting them out, you can stamp or paint them. Here I painted the "chipboard" with Rangers Acrylic Paint Dabbers (Sunshine Yellow, Red Pepper,Sunset Orange), let dry;
![](https://blogger.googleusercontent.com/img/b/R29vZ2xl/AVvXsEhklj1ra4tMq-cUf36oJDck9tsOEdzReYF30psX-oqelZcAe519S0bEgKM9vnSITVxHGeI0Hv9QWGYPWQ0wb0c3Sl0vp0NW_lQzJOuMIqZirw3I6uIMeElKuZtBJJ8dw26TODAK1j4kmWM/s400/3)
You can add more colors and textures by stamping over the chipboard;
![](https://blogger.googleusercontent.com/img/b/R29vZ2xl/AVvXsEiIufmJCCbjcJszKrQfgrQx3a4rdM7zqQan-qnM72NaXjV7YTkwkdwXZhe-0AfelpnmUbarKZmLR_R1af_CUT3eVcJh_eh5WekVDU4hdkgB742ZTzbylfBhJUJC2tXb_m63gCgUmneGYcU/s400/4)
You can choose any size or shape to customize them for your card or scrapbook layout. The best thing is that SRM Stickers work so beautifully with them;
![](https://blogger.googleusercontent.com/img/b/R29vZ2xl/AVvXsEiUgJiUlSbmKEqMzMrzD6ErTYdKVwtyPo7XcaglEztaYpYYHoq-2bhyphenhyphenKe0nP6uNyBFaLNyRY_mkUjIuuFLWOUe3TN9hwoT_ry_KyhrGQmVvF4V9MB3lzZp3KuqNC6FOvtWs91iZonEZzvE/s400/5)
And...the results!
![](https://blogger.googleusercontent.com/img/b/R29vZ2xl/AVvXsEjKnTkDb95Inxzh3JdY1IyMMgIrdrU0gZ2ig8JI-zw2Aqt5Le_mQAKXY-KDFX_ykpw5eAZDVj-vTXd6t7NoCcOz8H_Z67qJK6O8TL3Rv2l0HoJoSbLMKqntSOChSCwb8BcB3qXbnSb3_zw/s400/6)
![](https://blogger.googleusercontent.com/img/b/R29vZ2xl/AVvXsEg_E2Lxgvon4FlfzLU6unsMdq1cLiXf3cow4UxfBjgAdT1hs0ik-c7rx3wkf_o1cxj7FIeFgcRuCubPhlWEtBnLXQDllcgL-K0UUTVHknBWiUctk4vxbwit8usn-uPjGAcRrvjgitD7ee0/s400/7)
![](https://blogger.googleusercontent.com/img/b/R29vZ2xl/AVvXsEgC-1hyTA3oz_osTC1XeJoMi-vNUgUx7WlKkAWwhmh1c1fxuOhyCIQqC4rKxn3BU8f8WSVYkaMgNsbGToyNVFU7eJjEIzY4rgbDC5ItiDx4NGV9sSXTelvgkpY6FFZX4L5WIIhAmfsswUI/s400/8)
Thank you, Virginia! We have another tutorial for you tomorrow, be sure to stop by the Blog!