Showing posts with label Embossed Kraft bags. Show all posts

Monday, March 26, 2018

Watercolor Spring Bouquet Card by Emma


Hello there!  Emma here today to share a sweet and easy Spring card using SRM supplies.

After a long hard winter here in southern Ontario, I'm sure I'm not alone in looking forward to Spring!  (As I'm typing this, it's actually snowing outside again, so yes, REALLY would like to see the end of that as soon as possible..)


So to start this card, I stamped some flowers onto watercolor paper from the SRM "Just Believe" stamp set.  As some stamping ink reacts with water, I recommend a waterproof ink such as Versafine or Ranger Archival.  I wanted to use a colored ink, so for this I used "Warm Sunshine" crisp ink by Altenew.


To color the flowers, I used the Watercolor Twist pencils by Marvy, and a waterbrush.  It makes it so easy to get a nice soft watercolor effect.


Once this was dry, I fussy-cut the flowers out of the paper and set aside.  I adhered a couple of pieces of co-ordinating patterned paper on a white card base, then used a Kraft embossed paper bag.

Inside the top of the bag, I cut freehand some green 'leaves' and arranged them.  I then adhered my watercolor flowers on top of the leaves to make a Spring bouquet!  I tied some jute string around the bag for an extra fun element.

As finishing touches, I added 'Hooray!' from Sticker Sentiments "Thinking of You" and 'Spring' from Express Yourself "Easter" stickers.


So there you have it, a very cute card to send to a friend who is happy that Spring is here (or almost..)!
Happy crafting,

~~ Emma ~~


Supplies:
White watercolor paper
White cardstock
Green cardstock
Patterned paper
Glue dots / liquid adhesive


Tuesday, December 13, 2016

Holiday Treat Containers by Samantha and Melanie


Today we have a special treat!  Actually 2 special treats!  Samantha Taylor and Melanie Jarocki both have ideas for last minute treat projects.  You will have plenty of time to create them!  

Let's take a look at Samantha's project first...

Hello! Samantha here with you today sharing a holiday treat container with a surprise. Years ago we started to find unique and sometimes silly ways to give my nephews money for birthdays and Christmas. Today I'm sharing how I used some fun SRM containers to come up with this year's Christmas gift. 


These may look like simple candy containers made from the Small Clear Take Out Box and the Clear Rectangular Box, but they hold a secret inside. 


I put their Christmas money in a Tiny Tube...


then I nestled it inside one of the clear boxes and filled in all the space around the tube with their favorite candy. 


I finished off my treat boxes with stickers from We've Got Your Sticker Merry, We've Got Your Sticker Plus Christmas, and We've Got Your Border Christmas. I really love the seamless look of the clear stickers on the clear boxes! 


I put the finishing touches on the boxes by creating tags from Labels By The Dozen Christmas Greetings. I think this holiday treat container with a surprise is going to be a really memorable gift this year. How do you like to make giving money a fun surprise?

And now here is Melanie's project....


(To the tune of Jingle Bells . . . ) “Oh what fun it is to craft with S-R-M stickers!”


Seriously, when I was introduced to SRM stickers over 5 years ago, it felt like I held the winning lottery ticket to crafting. I love that I can sit down to make a project--clean and simple, embellished, or artistic--and it turns out looking great. 


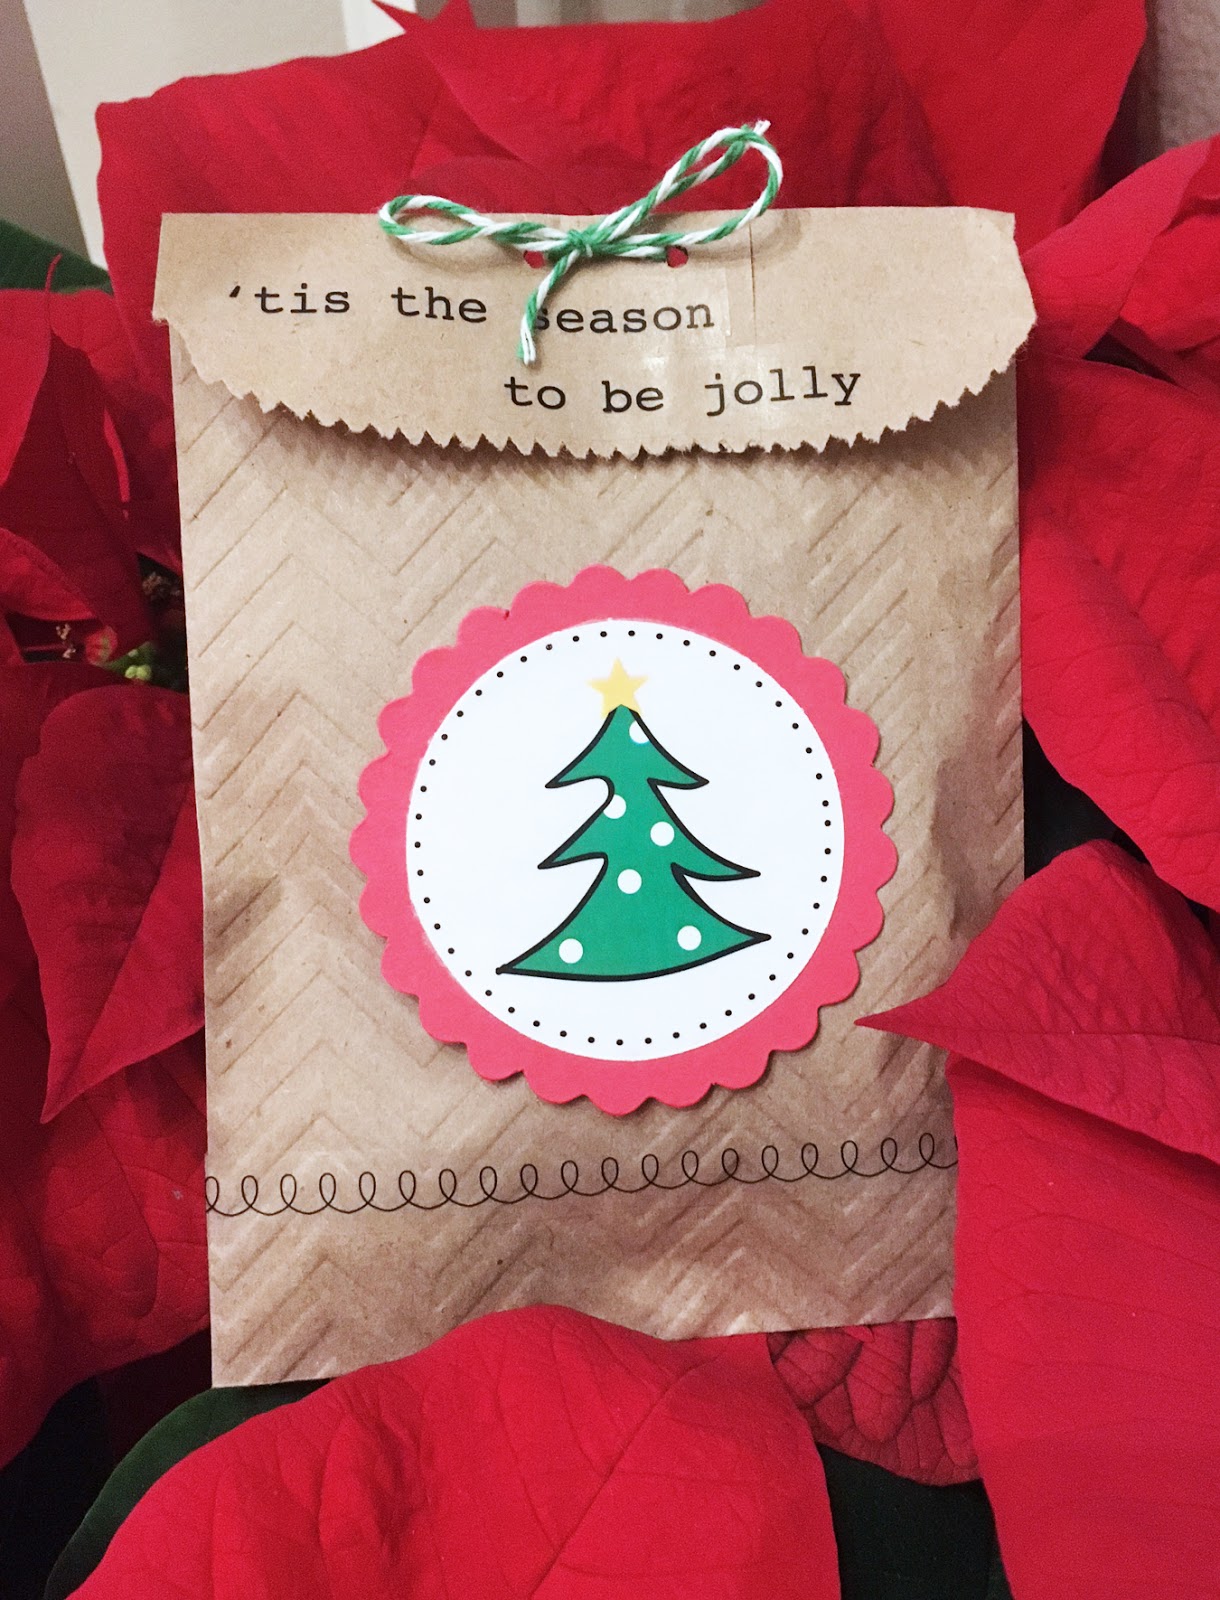
These Christmas treat bags were pretty quick to make and are a festive way to share holiday cheer. I used one sheet of stickers, embossed kraft bags, punched scallop circles, and twine.


The Christmas Tree stickers are a 1-¾” circle and fit perfectly inside the 2” punched scallop circles. The clear stickers are seamless on the chevron embossed bags. I love how well-thought-out these products are :)  Securing the treat bags closed with twine is a nice finishing touch.


What a sweet way to share treats during the holidays!

Products used:

Wednesday, November 16, 2016

Textured Thank You Card by Samantha


Hello! Samantha here today to share a textured thank you card. When it comes to card making, I tend to lean towards clean and simple designs.


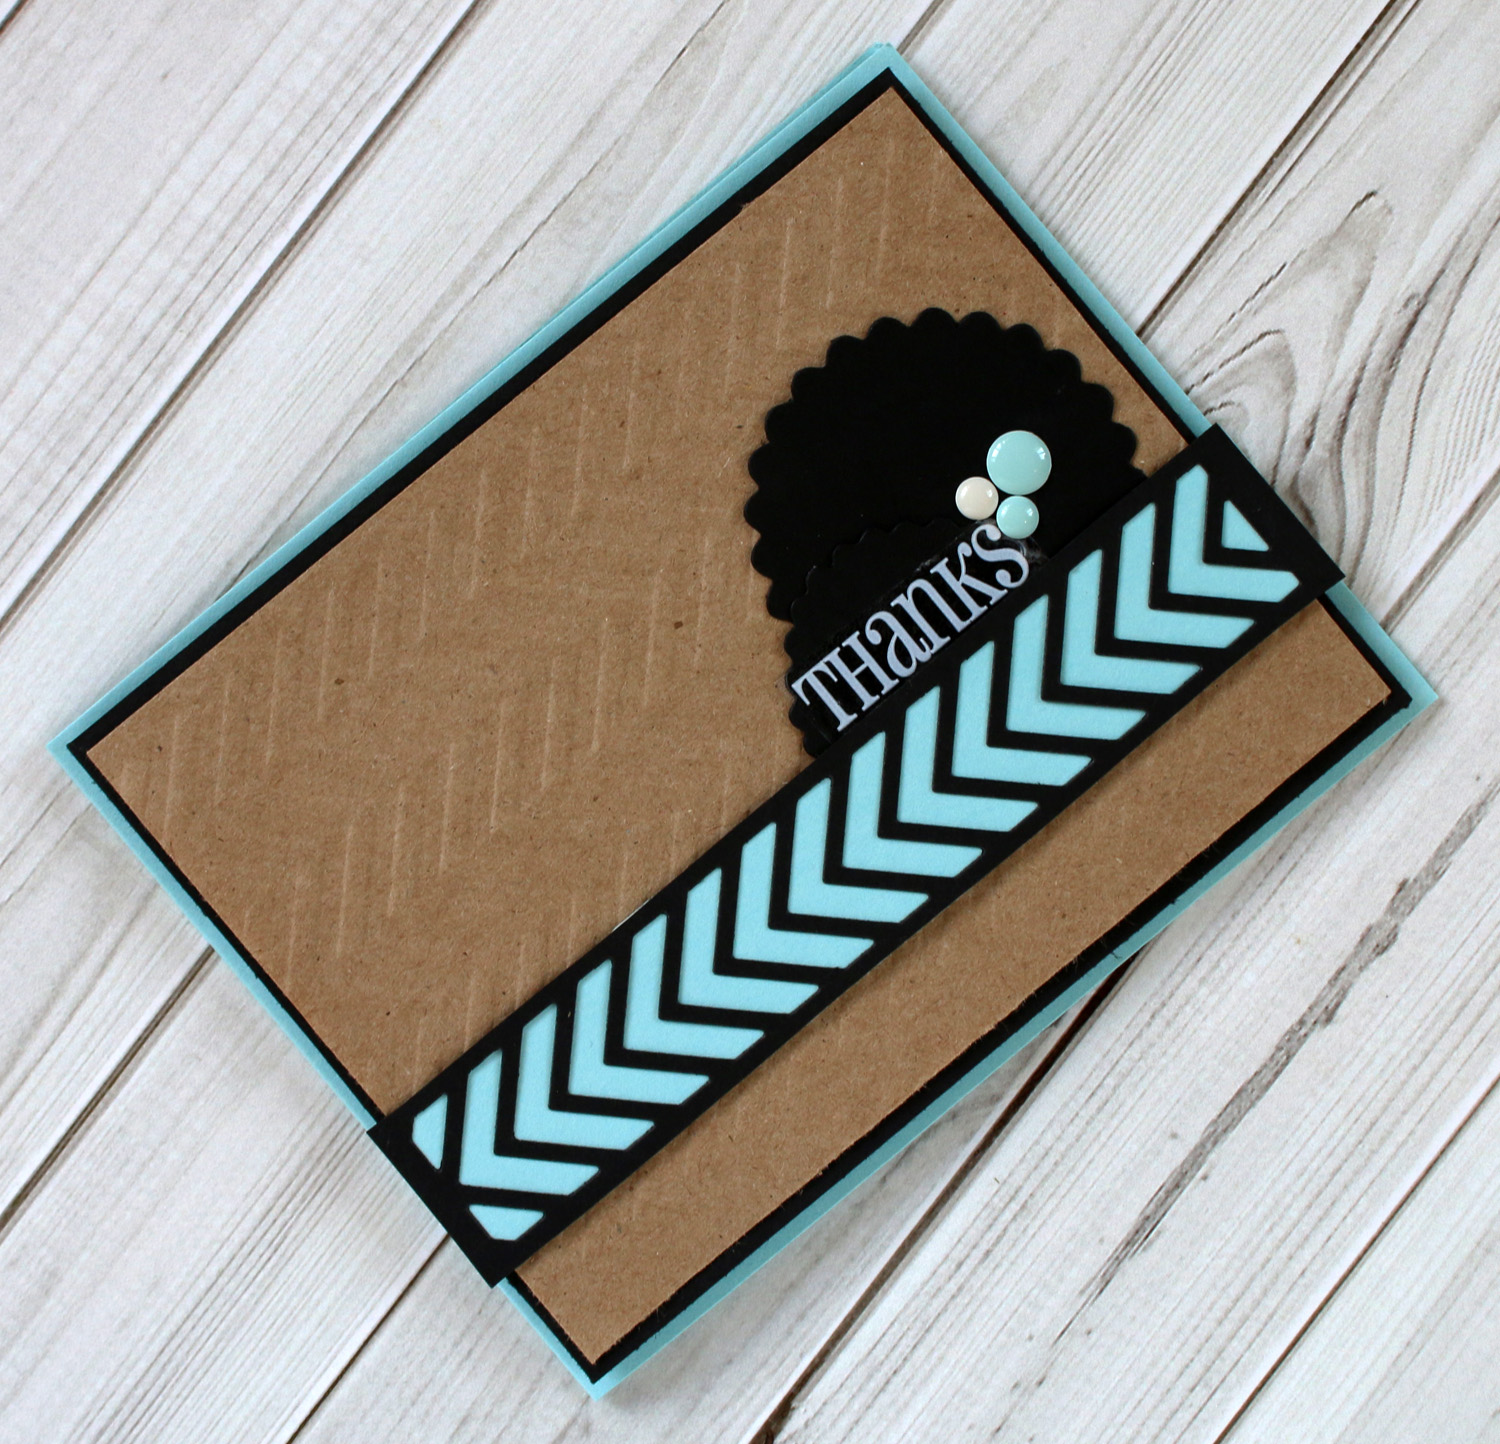
I've found that adding texture to clean and simple cards really gives them that extra WOW factor. Today I'll show how you can use SRM's embossed kraft bags to add texture to a card. 


For this card, all you need is some card stock in whatever colors you like (I chose black and aqua), an embossed kraft bag (I chose the chevron 4x6 kraft bag), We've Got Your Stickers Thanks, Fancy Sentiment Thanks, and scalloped circle punched pieces. 


All you have to do is cut an embossed bag down to the right size for your card (on my card I cut the bag to 4" x 5 1/4"). It's that simple to add beautiful texture to your card. I used a white "THANKS" sticker from We've Got Your Stickers Thanks set, and used some scalloped circle punched pieces as a background for it. 


Don't forget to add a little something special to the inside of your card with a sentiment from Fancy Sentiment Thanks sticker set. It's that easy to create a clean and simple textured thank you card!

Friday, October 14, 2016

Halloween Treat Bags by Samantha


Happy (almost) Halloween! Samantha here today with some fun Halloween treat bags that are cute and quick to make! 


I have some teenage nieces and nephews, who may be too old to trick-or-treat, but I still love dropping a little something off for them. Being the crazy aunt has some perks! SRM's embossed kraft bags paired with a variety of Halloween stickers make for a super easy way to package up a little candy for them (or anyone you want to treat this Halloween). 


I chose the 4 x 6 chevron embossed bag, but there are a ton of fun ones to choose from! For decorating my bag, I chose the Halloween Take 2 Stickers By the Dozen, Trick or Treat Stickers by the Dozen, Halloween We've Got Your Border, and Halloween Stitches stickers. 


What really makes these bags quick and easy is that creating the Happy Halloween tag takes all of 30 seconds. 


I simply took an orange "Happy Halloween" sticker and a black "Happy Halloween" sticker from Halloween Take 2 Stickers By the Dozen, stuck them back to back, and punched holes through them. It's really that simple! I finished them up with a little black twine to hold everything closed. I added my sticker choices to the front and back side of the bags to make them treat ready. 


Do you have anyone you like to make special Halloween treats for? These Halloween treat bags will make the perfect packaging! 

Wednesday, September 21, 2016

Trick or Treat by Amber


Hello everyone! I'ts Amber here, today I'm sharing this fun Halloween themed card and matching candy filled tube. I also have a quick bonus project at the end of this post for you to check out.


I started by folding an 8 1/2" x 5 1/2" piece of light green cardstock in half to create a 5 1/2" by 4 1/4" card base. Once my card base was folded I took the largest die from Avery Elle's Double Pierced Rectangles Elle-Ments Die and die cut a large rectangle out of some colorful striped  patterned paper, adhered it to my light green card base, and set it aside to work on my stamped photo frame. 


For the next part of my card, the photo frame I traced a die cut photo frame I had in my stash onto some orange pattered paper and cut it out. I stamped my cute little Halloween image in some black Memento Ink onto some white cardstock and colored it with some Spectrum Noir Markers. A quick little trick for you, I like to pick my patterned paper in the beginning of my card making process. Ding this ensures the entire card will match and it makes it so much easier to choose colors to color your images. I added my colored image behind my orange photo frame, added a Trick-Or-Treat sentiment from SRM's Stickers By The Dozen/Halloween sticker sheet, added some twine with a mini black safety pen, and attached the entire finished photo frame to my card base at an angle.


I'm always looking for fun new ways to package up fun little classic treats like these lemon drops. Since my card featured a little boy dressed as a dragon I thought it would be fun to fill one of The Original Tubes with some yellow lemon drops and label it with a little tag that read Dragon Spots. Fun right?  If you don't have any clear tubes on hand or if your looking for a quick way to mass produce more then one gift another fun way to package up some treats is with a bag.


I quickly decorated this 5" x 7.5" Embossed Chevron Kraft Bag with some matching patterned paper, clear stickers from the Sentiment/Halloween sticker sheet, a mini black clothespin, and some twine. This was super easy to make and can quickly be made while you still have all your supplies out. I hope you enjoyed my card, tube, and gift bag today! Thanks for visiting!

SRM Supplies

Wednesday, August 10, 2016

Stamped Lilies & Embossed Gift Bag by Amber


Ready to meet another one of our new design team members?  Today, it's Amber Rasmussen and she creates the most wonderful cards.  Amber loves combining SRM Stickers and goodies with other products in her stash and the results are amazing!  Here's more about Amber in her own words:  


“Hi Everyone! My name is Amber Rasmussen, I currently live in Florence, Arizona with my high school sweetheart Jason & our cute little black cat named Pookie. I've been paper crafting for about the last 12 years. I started out creating paper embroidery cards who dabbled with stamping and over the years I have evolved into a full time scrapbooker and card maker. I'm a big fan of SRM Stickers and I'm so thrilled to be a part of SRM Stickers DT family! I'm looking forward to sharing all my SRM Sticker creations with you!"

----------------------

Hello everyone! It's Amber here, today I'm sharing a fancy little Thank You card and matching embossed gift bag. I started by folding an 6" x 6" piece of white cardstock in half to create a 3" x 6" card base. 


Once my card base was folded I added one of the black zig- zag borders from the Sticker Stitches - Black sticker sheet towards the bottom of my card base and layered two pieces of patterned paper towards the top half of my card. On another piece of white cardstock I stamped and colored some lilies, trimmed the piece, and adhered it right over the two pieces of patterned paper I added to my card base. I need a sentiment for the front of my card so I used one of the clear circle "Thank You" stickers from the Fancy Sticker Sentiments - Thanks sticker sheet and added it to a 1½" yellow scalloped circle. I added some twine and the sentiment right below my stamped image towards the right finishing my card.


I decided to create a little matching gift bag to go along with my card. I used one of SRM's 5" x 7.5" Kraft Chevron Embossed Bags and dressed it up to match my card by adding a mini yellow clothespin, large fancy sentiment sticker from the Fancy Sticker Sentiments - Thanks sticker sheet, and some matching twine.


I hope you enjoyed my card and embossed gift bag today. Thanks for visiting!

SRM Supplies


Wednesday, April 27, 2016

Delightful Daisy Gift Bag by Lesley


Hello crafty friends! Lesley here! Today I am sharing a Springy gift bag...just perfect for putting a small gift into!


I used some We've Got Your Border/Thank You stickers and one of SRM's Embossed 4x6 Kraft Bags!


My bag front measures 4" x 4" and the daisy was die cut using an older Sizzix die. I kept my design nice and simple, so that it could be used for a friend, colleague or even a family member!

Hope you have a crafty day!

Monday, September 21, 2015

BIG Hello Gift Bags by Angi Barrs


Hello everyone! Angi Barrs here with a fun little bag that I whipped up this weekend. I was attending a crop event and a few of the ladies wanted to see the variety of products that SRM Stickers carries.

I was happy to show them some products. We ended up making gift bags for everyone in the group.

SRM Stickers Blog - BIG Hello Gift Bags by Angi Barrs - #kraftbags #embossed #giftbag #partyfavor #doilies #bigstamps #bighello #hello #clearstamps

I used the kraft embossed bags. The embossed flourish design has such pretty detail that goes great with embellishments.

I used a light adhesive to place an SRM white lace doily onto the bag. I folded down the sides to fit around the bag. I then topped it off with a patterned heart.

SRM Stickers Blog - BIG Hello Gift Bags by Angi Barrs - #kraftbags #embossed #giftbag #partyfavor #doilies #bigstamps #bighello #hello #clearstamps

I placed a greeting in the center of the bag using the BIG Hello clear stamp set. This one is great to use for a variety of projects.

SRM Stickers Blog - BIG Hello Gift Bags by Angi Barrs - #kraftbags #embossed #giftbag #partyfavor #doilies #bigstamps #bighello #hello #clearstamps

I added a colorful paper straw and paper confetti to the inside of the bag. I also used a leaf die to add a little more detail.

These bags are just the right size for parties and gifting. They are even great to use at a craft party. My guests loved them. 

Tuesday, September 8, 2015

Canvas Tag & Chevron Bag by Shantaie


Hi I'm Shantaie bringing you a canvas tag, on a card, all tucked inside a chevron kraft bag! Okay that title may need some reworking, but this single layered card is packed full of sweet and sparkly goodness!  Lets start with the card first.

SRM Stickers Blog - Canvas Tag & Chevron Bag by Shantaie - #giftbag #embossedkraftbag #kraft #canvas #doily #twine #floralribbon #lace #fancysentiments #stickers #card #birthday #DIY

 A flat postcard style card is fitted with pretty papers, and a stitched down canvas tag embellished with three brads and a fancy sticker sentiment  A pull tab style floral ribbon was added to easily slip the card from the decorated bag.

SRM Stickers Blog - Canvas Tag & Chevron Bag by Shantaie - #giftbag #embossedkraftbag #kraft #canvas #doily #twine #floralribbon #lace #fancysentiments #stickers #card #birthday #DIY

The Chevron kraft bag is embellished with more pretty papers, and a delicate lace border, a folded doily is wrapped up with a twine bow and a crochet flower and bitty pearls. The Fancy birthday sentiment says it all, and hints at the contents of he package! 

SRM Stickers Blog - Canvas Tag & Chevron Bag by Shantaie - #giftbag #embossedkraftbag #kraft #canvas #doily #twine #floralribbon #lace #fancysentiments #stickers #card #birthday #DIY

I had so much fun making this card and bag/envelope, I hope you are inspired to try one yourself!