Thursday, June 9, 2016

Mini Calendar by Roberta Rosi


Today we have a treat for you!  It's a project from Roberta Rossi creating the most wonderful boxed mini calendar using SRM Stickers and one of our rectangular clear boxes.  Roberta made this project in 2014 when she was a member of our design team.  Just change the stickers to the 2017 version and you are good to go!

Here is the finished box!

SRM Stickers Blog - Mini Calendar Tutorial by Roberta - #calendar #mini #gift #2014 #twine #borders #stitches #clear box

And to hold her Mini Calendar, Roberta used this rectangular clear container. 


And now we'll show you how she made it!   First Roberta  covered the outside with a strip of paper ( 10 ½ " x 3 5/ 8 "). , She also cut  4 squares of paper 2 ½ "x 2 ½ " (two yellow and two gray ) to cover the bottom and the cover of the box which helps the box to become more rigid and sturdy.

SRM Stickers Blog - Mini Calendar Tutorial by Roberta - #calendar #mini #gift #2014 #twine #borders #stitches #clear box

SRM Stickers Blog - Mini Calendar Tutorial by Roberta - #calendar #mini #gift #2014 #twine #borders #stitches #clear box

She then cut out 6 rectangles in yellow cardstock (2 ¼ "x 3 ½ ") and adhered the calendar months to the white cardstock.  She cut out the months by hand.

SRM Stickers Blog - Mini Calendar Tutorial by Roberta - #calendar #mini #gift #2014 #twine #borders #stitches #clear box

She decorated with stitching and borders the six yellow cards on both sides.
With pop dots Roberta put the 12 months, two on each yellow card (front and back and decorated them with Stone twine.

SRM Stickers Blog - Mini Calendar Tutorial by Roberta - #calendar #mini #gift #2014 #twine #borders #stitches #clear box

With a Sizzix die Roberta cut flowers in yellow cardstock and she assembled them to make it 3D. 

SRM Stickers Blog - Mini Calendar Tutorial by Roberta - #calendar #mini #gift #2014 #twine #borders #stitches #clear box

On three sides of the box she attached strips of kraft high ¾ " and decorated with Sticker Stitches.

SRM Stickers Blog - Mini Calendar Tutorial by Roberta - #calendar #mini #gift #2014 #twine #borders #stitches #clear box

On the cover of the box I attached the flower and a 2014 sticker mounted on Kraft. (change that to the 2017 sticker)  And now the box is ready to be loaded with the mini calendars!

SRM Stickers Blog - Mini Calendar Tutorial by Roberta - #calendar #mini #gift #2014 #twine #borders #stitches #clear box

Just put the mini calendars inside the box.  You will have 6 cards with 12 months and be sure to include a small metal clamp inside as well.

SRM Stickers Blog - Mini Calendar Tutorial by Roberta - #calendar #mini #gift #2014 #twine #borders #stitches #clear box

To use as a calendar, simply remove the first month from the box, attach it to the top front of the box with the metal clamp. 


 Brilliant and beautiful!  

Roberta is from Milan, Italy.  You know that Milan is the design capital of the world.  When someone asks you about the calendar that you made, you can simply say "It's an Italian design!"  And it is!  Thanks Roberta for this ingenious project.  It is truly an inspiration!

Wednesday, June 8, 2016

Mini Calendar Gift by Lorena


I celebration of our new 2017 Mini calendars, this week we are sharing some of my favorite mini calendar projects from our Design Team.  Today we have a little beauty from Lorena Cantó.  Using the 2017 Standards Mini calendars, 2017 Year of Memories and one of SRM's small glassine bags, you can create this little beauty too!


Lorena wanted a calendar that could be pinned to a cork or bulletin board and changed every month.  She created 12 die cut tags and adhered different colored 1/2" strips to each of them.   She then placed the calendars on each month.  What a happy project!


Once the individual months are finished she created a cover page with the year.  You change it to 2017 to make it current and you are good to go!  Put them all inside a small SRM glassine bag and it's great to use for yourself or to make for gifts.  


Super fun, super fast and something that anyone would love to receive.


Tuesday, June 7, 2016

Mini Calendar Inspiration by Tessa Wise


Welcome to day #2 of our introduction of our 2017 Mini Calendars and Year of Memories.  We celebrate this introduction with lots of ideas for you!  Here's a fun one from former SRM Design Team member Tessa Wise.  What a talent!  

Tessa created a a set of mini calendars.  And she loved storing the mini calendars in one of our darling floral bags!  She circled the important dates in each month so she would not forget to send a card.


She loved using our decorative die for this project!  


Tessa used a SRM Clear A2 Card box to hold 8 cards and she can add to them each month.  She added a bit of velcro tape to the back of each month's calendar and she can easily change the month as she goes through the year.  How fun!  When a new month comes around, she simply changes the month and adds the cards that she made for that month.  

Instead of the 2016 Year of Memories, you would use the 2017 decorative mini calendar sticker.  And don't forget the twine!  Tessa used Honeydew… one of my favorite colors!


What a great way to stay organized throughout the year! 

Be sure to come see us tomorrow when we will share a layout using SRM mini calendar stickers! 

Monday, June 6, 2016

NEW 2017 Calendar Products


Good morning and welcome to a week of mini calendar happiness!  You will see gift calendar projects, mixed media projects, cards, and layouts using our mini calendars.  They are clear so if you use them on patterned paper, you see the paper too!

We are excited to announce that the 2017 Mini Calendars (both decorative and standard) and the 2017 Year of Memories are both in stock and ready to ship!  YAY!   The mini calendars are our most popular product.  You can do so many things with them and this week we are going to share some of the most popular projects over the years that our design team has created.  If you see another year on the project, you can CASE it and just add the 2017 stickers! 


Today we share with you a darling idea for a special gift from Jennifer Pohl.  It's never too early to get started with creating hand crafted Christmas gifts and a mini calendar project is something that your friends and family will use throughout the year. 

Jennifer created 12 decorated calendar pieces, 1 for each month of the year. She decorated them with the Standard Mini Calendar and various We've Got Your Borders that match the month, the season or the holidays.  And then she got a little easel to hold them.  Don't you just LOVE this idea?  You can make it.  It's easy peasy.  I have made many of these!


And here are the results….month by month!


This is a very quick and easy project and fun to make with kids! 


So how many of these are you going to make?

Friday, June 3, 2016

Friday Feature from Tobi Crawford


I'm always on the lookout for wonderful cards using SRM products.  This week I spotted this beauty from Tobi Crawford, former Design Team member and crafter extraoridinaire!  Tobi created this card for a Simon Says Wednesday Challenge.

Tobi was asked by a friend to make some wedding cards so she combined her SRM Stickers by the Dozen Take 2 Stickers along with one of her favorite stamps and lots of inky supplies.  

First she created a background with varying vales of one color or watercolor paint. 


Then she used one of her favorite flower stamps, Altenew's Peony Bouquet stamp to create this beautiful card. 


She added the SRM Mr. & Mrs. sticker that she mounded on cardstock and voilá!  That is one beautiful card.  Love that our former design team members still love their stash of SRM Stickers.  Those stickers go with just about any kind of project and any style of crafting. 

Thanks Tobi for such a treat!

Thursday, June 2, 2016

Rain or Shine by Michele


Good morning! Michele here with a "pick me up" type of card! Sometimes we just need a bit of cheering up when life throws ya' those curve balls, you know? ;)  I love this set by Jane's Doodles called,  Rain or Shine.


I used my Misti and a bit of masking to layer the umbrellas and flowers.   They were colored in with Copic markers and then a bit of colored pencil.  I added Stickles to give it  some sparkle. 


 I also added clear dew drops and coordinating string. 


Thank you so much for stopping by today!
Be sure to check out our Instagram, Facebook and Pinterest pages for lots more inspiration!

Wednesday, June 1, 2016

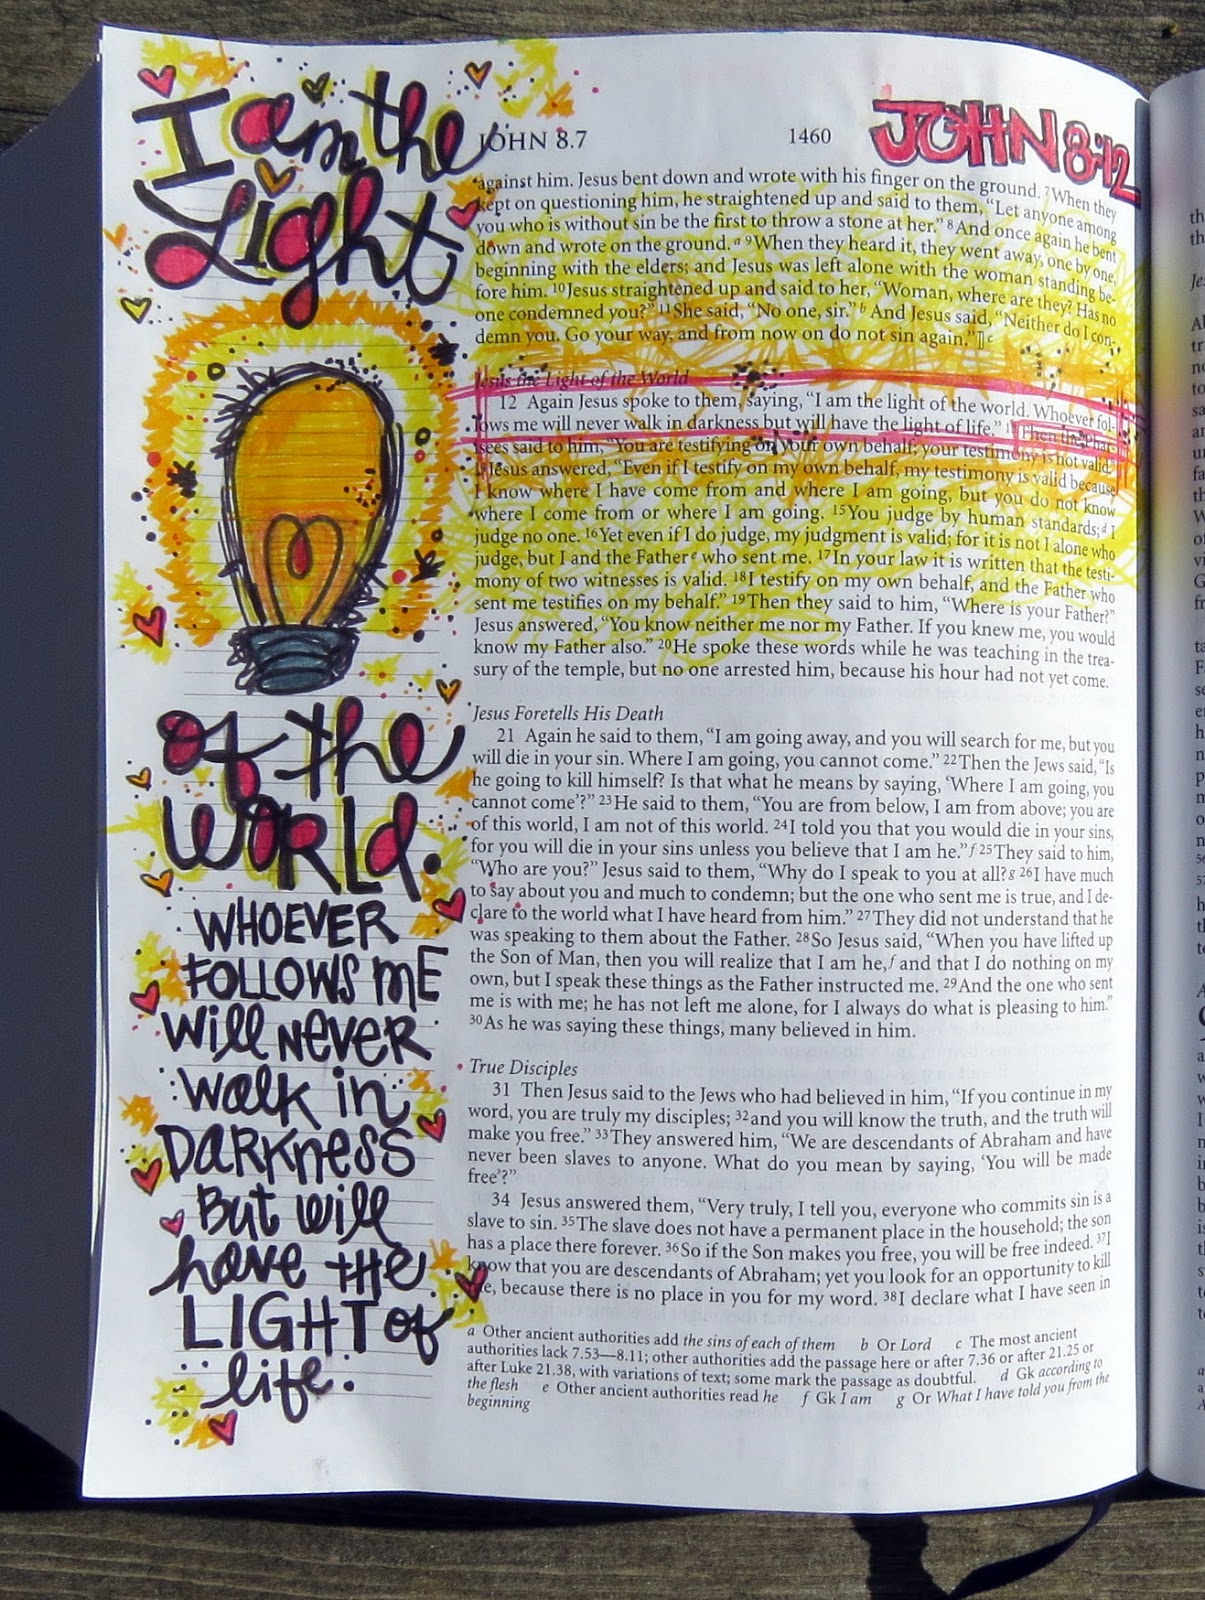
⁕{Be the Light}⁕ by Shannon


There is a lot of Bible Journaling inspiration out there, it's almost overwhelming. EVERY single entry is beautiful...whether you're a beginner or you're an individual who teaches workshops, it's all created out of devotion and love.

Some pages are lumpy, and others have only a few words on them. I'm still finding my style. You may be still finding yours, or even afraid to begin, jump in friend, spread the word and remember this is another way you're leaving a piece of yourself here for your loved ones. 

You'll find that sometimes pens alone are a formidable tool for getting your thoughts onto paper.

SRM Stickers carries Le Pens in a variety of colors...they are perfect for your planners, doodling, writing a heartfelt note, addressing envelopes, all the lost arts of simple thoughtfulness. These pens are also versatile, easy to work with and can color small areas with ease. I wouldn't recommend them for coloring large areas. 

This page features scripture from the Gospel of John:


Here is a close up of the highlighted text that I wanted to feature:


I worked in a warm color palette because the entry made me feel warm and safe. I used red, because it made me think of love and it compliments yellow and orange so well.


I used Le Pens from the following sets:  Neon, Primary and Dark.


Have a great day! ❤


Tuesday, May 31, 2016

Mermaid Heat Transfer Bag by Shantaie


Hi! How are you today? Feeling a little summery yet? Me too!
I've been having fun playing with some black heat transfer vinyl and 
linen bags, to make these splashy mermaid treat bags.


I love this mermaid cut found on the Silhouette store, and decided to alter it, by only using the tail portion of the design, "splashing into the water" was what I was going for! I cut the design into heat transfer vinyl and ironed it onto the bag with a dry hot iron. I wanted a bit of color so I pulled out a green and a blue glimmer mist, and sprayed fairly generously! :) 


I also added a few little heat transfer gems, and glued on some half back pearls. In the top corner A small glass bottle filled with sandy hued glitter, and a rope bow are just the cherry on top!  Dive right in and fill the bag with candy, a strand of pearls or some fabulous beach waves hair products to give as a summer gift! 

I'm Shantaie and I appreciate, you stopping in to take a look at todays fun heat transfer vinyl project.   If you love vinyl, drop by our vinyl Facebook group and see what other people are doing with their vinyl and be sure to share your vinyl projects with us!


Monday, May 30, 2016

Bible Journaling with Christine


It is so relaxing to do Bible Journaling during stressful times!  I love searching for a verse to create with that hits home!  My family is currently packing up for an out of state move and there's a whole lot of trusting in the Lord happening.  So Jeremiah 17:7 felt like the perfect verse to capture my mood and serve as a reminder as I open up my Bible!


I like to journal on some sturdy cardstock and insert it by the verse in the Bible - I know lots love to do the margins - I just have a different approach :)


After creating my background using watercolor paints, I used a combination of stickers and stamps to write out the verse.  The Big Faith stamp supplied both the word "Blessed" and my stitching border.


I used the Words of Faith Stamp set for my crosses.  The solid black hearts come from the Life is Good stamp set and the others are punched out of patterned paper.  I have to mention how great the Black Le Pen is for this type of project - I used it for all my outlining and it works beautifully!


We've got a ton of new Bible Journaling stamps coming your way soon so be sure to stay tuned to see their release!

Friday, May 27, 2016

Soccer Treat Tubes by Juliana


Hi everyone! It's Juliana here with you today to share a great way to treat your little soccer star using SRM Stickers Tubes. These fabulously fun tubes come in so many sizes. All you have to do is select the one that works for the treats you want to fill it with. 


I used the Original Tube which is 7 x 1 inches. To decorate it, I grabbed a variety of SRM Stickers including the Say It With Stickers Mini Soccer, Tiny Stickers Soccer Balls, and Labels By The Dozen Black/White.

I adhered the Tiny Soccer Balls directly to the tube. Next, I selected several sayings and adhered them to white cardstock to create tags. I added a soccer ball to a Small Scallop Circle in White.


I then punched holes in the top of each of these and tied them to the top of the tube using a piece of ribbon.  The banner shaped label was perfect for adding a name which I attached to the back side of the scallop circle.


Now my treat holder is ready to be filled with my little soccer star's favorite treats!


How do you like to use SRM Stickers Tubes? Remember you can share them with us on our Facebook page, Flickr Group or tag us on social media with #srmstickers.
HUGS!
Juliana