Showing posts with label Year of Memories 2014. Show all posts

Friday, June 13, 2014

Doily Layout by Yvonne


Yvonne Yam loves how SRM's 4" doilies are just the right size to use as a photo mat.  They look great on this mixed media project where Yvonne used stencils and mists.

SRM Stickers Blog - Doily Layout by Yvonne - #layout #doilies #stickers #mists

Yvonne loves how the doilies are a very subtle way to add interest to your layout without adding bulk.  She used 2 wallet sized photos of her nephew.  Super cute!

SRM Stickers Blog - Doily Layout by Yvonne - #layout #doilies #stickers #mists

And then she embellished her layout with lots of SRM clear stickers.  Love how she cut up the dots on the SRM Borders.  So fun and playful!


SRM Stickers Blog - Doily Layout by Yvonne - #layout #doilies #stickers #mists


Here are the products that Yvonne used on her project: 


Thanks for the fabulous layout Yvonne.  Love the idea of using the doily as a photo mat!

Thursday, March 13, 2014

Love to Play Layout by Yvonne


Yvonne Yam loves the variety of SRM Stickers and loves to incorporate them into her layouts.  They help her to create fun and fabulous layouts really quickly.  Be sure to click on the photos to see all the amazing details.

SRM Stickers Blog - Love to Play Layout by Yvonne - #layout #stickers #doily #borders

Yvonne tucks a new SRM 4" paper lace Doily behind the photo mat for added interest!  And she added some real lace over the doily for added texture.  

SRM Stickers Blog - Love to Play Layout by Yvonne - #layout #stickers #doily #borders

Check out all the different SRM Stickers that Yvonne used on her luscious layout and the rest of her supplies as well.  Click on photo to enlarge. 
SRM Stickers Blog - Love to Play Layout by Yvonne - #layout #stickers #doily #borders #materials

Here's a list of the SRM goodies used on Yvonne's layout: 

Wednesday, February 12, 2014

Graduation Invite & Favor by Corri


Corri Garza has created a graduation invitation and favor bag in the colors of the local high school, orange and black.  Left over Halloween papers came in handy for this project! 

Corri used her Cameo to cut this gate fold card but replaced the graduation cap in the file with a starburst and then popped a SRM Graduation Stickers by the Dozen image on it. The 2014 sticker is from SRM's 2014 Year of Memories sheet.  

SRM Stickers Blog - Graduation Invite & Favor by Corri - #card #2014 #graduation #stickers

She added an invitation sticker for the interior of her card from SRM's We've Got Your Invite and used some clear sticker sentiment words from Express Yourself Graduation.  

SRM Stickers Blog - Graduation Invite & Favor by Corri - #card #2014 #graduation #stickers

For her favor bag Corri used a SRM Glassine Bag and cut a graduation cap from SRM's new Vinyl using Black for the cap and Orange for the tassel.  She topped the bag off with a Thank You clear sticker from Stickers by the Dozen Thank You and orange and black solid twine.  How fun and festive!

SRM Stickers Blog - Graduation Invite & Favor by Corri - #glassine #bag  #graduation #stickers #vinyl #twine #thank you

Put it all together an it spells G-R-A-D-U-A-T-I-O-N!  What a perfect pair!

SRM Stickers Blog - Graduation Invite & Favor by Corri - #card #glassine #bag #2014 #graduation #stickers #vinyl #twine

For your party, just change up the school colors and you are good to go! 

Tuesday, November 12, 2013

Mini Calendar Tutorial by Roberta


Today we have a treat for you!  It's a tutorial from Roberta Rossi creating the most wonderful boxed mini calendar using SRM Stickers and one of our rectangular clear boxes.  This project is being featured on Creating Keepsake's Facebook today.  Leave a comment here on the blog and you will be in the running to win the stickers and the clear box used in this project!  

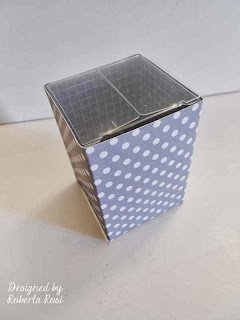
Here is the finished box!

SRM Stickers Blog - Mini Calendar Tutorial by Roberta - #calendar #mini #gift #2014 #twine #borders #stitches #clear box

Here are the stickers that Roberta used:  Mini Calendar Decorative, 2014 Year of Memories, Bright Borders and Black Sticker Stitches.


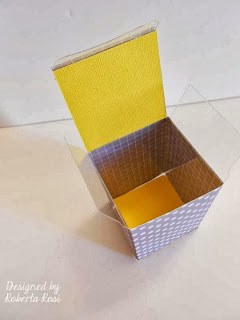
And to hold her Mini Calendar, Roberta used this rectangular clear container. 


And now we'll show you how she made it!   First Roberta  covered the outside with a strip of paper ( 10 ½ " x 3 5/ 8 "). , She also cut  4 squares of paper 2 ½ "x 2 ½ " (two yellow and two gray ) to cover the bottom and the cover of the box which helps the box to become more rigid and sturdy.

SRM Stickers Blog - Mini Calendar Tutorial by Roberta - #calendar #mini #gift #2014 #twine #borders #stitches #clear box

SRM Stickers Blog - Mini Calendar Tutorial by Roberta - #calendar #mini #gift #2014 #twine #borders #stitches #clear box

SRM Stickers Blog - Mini Calendar Tutorial by Roberta - #calendar #mini #gift #2014 #twine #borders #stitches #clear box

SRM Stickers Blog - Mini Calendar Tutorial by Roberta - #calendar #mini #gift #2014 #twine #borders #stitches #clear box

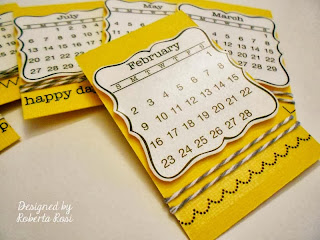
She then cut out 6 rectangles in yellow cardstock (2 ¼ "x 3 ½ ") and adhered the calendar months to the white cardstock.  She cut out the months by hand.

SRM Stickers Blog - Mini Calendar Tutorial by Roberta - #calendar #mini #gift #2014 #twine #borders #stitches #clear box

She decorated with stitching and borders the six yellow cards on both sides .

SRM Stickers Blog - Mini Calendar Tutorial by Roberta - #calendar #mini #gift #2014 #twine #borders #stitches #clear box

With pop dots Roberta put the 12 months, two on each yellow card (front and back and decorated them with Stone twine.

SRM Stickers Blog - Mini Calendar Tutorial by Roberta - #calendar #mini #gift #2014 #twine #borders #stitches #clear box

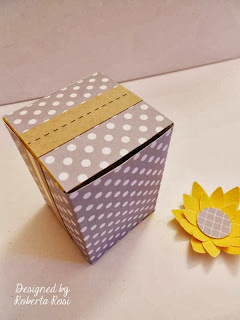
With a Sizzix die Roberta cut flowers in yellow cardstock and she assembled them to make it 3D. 

SRM Stickers Blog - Mini Calendar Tutorial by Roberta - #calendar #mini #gift #2014 #twine #borders #stitches #clear box

On three sides of the box she attached strips of kraft high ¾ " and decorated with Sticker Stitches.

SRM Stickers Blog - Mini Calendar Tutorial by Roberta - #calendar #mini #gift #2014 #twine #borders #stitches #clear box

On the cover of the box I attached the flower and a 2014 sticker mounted on Kraft .  And now the box is ready to be loaded with the mini calendars!

SRM Stickers Blog - Mini Calendar Tutorial by Roberta - #calendar #mini #gift #2014 #twine #borders #stitches #clear box

Just put the mini calendars inside the box.  You will have 6 cards with 12 months and be sure to include a small metal clamp inside as well.

SRM Stickers Blog - Mini Calendar Tutorial by Roberta - #calendar #mini #gift #2014 #twine #borders #stitches #clear box

SRM Stickers Blog - Mini Calendar Tutorial by Roberta - #calendar #mini #gift #2014 #twine #borders #stitches #clear box

To use as a calendar, simply remove the first month from the box, attach it to the top front of the box with the metal clamp. 


 Brilliant and beautiful!  


Roberta is from Milan, Italy.  You know that Milan is the design capital of the world.  When someone asks you about the calendar that you made, you can simply say "It's an Italian design!"  And it is!  Thanks Roberta for this ingenious project.  It is truly an inspiration!

Monday, October 7, 2013

2014 Instagram Calendar by Michelle


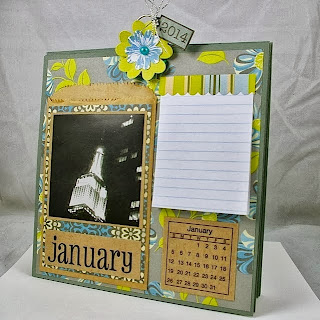
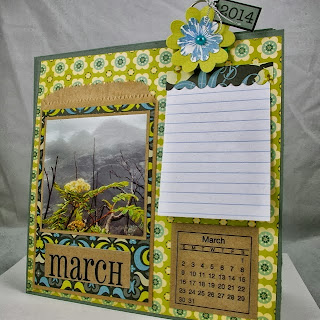
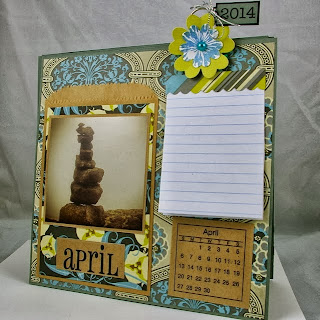
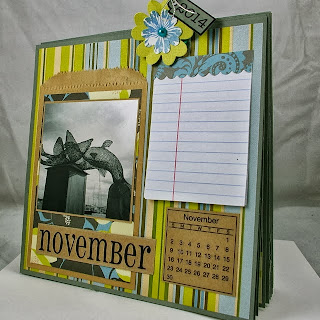
Michelle Giraud has created an 8 x 8 calendar that is pure inspration.  She was so happy with this calendar turning to a couple of her favorite things to use these days; Instagram prints and SRM Kraft bags!    

It's calendar time and what a great gift this calendar would make.  Just think of all the people that would love this calendar to enjoy every day of the year! Perfect gift for friends, family, teachers, co-workers and the list goes on!  I love the use of Instagram prints on this calendar.


SRM Stickers Blog - Michelle Giraud - #calendar #minicalendar #months #kraftbags

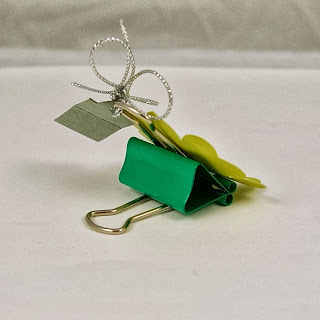
The calendar pages measure 8 x 8.  Michelle made them out of a nice heavy cardstock and a decorated paper clamp which provides enough pressure so the calendar will stand up on its own by fanning out the bottom of the pages, or can be hung on a wall.

SRM Stickers Blog - Michelle Giraud - #calendar #minicalendar #months #kraftbags

Each calendar page has a 4 x 6 SRM Kraft bag attached for holding photos, envelopes/bills, appointment cards, or anything else that you would want to save as a reminder.  

SRM Stickers Blog - Michelle Giraud - #calendar #minicalendar #months #kraftbags

Each page also has a SRM Standard Mini Calendar and a 4 page notepad for jotting down notes & reminders.  The notepad was simply cut from loose leaf paper than lightly glued together at the top and decorated with a scalloped strip of paper.

SRM Stickers Blog - Michelle Giraud - #calendar #minicalendar #months #kraftbags

This whole project was made using coordinating designer paper from 12 x 12 paper pad.  Michelle likes how all the colors work together and the variety of photo prints make it interesting.  To coordinate with the SRM Kraft bags she used Kraft paper for the base of the mini calendars, SRM's Large Month stickers and a matte for the photo.  

Here are all the pages.  They all use the same format.  Just different papers, photos and stickers.  Click on photos to enlarge.

SRM Stickers Blog - Michelle Giraud - #calendar #minicalendar #months #kraftbags

SRM Stickers Blog - Michelle Giraud - #calendar #minicalendar #months #kraftbags

SRM Stickers Blog - Michelle Giraud - #calendar #minicalendar #months #kraftbags

SRM Stickers Blog - Michelle Giraud - #calendar #minicalendar #months #kraftbags

SRM Stickers Blog - Michelle Giraud - #calendar #minicalendar #months #kraftbags

SRM Stickers Blog - Michelle Giraud - #calendar #minicalendar #months #kraftbags

SRM Stickers Blog - Michelle Giraud - #calendar #minicalendar #months #kraftbags

SRM Stickers Blog - Michelle Giraud - #calendar #minicalendar #months #kraftbags

SRM Stickers Blog - Michelle Giraud - #calendar #minicalendar #months #kraftbags

SRM Stickers Blog - Michelle Giraud - #calendar #minicalendar #months #kraftbags

SRM Stickers Blog - Michelle Giraud - #calendar #minicalendar #months #kraftbags

SRM Stickers Blog - Michelle Giraud - #calendar #minicalendar #months #kraftbags

Once Michelle figured up her layout she cut all her layers so everything was ready to go and she could mix and match the patterns as she put them together.  Here's a list of all supplies you'll need:

12 pcs 8" x 8" heavy weight cardstock
12 pcs 7.5" x 7.5" coordinating designer paper
12 pcs 4" x 6" SRM Kraft bags 
12 pcs 5 3/4" x 4" designer paper (glue on bag front)
12 photos trimmed to 3.5" x 3.5"
12 pcs Kraft cardstock 3.75" x 3.75" (photo base layer)
1.25" strips of Kraft cardstock for large month stickers
12 pcs 2.25" x 2.25" Kraft cardstock for mini calendars
12 sheets loose leaf paper cut into 4" x 2.75" sheets
Paper clamp

Once all the supplies are cut the assembly is really easy.  Thanks Michelle for this great gift idea.  You have inspired us!  

Friday, October 4, 2013

Christmas Ornaments by Lesley


Leslay Croghan loves to create handmade Christmas ornaments.  They are such a beautiful and thoughtful gift.  

For her first ornament, Lesley uses glitter paper to create an intricate diecut shape.  She then adds a 2014 sticker from SRM's Year of Memories for personalization.  So pretty! 


And for her second ornament, Lesley again uses diecut shapes to create this darling Christmas stocking.  She creates a smaller version of the glitter diecut ornament and attaches it to the stocking and tied it all off with some delicious Peapod Twinery Twine.  Perfection!


What a great gift for friends at work or for a teacher.  Thanks for the inspiration Lesley! 

Be sure to join us tomorrow for World Cardmaking Day when SRM will have a special Saturday Blog and join in with Operation Write Home in a MEGA Blog Hop!  And there will be giveaways of 5 special "Thank You" prize packets.  Be sure to drop by and leave a comment on the blog to be in the running to be a WINNER!

Hope to see you here on the MEGA Blog tomorrow in celebration of World Card Making Day.  There will be plenty of inspiration from some members of SRM's fabulous Design Team.