Showing posts with label Kraft Window Box. Show all posts

Monday, December 4, 2017

Personalizing Containers with Vinyl by Samantha


Hello! Samantha here today to show you 3 different ways to personalize SRM containers with vinyl. This is a super easy and fun way to take your packaging up a notch. 

All you'll need is an SRM clear container or one with a window (like the kraft box on the bottom), some vinyl (I used matte vinyl, metallic vinyl, and holographic vinyl, but any SRM vinyl will work), and a way to cut vinyl (I used a Silhouette Cameo).  


You can get into the wedding spirit by personalizing wedding favors or a wedding gift box. A gift card will fit perfectly inside one of these clear rectangular boxes. Layering metallic vinyl give the packaging a fancy look. 


Add initials to a box for the perfect packaging for a graduation, birthday, or Father's Day gift. You can use the recipient's school colors or favorite colors, too!


Or, you can just go ahead and add the recipient's full name. Add their nickname and a bit of holographic vinyl to really make it pop. I created the above container with my 3 year old niece in mind! 


Weather it's a special occasion, a holiday, or a just because gift, you'll be ready to add a little extra pizazz to your packages with some SRM vinyl. 
 

Tuesday, October 3, 2017

Halloween Treats 4 Ways by Samantha


Hello! Samantha here, and today I'm getting ready for Halloween. I've got 4 different containers all packaged up with treats, but here's the best part: I only used one sticker sheet to decorate all 4 containers. 


I'm telling you, no matter what you have to package up, SRM has a container for that! As you can see in the photo above all 4 containers are decorated with stickers from the We've Got Your Sticker Treats sticker sheet. Here's a closer look a the different containers I chose to use and what fits inside.


First up are the pillow boxes. They come in 3 different sizes (small, medium, large) and 2 different materials (kraft and clear). The small pillow box is perfect for a handful of candy corn, while the medium size fits a couple of fun sized candy bars or bags. The clear are a great way to show off brightly colored candy, while the kraft are great for making your treat a surprise. 


One of my all time favorite SRM products are the clear tubes, but if you're looking for something just a bit different this time around (and something that won't roll away from you), these tall thin clear boxes are super fun. I stuffed mine with 4 pieces of licorice, but smaller candies like Rollos, M&M's, Skittles, Kisses, and the like fit wonderfully in this box. 


The last box I decorated was a kraft window box. This comes in a few different sizes, but I chose the 4 1/8" x 4 1/8" size. This box fits 3-4 fun sized candies in it. You also get the best of both worlds; both a clear window and a kraft box to decorate with stickers. You can even match your stickers (pumpkin sticker) to your candy (Reeses Pumpkin) like I did. 


And that's it guys! All you need is one sheet of stickers to decorate all these treats...and you'll even have stickers left over to use in your planner or scrapbook. 

Tuesday, September 5, 2017

Baby's First Year Mini Album by Giorgia


Hello SRM friends, Giorgia here to share a mini album of a baby: my husband cousin had a little girl almost a year ago, so I decided to make a mini album to document each month of her first year.The mini isn't finished yet, since by niece Greta is now 9 months, but I want to show you what I made so far.

This is the cover: I used some baby themed SRM stickers and glittered hearts die-cut with cutting machine.


The mini is a very small, cute, accordion mini album: to create the structure cut a 12x12" pink cardstock in 3 strips of 4"x12" and score them at every 4". Adhere together two strips, cut the other one in two identical parts and glue them to the beginning and end of the previously made accordion. This is the final result:


For the inside pages, I chose this cute patterned paper with months on it. I cut each month and adhered it onto a piece of patterned paper: this papers measures 3x8", scored in half in the long side, and they will contain the picture inside, on the bottom flap.


Adhere each paper to the structure: you will have 4 pages free from pictures, I decided to place them in the beginning to document Greta's first day of life, between month and in the back cover.

This is the first page, to document the first day of life: I used Baby plans stamps and I added handwritten dates with black pen from Le Pen 4 Piece Set - Dark Colors.


The top flap of each page is filled with SRM stickers: I used Baby's First Year-Girl stickers and Calendar Numbers/Small for the date. 


  In each page I used a lot of lovely baby themed SRM products. I didn't add dimensional parts, because I wanted the mini to stay flat once closed: I only used stickers and die-cuts:


I love the cute "milestones" stickers from Baby's first year stickers.


I adhered some of the stickers to scalloped punched pieces circles to create fun embellishments:


 Here you can see another examples of how I decorated the pages without picture.


My niece is the cutest, isn't she? I love her so much!
I already made also the gift box to contain the album: the mini perfectly fits into a kraft window box A2. I embellished it with a sticker, sequin and a jute twine bow.
I will gift it to her parents at her first birthday.


Until next time,
ciao, Giorgia. 


SRM products used 

Thursday, August 24, 2017

But first coffee....by Shelly


Hey y'all! Shelly, here.
Today, I'm sharing a sweet little gift with you! 

There are so many fun and new goodies from SRM Stickers, I didn't even know where to start! lol Then as was doing some thinking and looking through things, I came up with a coffee gift idea. 


I started with my tag. I used a canvas tag and stamped on my coffee sentiment, using a brown ink. After, I added a couple green die cut leaves and a wood veneer coffee cup. Once done, I added my '#caffeineplease' sentiment to a piece of white cardstock using brown ink and then trimmed it to into a small banner/flag. 


I then choose a little Kraft window box for my gift, which I added a burlap bag inside of it. (You can add coffee beans, coffee packs, chocolates, etc. inside the burlap bag.) After having my goodies inside my box, I wrapped everything together using all 3 colors of the new jute twine. Simple, yeah?!...

Thanks so much for stopping by!
Enjoy your day!

SRM Stickers supplies used:


Wednesday, August 2, 2017

Coffee Plans Gift Box by Emma


Hello!  Emma here, and welcome to my first post as a member of the SRM Stickers Design Team.  Here's a bit of info about me: 

"Hi, I’m Emma Ivemey, and I am a British-Canadian gal based in Oshawa, Ontario. I am the proud mother of 4 beautiful children, and married to a wonderful husband. I LOVE to craft, and I’ll try anything once! My favourite crafts are scrapbooking, cardmaking, knitting & crochet, colouring, mixed media and trying to find fun ways to upcycle junk into home decor."

I am excited to share my idea for a sweet and easy gift card holder, using the 4 1/8" kraft window box and the NEW Coffee Plans stamp set.


So first of all, I folded together the kraft box, and created an insert slightly smaller than the box to go inside.  I used 110lb cardstock to create the insert, which will serve as a platform to hold my envelope with the gift card inside.


I then folded my envelope, and stamped the front with the 'But first, coffee...' sentiment, coffee cup and beans (so cute!)


Next, to add a little colour, I used the ColorIn Watercolor Twist pencils to add a little blue, green and yellow as if it were a landscape.  These pencils are so great, and so easy to carry around in the handy dandy case.  To finish, I used white ink and stamped the small coffee words and images around the edges of the box window.


On the back of the box, I used a To / From sticker from the Labels by the Dozen Everyday Pastels sheet so that a personal message can be added.


So there you have it, a thoughtful gift for a coffee pal!  I hope you've enjoyed this project as much I as I had fun making it.  


Happy crafting!  Emma x


Monday, July 24, 2017

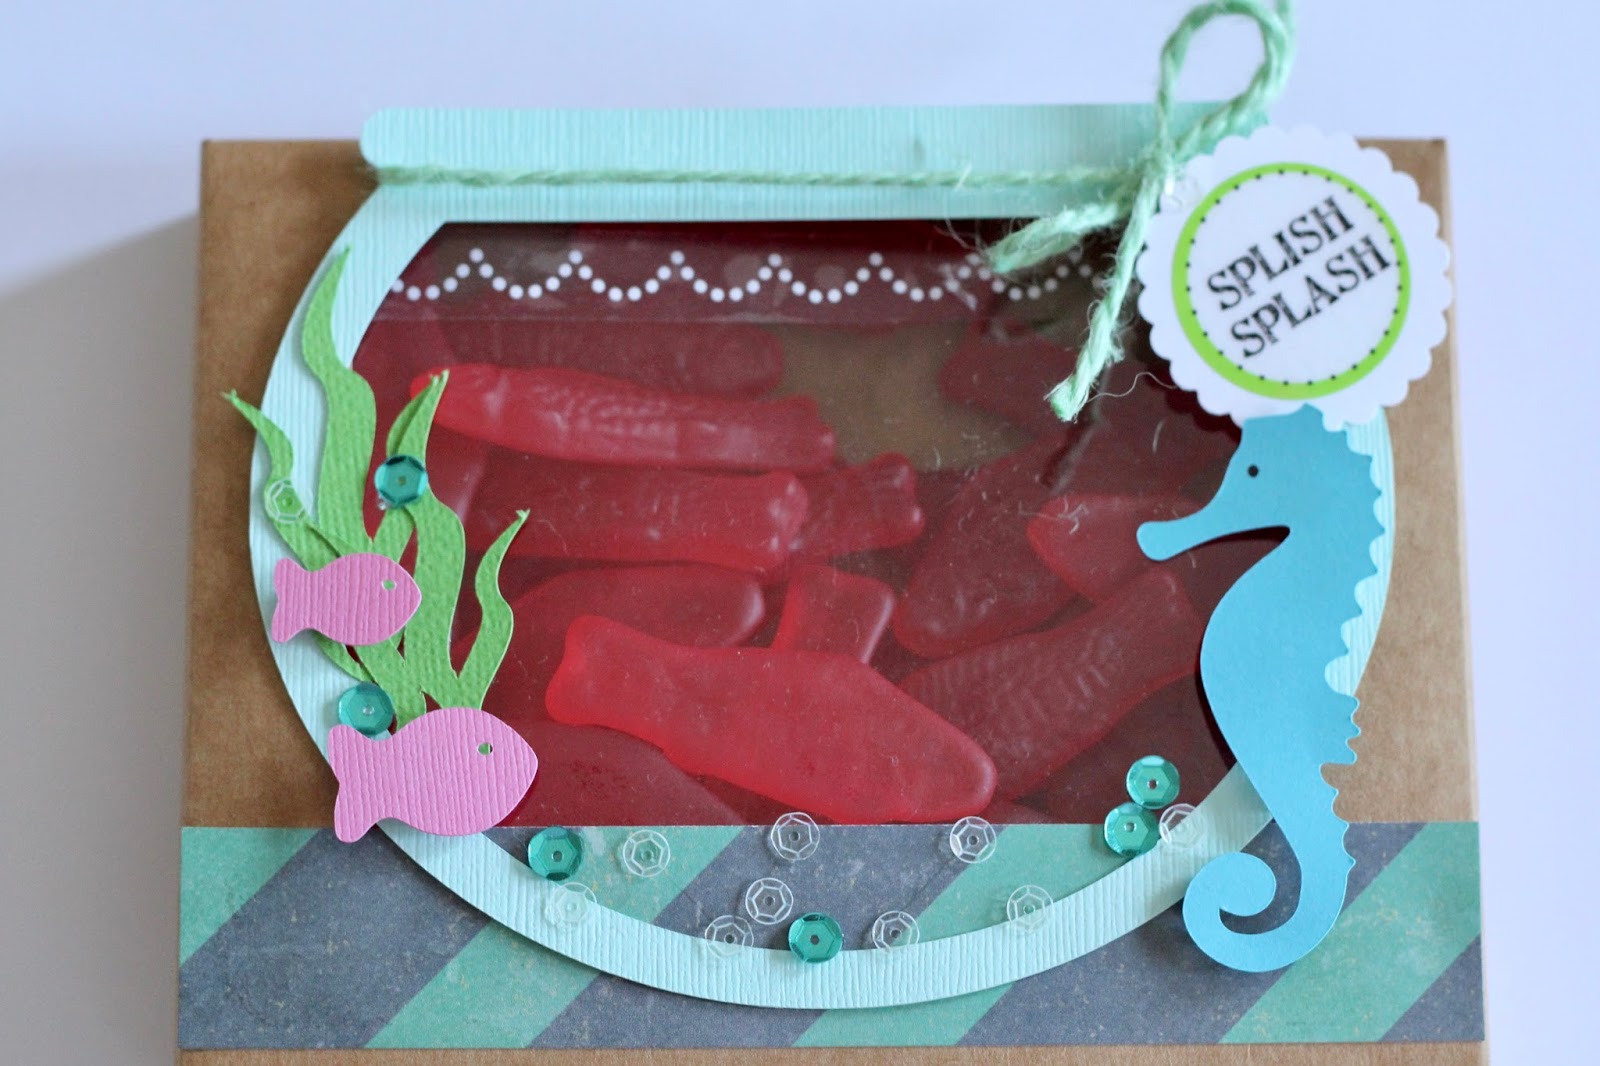
Fish Bowl Packaging by Shantaie


Hello!  Shantaie here today having fun! 

There's few things I love more than packaging.....anything! I'm one of those people who loves to wrap gifts, and package favors of any kind! When this weeks assignment was packaging, I really wanted to use a kraft window box to showcase some candy fish. 


By cutting a fishbowl to layer over the window, it gives the illusion of a shaker box, or a custom made favor box, how fun is that?!

I added a little piece of border sticker scallop as a little watery wave, and a sticker on a punched piece tied with mint jute twine. 


To finish the box, add a few little fish and some sea colored sequins. Fill the box with fish candies, or fish crackers for an adorable little favor or gift! 

Tuesday, September 6, 2016

Love.Joy.Peace.Patience.Kindness by Shelly


Hey y'all! Shelly, here! 

Today I'm sharing a simple and sweet set of cards with you! 


I started with making my cards. Which I chose use a kraft cardstock base, along with SRM's Just Believe stamps. I stamped the 'sentiments/border' to go around my card and then stamped the flower in the middle. After I used markers with the blender pen to color my flowers. 


Once done, I added envelopes to my set of cards and used some white jute burlap twine to hold it all together. 


I then placed the set in a glassine bag and added it inside a kraft window box. Next, I added some burlap ribbon around the box. To top things off, I added a white doily with a sticker and piece of jute burlap twine. 


A quick and sweet little set of cards, don't you say?!...

SRM products used:


Thanks so much for stopping by!

Monday, November 9, 2015

Lacey Little Bits by Shantaie


There are some things that are just perfection, lace is one of those things if you ask me. I have always admired the ability lace inherently has to transform. Lace can be elegant or frilly, country or rock and roll but it never fails to elevate!


Hello!  Shantaie joining you today!  Here I have used a 4X4 window box as both a shaker and gift box for a set of  small enclosure cards or tags. Each card shares the common element of just a bit of lace ribbon, how delicious! This is one time where it's true....a little bit goes a long way!


This is one time where it's true....a little bit goes a long way!


These little cards measure in at just 3.75X 3.75 and use a clear sticker from the Happy Holiday sentiment sticker sheet and my new favorite twine gunmetal shimmer {its so pretty}


My shaker is filled with silver, blue and snowflake sequins, pretty papers and a row of sticker stitches in red. 


Just pop the cards inside and its ready to give! Or keep :)

Thanks for stopping in!