Friday, September 29, 2017

Shake It Up Baby Card by Shantaie


Hi!  I'm Shantaie and I want to share a few different ways to use SRM stickers the way you would use a stamp, patterned paper, even an envelope seal!


When we think about stickers sometimes we think about the ease of use ....and rightly so, but we can also think about the versatility and function of clear stickers. 


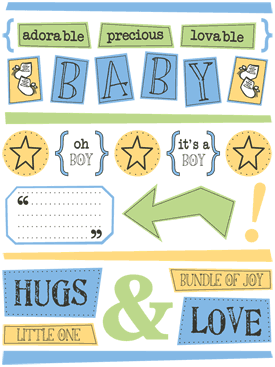
For my baby card I knew I wanted to make a sweet little shaker card, I cut 3 circles and used the three stars from the free style baby boy sheet as the base of my shaker, this takes the place of stamping AND coloring in one simple step! Saving me time, space, and money... yay!


I filled my windows with micro beads, sequins, and glitter. I used a double bow of jute and added a strip of white cardstock with a fancy sentiment on it, again in place of a stamped sentiment. Just below a little piece of the baby boy border.


Don't forget to add stickers to the inside of your cards to tie your sentiment or greeting together, here I have again used the baby boy we've got your border as well as the free style baby boy for the main greeting, adding both color and a fun font, SRM stickers are designed to work together, so the fonts are easy to read and are really pretty!


To create a handsome gift card holder I folded the top of this little kraft dots bag. Close to the bottom a strip of leftover patterned paper was added, and a layer of bitty stars and a strip of that we've got your border baby boy a star is born saying ties it together. 


I just love the live life baby's first year sheet and I used another circle sticker from that sheet to add color, and again a sweet dual font. 


I plan to put this in with the card as it is flat and will fit inside the embellished envelope. New parents can use a gift card to stock up on all those supplies that seem to always be needed!

I encourage you to look at SRM stickers as not just an easy way to decorate but as a really useful tool in your creative projects. 

Thursday, September 28, 2017

Sticker Stash Layout Tutorial by Giorgia


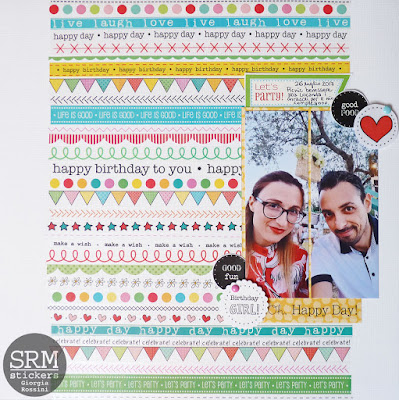
Hello SRM friends, Giorgia here with a technique to create a unique background for layouts.  One of my favorite SRM Stickers products are stickers, I use them all the time, and for this layout I used tons of them to create a funny background.


I started by pulling out all my stickers stash and choosing the ones that could be useful for my project: a lot of borders, stitches, birthday themed stickers - since I was scrapping my birthday's picture - and also some stickers with a different themes because in all the stickers sheet you can find borders, drawings and words that can be used for several purposes... just think outside the box and let your creativity spread!


To create the background I adhered borders and stitched stickers on the centre of a white textured cardstock: I alternated colors and motifs, and I created a stickers line from top to bottom. 


I adhered the pictures on patterned paper and I added other stickers as embellishments: I adhered some of them on white cardstock and then fussy cut them, to make them pop from the background. For another one I used a small white punched piece.  Use foam tape to adhere it to give an extra pop! 


To handwrote the journal with black pen from Le Pen 4 Piece Set - Dark Colors on a birthday theme label. These pens are great to add journaling also on these smooth surfaced stickers: the ink perfectly dries, it doesn't fade away and it doesn't make a mess (I am always worried to make a mess when I handwrite my journal, since I am a leftie and with many pens I have problems, but not with these!)


I used a sticker as title and I added enamel dots to give an extra pop of colors.


Some close up of the finished layout: 


I hope you liked this technique, I hope you will give it a try.  I would love to see your projects!

Until next time,
ciao, Giorgia 


SRM products used 

Wednesday, September 27, 2017

Bible Journaling with Stamps by Karen


Hello!  Karen here today with some Bible Journaling with SRM Stamps. 


In the Book of Exodus, God tells Moses,
"Say this to the people of Israel: 'I AM has sent me to you'" (3:14). 
God, I AM, is past, present, and future. 
He is, as the verb indicates, the essence of all being. 
God is Father, Son, and Holy Spirit, three in one. 


For this page, I began by stamping Father, Son, & Holy Spirit in yellow. I felt it was a little too light, so I added darker yellow/gold layers with my ColorIn Watercolor Twists and waterbrush. I repeatedly stamped "I am" over the yellow and added the "amen" block stamp throughout the page.
I repeated the element of 3 with three mixed media leaves.


We are so incredibly blessed by a God who wants to be, and is, present with us. He meets all our needs because He is all things. Be blessed today as you reflect on the great I AM.

For my bible journaling page I used:

Tuesday, September 26, 2017

Birdhouse Gift Box by Michele


 Good morning my friends! Michele here with a bird house shaped box!
Every now and then I love to dust off the ole' Silhouette and do something "outside" the box!  (Sorry, I couldn't resist!) ;)


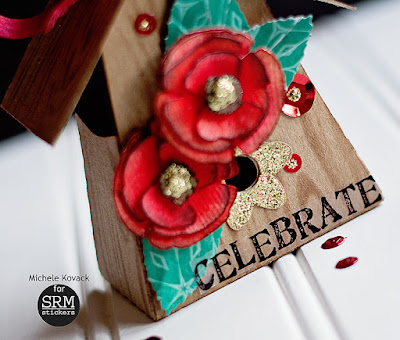
I cut the bird house out of kraft card stock.  I stamped it with a wood grain texture and assembled it.  I added flowers, leaves and a few sequins. I decided to finish it off with an SRM sticker!  Mine is from the Happy Birthday Sticker Sentiments, which is no longer available, but you can find a very similar sticker in the Sentiment/Congratulations sticker sheet!


Here is one last look at my bird house in all of its glittered glory! 


Have a wonderful day my friends! Thank you for stopping by!

Monday, September 25, 2017

Back to School Card Set by Tobi


Hi there, it's Tobi Crawford here! As a teacher I always have a need for school-related cards, especially at the beginning and the end of the year. Councillors, admin, and fellow teachers need a special "kudos" this time of year, and small little note-cards are the perfect token of appreciation. 


Each card is a little different (that's for me - so I don't get bored), but also because I wanted to switch up the sentiments slightly to be a little more personal. 


The formula is easy: 

 1) ruled patterned paper
2) lined patterned paper
3) apple stickers (Live Life: School)
4) sentiments (Fancy Sentiment: Thanks)
5) twine (Solid Maraschino)

Thanks for stopping by!  See you again soon!

Friday, September 22, 2017

Mixed Media Project Life Cards by Shanna


Happy Fall Y'all!!  Fall brings some of the best things in life back to me.....including my beloved Pumpkin Spice Latte!!  It's like fall in a cup!  I decided to scrapbook my first PSL of the season this year, and to commemorate it I chose to make a mixed media project life card utilizing some of my favorite SRM products!


Here is what I used:

** SRM Sticker Products**
Coffee Plans  Clear stamp set
BIG Numbers Clear Stamp set

**Miscellaneous Craft Supplies**
Matte Gel Medium
Glass Bead Gel Medium
Decorative Stencils (Brick Motif and line-dots)
Distress Oxide inks in: Marmalade and Vintage Photo
Glossy Accents
Adhesive of choice


I love how the layers all came together to make this card complete... It makes my pumpkin-spice-loving heart happy! I made a quick digi journal card and inked it to match the 4x6 card.  I love the set and can't wait to use it in my album!


My crafty friend Carrie gave me a delicious recipe for an amazing homemade Pumpkin Spice Latte....hop on over to my blog and check it out!

Do you have a favorite fall drink??  Tell me about it in the comments!!

Until next time,

Thursday, September 21, 2017

Mixed Media Fall Decor & Video by Karen


Hello!  Karen here today with a mixed media project and a video too.  


I love fall and can't help creating a project or two featuring fall's rich colors. Today I'm sharing a fun mixed media project with lots of layers! 
Watch this video to see this project come together.


The finished project with all its yummy layers, including: paper, paint, washi tape, clear stickers, stamps, vinyl, and jute twine.


I'm ready to decorate for fall. Are you, too?


For this project, I used:

Wednesday, September 20, 2017

Sports Tubes by Shantaie


Hi guys!  Shantaie here having some fun with TUBES! 


The word "Fall" is practically synonymous with gatherings, this time of year we come together with friends and family for hearty meals, warmth, and for football fans game time! We all have our favorite teams, and favorite players and favorite game day snacks, the one thing we all can agree on is that game day parties are a great time no matter who you are cheering for.

I love these tubes for a sweet little treat to give each tailgater or to place on the table along with the nachos and party subs, filled with mint M&M's in green they are adorable sporty and sweet!


To make the tags, I used medium green punched pieces and added a white sticker stitches border along the bottom to look like the field (cute right?) I added a goal post I cut with my Silhouette and put the football sticker from the have a ball sheet onto cardstock and trimmed them out, and attached them to the goalposts.
A double bow of twine in peapod and cappuccino was tied around the tubes  and the tags were attached with glue dots. I look forward to sharing these at our next game day gathering!!!

Tuesday, September 19, 2017

Watercolor Techniques by Christine


Options abound when it comes to watercolor techniques and we have all kinds of products for you to play with too!  Christine joining you today with a set of techniques for you that work great using the Watercolor Twist Pencils!  The Watercolor Twist Pencils come in three different sized packages, 12, 24, and 36.The video below features several ideas with tutorials on how to do each:


Here's a card that showcases how I used one of the backgrounds I created.


I punched the two leaves out from a watercolor background I made.  Doesn't it add a lovely, whimsical element?  The more I play with watercolor, the more I love the softness it adds.


The sentiment comes from the Child of God stamp set which is a versatile set great for cards and so much more. 

Monday, September 18, 2017

Beware of Hitchhiking Ghosts Halloween Sign by Samantha


Hello! Samantha here with you today to share a Halloween decor idea. We love to decorate for Halloween in our family, but my kids aren't too big on the scary aspects of Halloween. We are also big Disney-a-holics in our family, so I decided to draw inspiration from one of our favorite Disney rides (the Haunted Mansion) and create this Beware of Hitchhiking Ghosts Halloween sign. 


For this project all you'll need is wood (mine is about 11" x 13" long), paint (I used white and gray), SRM vinyl (I used black and gray), and a way to cut vinyl (I uses a Silhouette Cameo).


I started by painting my wood with white paint. To give this a little more of a distressed look, I sponged a little gray paint around the edges when the white paint had dried. 
  
 
I cut my black vinyl words using a free font called Haunted Mouse. I thought it had the perfect haunted house feel to it...old, elegant, and a little bit creepy! I added my hitchhiking ghost that I cut from gray vinyl last. It was easiest to line up my words on top first, then my words on the bottom, and finally center my hitchhiking ghosts in the empty space. 


Since we have awesome memories of family time spent on this ride, this sign is a perfect piece of not too scary Halloween decor. Do you ever take decor inspiration from your favorite places? 

Friday, September 15, 2017

Coffee Lover's Blog Hop - Project by Shanna Slater


Hello, Shanna here with a fun caffeinated card using SRM Stickers Coffee Plans clear stamp set.  SRM Stickers is a Super Sponsor for this year's Fall Coffee Lover's Blog Hop, be sure to "hop" over and check it out!


 I simply adore this set for it's tremendous versatility (it is a go to set for me frequently!).  In this particular project I used nearly every stamp in the set! 


I stamped all of my images using my stamp positioner for precision placement using Versamark ink


 I heat embossed all of my stamped images in a white detail embossing powder, allowing them to all stay front and center after inking over them with Distress Oxides in Vintage Photo.  The coffee cup you see in my pictures isn't just a prop...It's a TOOL too!  I watered down some walnut stain Distress ink and dipped the bottom of my cup in the ink.....stamped the "coffee ring" around my panel and again on the inside of my card to frame out my sentiment! 
 I love how the regular Distress ink and Distress Oxides collide and look.  


Everyone needs a little encouragement....and caffeine generally helps too! 


Supplies used in this project:
Versamark Ink
Distress Oxide in Vintage Photo
Distress Ink in Walnut Stain
WOW Super Bright White Detail embossing powder
Recollections Clear embossing powder
Tim Holtz Stamp platform
Miscellaneous puffy heart stickers
Coffee Washi (Recollections I think)

 As avid coffee addict drinker I love everything about this card... 
                                              What about you??  


And remember what coffee says... "You can do it"!!!

Until next time, stay happily caffeinated!!

Thursday, September 14, 2017

Mixed Media Halloween by Tobi


Hi there, it's Tobi Crawford here with some mixed media fun! Halloween is a great reason to get a little messy with your projects, and it's fun to let loose and experiment a little.

I used a 3x3x3 Kraft box as my base. Before I assembled it, I did some stencilling, and misting and created a fun little background for the vampire (Sizzix). 


(For all of the stencilling I used Tim Holtz Distress Oxide Inks)

Once all of the sides were decorated, I folded the box into place and added the sentiment and vampire!


Thanks for stopping by!