Wednesday, February 28, 2018

Your Word is a Lamp Bible Journaling by Samantha


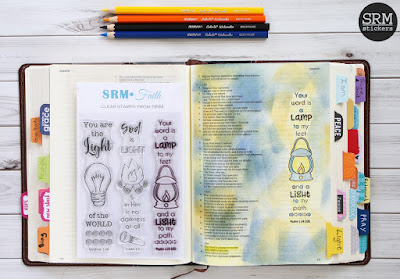
Hello! Samantha here with you today. I am absolutely in love with the new Bible Margins stamps, so today I have a Your Word is a Lamp Bible journaling to share with you. 


 For this page I used SRM's Bible Margins Light Stamp Set and Color In Pencils, as well as black, yellow, blue, and orange ink, and temporary adhesive. 


I started by stamping my image in the margin of my Bible and roughly coloring it in. 


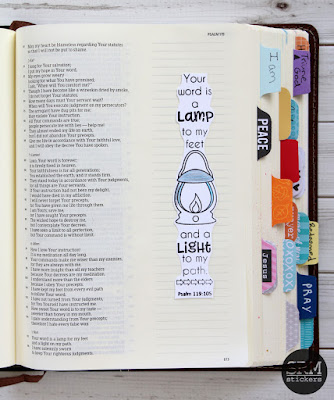
I stamped the image a second time on a scrap piece of paper. I cut it out and laid it over the image stamped in my Bible (securing it with a bit of temporary adhesive). 


I used the cut out image as a mask over my Bible so I could then sponge ink on to the entire page. 


I finished up by adding a bit more color and detail to my Bible Margin Stamp with my colored pencils. 


Have you gotten to use any of the new Bible Margin Stamps yet?

Tuesday, February 27, 2018

Snowman Layout by Melanie


Welcome, welcome! So glad you could drop by today :) We are in the thick of winter here--which actually means lots of rain and an occasional snowfall. My son is so happy to see the snow and will immediately want to go outside to build a snowman. So, I thought it would be fun to document that with our first snowfall of the season this winter.

As you can see, it took most of the snow in our yard to build the snowman! But he sure looks happy doesn't he?

 I used several different sticker sheets to enhance the layout. The sticker stitches always come in handy to define edges or add some depth.

SRM has quite a few stickers available for winter-theme projects. I appreciate how the colors on the sticker sheets coordinate across the line. That way I can mix and match from several options.


Thanks for stopping by today! We are hoping for some more snow soon. Let the snow-dancing commence!

Labels By the Dozen #63005 Bright Blank
Sticker Stitches #58003 Sticker Stitches Black
Sticker Sentiments #51009 Winter
Freestyle #50001 Winter
Live Life #49004 Calendar Year

Monday, February 26, 2018

Bible Bubbles Bible Journaling Page and Process Video by Karen


The new Bible Bubbles faith stamp set is so cute and perfect for faith planners, cards, quick notes, and the margins of your Bible. 


After putting down a thin layer of acrylic paint for some background color, I used several of the stamps on this page in the book of Joel. 


 Mirroring the stamps, I then drew a larger bubble for my journaling.


I really like how they look clustered together on my page.
The crosses featured on the page are from another new set called Bread of Life.
Watch this process video to see more of these stamp sets and how this page came together for me.


For this project, I used the following SRM products:

Friday, February 23, 2018

Happy Easter Hybrid Project Life Layout by Shanna


Hello SRM friends, Shanna here today with a springtime Easter layout in anticipation of Easter 2018!   I am a Project Life/pocket page scrapbooker mainly, but here lately have been enjoying making hybrid layouts that combine a PL layout with a traditional 12x12 layout.  I am in love with the marriage of these two!  For me it's the best of both worlds, because sometimes there is a single picture or two that I really want to highlight, ESPECIALLY with holidays.  

I decided to "scrap ahead" and create a layout that will highlight this coming Easter's festivities.  I loved pulling all of the different elements together for these pages!  


 Here is a look at the traditional 12x12 scrapbook layout...I am really enjoying all of the layers! The doily added some visual contrast with all the squared edges going on in this layout as well.  Easy-peasy :)


For the traditional 12x12 layout I pulled stickers from the Year of Memories/2018 and Express Yourself/Easter stickers sets. 


I also used a mini calendar sticker and circled the date!  Such a fun way to journal the date!  I had fun creating bunny ears above my sticker sentiment with some pink jute twine that I unbraided for a single piece.  Hippity-Hop!


Next up, here is a closer look at the pocket page layout (Project Life format). I am a big matchy-matchy person....so the 2 layouts make my crafty heart happy! This layout pulls together the same sticker sets used in the traditional layout, so the coordinate perfectly!


I had a lot of fun embellishing the different cards..I discovered a new (at least to me!) technique to use my fabulous jute twine for....Rosettes!!!  All I did was spiral and twist a single strand of the jute around in a circle to make these whimsical little flowers!  


Here is a larger version of the jute rosette with a dainty yellow button for the center :) The Easter eggs sentiment comes from the Express Yourself/Easter stickers set as well! I also took a close up of the smaller one...I did a tighter spiral for the smaller ones, but the larger one lets the "ruffles" from unbraiding the jute totally shine! 


I also took a close up of the smaller one...I did a tighter spiral for the smaller ones, but the larger one lets the "ruffles" from unbraiding the jute totally shine! 


Another fun combo of  Express Yourself/Easter  and Year of Memories/2018 made for a quick and cute journaling card. A small piece of jute finished off this card nicely!


Supplies used:
Pink Jute Twine


Have you ever "scrapped ahead"?? 

Until next time...


Thursday, February 22, 2018

No Heat Foil Faith Cards by Shelly


Hey y'all! Shelly, here.
Today, I'm sharing a set of foil faith cards with you. And did I mention, I used no heat and no fancy machine for the foiling!?! :)


I started with my stamps. I did some masking with the images and the rest I just stamped in black ink. Now for my images, I used a paintbrush with glue and 'painted' it on my images and then stamped it on my card with the sentiment piece. (Note: a stamping platform works great for this, so everything lines up.)


Once having my image stamped on my card, I cut a piece of foil to fit over it. Then pressed it down my my fingers and simply ran it through my die cutting machine. After, I peeled off the foil and....ta-da! A foiled image! 


To finish my cards off, I used a black pen and added a simple line around the card. I usually prefer my lines to be straight but I really liked the 'freehand' of a little bit straight and a little bit not so straight. ;) 

Thanks so much for stopping by!
Enjoy your day!

SRM Stickers supplies:

Foil

Wednesday, February 21, 2018

Light of the World by Christine


The new Bible Margins Stamps are so beautiful and just perfect for diving into your Bible Journaling!  Christine joining you today to show how I combined the Bible Margins stamps with a few more stamps in our line to create some colorful Bible Journaling!


I used Distress Oxides to create my background.  I like the milky look that they produce!  I just dabbed a sponge into the oxides and then spread them on my margin.  I dried between each layer so that they would maintain their own identity.  I then added my stamping - beginning with the Bible Margins - Light Set.


I used the cross from the Pray, Journal, Repeat Stamp Set as an accent around my Bible Verse.  I also drew a flourish to connect the top all the way to the bottom.  One of the things I enjoy most about this process is the freedom to experiment. 


I had not previously used my white gel pen to highlight around black drawing or journaling but this was a good time to try it out.  It changes the look a lot and was a nice way to soften everything up a bit!

Run on over to the SRM Store and grab these new stamps - they will be a great addition to your Bible Journaling Collection!

Tuesday, February 20, 2018

DIY 2018 Planner by Melanie


Hi Everyone! Melanie here today to share with you my planner for 2018. I LOVE having a planner! Over the past few years I've tried several different ones--but never really found one that I could use efficiently or that matched my needs. So . . . this year I decided to make my own :)

(Front Cover)

I wanted one that was light and compact; a planner that wouldn't end up half-unused. After searching around for blank journals, I found one that I preferred with dot pages. This makes it easy for me to line things up, but not feel like I have to fill up every line.

The look of colorful, decorated planners is BEAUTIFUL--but it doesn't work for my style of what I need a functioning planner to be. Using SRM stickers and stamps is perfect for designing my own planner because of their classic style and clear backing. It would be easy to add color to any of these pages if I wanted to.

(Inside title page)

(Year at a glance)

I tried to incorporate my favorite layouts from other planners, as well as ideas of my own. I need the year at a glance and planning ahead pages for the upcoming months. Because I am only making one month at a time (so I don't have wasted pages in between months), the layout with upcoming events is really important for my planning.


As you can see I used a ton of SRM stickers to set up these pages and they turned out better than I had imagined!

For the monthly layouts, I am using the new planner season stamps. For the February layout, I used both the Winter Plans and Spring Plans sets, as well as the Notes to Self Planner stamps for the days of the week.


I love having these pages tailored to my needs and style. Happy planning! :)

SRM Products Used:

Monday, February 19, 2018

Bible Journaling Stamp Layout by Samantha


Hello! Samantha here with you today. It's no secret that I love SRM's Bible journaling stamps. However, I usually use them in my Bible, and only occasionally on cards. I thought it would be fun to try something different with my stamps, so today I have a Bible Journaling Stamp layout to share with you. 


I saw this "Every good and perfect gift" stamp from the new Bible Journaling Bible Margins Rejoice stamp set, and knew it would work beautifully on a layout. 


I used ColorIn Watercolor pencils to color in the stamp in colors that coordinated with my matching paper. Placing the stamped image in between two photos really makes it pop as a focal point. 


I'm super happy that I stepped outside my comfort zone and tried SRM's Bible Journaling stamps on something besides my Bible. Have you ever used SRM's Bible journaling stamps on a layout?

Friday, February 16, 2018

Spring/Love Layout by Giorgia


Hello SRM friends, Giorgia here.
Today I am here to show you a spring layout (we are still in winter days but I really needed to think about sunny and warm day, since here it is rainy and foggy!)  

So I printed this picture of me and hubby last year on holiday in beautiful Tuscany and created a colorful springy layout.  As background I used a photographic paper and I decorated the layout with many SRM Stickers!


I adhered strips of different colors to the background paper. I used many types of FreeStyle stickers, then I added the picture and decorated it. I also used the lovely quote from Say It With Stickers/Outdoors sheet.

Some stickers are adhered directly on the paper, some others are adhered on white cardstock and fussy cut.  For some of them I used foam tape to make them pop.


I also used some stickers to create my title "wonderful vacation". I added sequins to  little extra sparkle (you know, I love sequins!)


I hope you liked my layout and wish you a good day. 

Until next time,
ciao, Giorgia

SRM products used 

Thursday, February 15, 2018

Lucky Cards by Shelly


Hey ya'll! Shelly, here.
Today I'm swinging in to share a couple of fun and luckycards with you! 


I started with my background, which I used a clover stamp with and spritzed it with water and then stamped it on my card base. After I let it dry. I then used some gold glitter cardstock for my rainbows and some gold sequins for 'gold'. 


I added some foam tape on the back of my rainbows before adding them to my cards. Then glued on my gold sequins for a 'pot of gold' at the end of the rainbow. Lastly, some washi tape with a sticker sentiment on it and then some green twine. Fun and easy, right?!...

Thanks so much for stopping by!
Enjoy your day!

SRM Stickers supplies:


Wednesday, February 14, 2018

Vinyl Valentine by Tobi

Hello!  Susan here to wish you a Happy Valentine's day and to thank all of our wonderful design team members for creating so many fabulous Valentine's projects.  Hope they have inspired you! 

====================

Hi there! Tobi here today sharing a valentine idea using one of SRM's most versatile products: vinyl! It's not just great for home decor, it's fabulous for cardmaking too! 


Once you cut out the shapes you want, think of the vinyl as a read-to-go sticker! Transfer tape (the red grid) makes it easy to transfer your design to your project without worry!


I chose to mount my vinyl to vellum to create a quasi-window card. You have to rub the vinyl into the paper and carefully lift the transfer tape to reveal the design!


And here's a look at the card with a little light streaming through the vellum... Pretty, right? 


Thanks for stopping by!