Thursday, August 31, 2017

Using Jute Twine on Cards by Shantaie


HI, I'm Shanatie and I love to make cards of all kinds! 


I wanted to share a couple of ways that adding a bit of colorful jute twine can make a card that is already pretty, really pop!


For this simple shaker card I stamped the back of my window with bible backgrounds little clouds and the flowers from just believe all built into a frame and filled with sequins, and loose flowers.


 A super cute card on its own, but that pop of wrapped jute twine and tiny bow, really pulls the bold colors together, and adds essential texture and softness.


For this card I created a circle window and stamped the happy sentiment from BIG happy and embossed it in gold, to add a layered greeting a happy birthday to you from the we've got your border sheet clear sticker was placed just below the embossed sentiment. A watercolor flower was embossed in white placed overlapping the window, a tiny bow of plum jute twine anchors the flower and adds a jolt of fibrous color in the same shades, its beautiful!

Try adding little bits or bows of jute twine to your cards, and layouts for a beautiful alternative to a bulky ribbon!

Wednesday, August 30, 2017

Polke Dot Bag/Card Holder by Angie


Hello!! Angie here again with a fun way to give a card!


 I wanted to use the black polka dot cotton bag instead of an envelope to hold my card.


I started with a scalloped circle punch out in a teal blue color and added a 'Love You' sticker to the center. To add some embellishment to the circle, I used the small flowers from the Just Believe stamp set. I stamped them with archival ink, watercolored them using the watercolor markers and pencils and then fussy cut them. Quick, easy and so cute!!


For my card, I used some bright pink cardstock from my stash and just trimmed it down so that it would fit inside of the bag. I used another scalloped circle punch out to tie the card and bag together. This time I used the larger flower and branches along with the butterflies from the Just Believe stamp set. I watercolored them as well and cut them out. The top of my card was looking a little plain, so I used a scalloped sticker stitch to fill in the space. I placed a best wishes clear sticker at the bottom to complete my card. 

What fun a fun way to give a card instead of the traditional envelope!

Tuesday, August 29, 2017

Sermon Notes Bible Journaling & Video by Christine


Who likes to take Sermon Notes?  Christine here today and I'll admit it's a bit of a foreign concept for me on a live basis because I am married to a pastor....so I'm fending for myself in the pew with four kiddos.  Today I have a couple ideas of how to go in with some ready made creations to add your sermon notes into!  The first project involves a traveler's notebook.  The second is a mini book for kids.

Let's kick things off with a video walk thru of how I created these two projects:


Now let's take a close-up look at these projects - here's the full spread in my traveler's notebook.


The notebook combines the use of the Sermon Notes Stamp Set, The Amen Frames Stamp Set, and the Bible Background Stamp Set.


The Bible Background Stamp set was perfect for adding some interest to my punched out butterflies!

I made the kids notebook Black and White so that it could be colored.


Then I set my 10 year old loose on coloring! This is the cover page - packed with the Sermon Notes Stamp Set.

Here's one of the inside pages with just the black and white.


My goal was just to leave enough room for a little bit of note-taking and then places to doodle and color.


Here's what it looks like when she filled in one week!

So there you have it, a couple of ideas for you on how to start using those new stamps in your Sermon Note taking on Sunday morning!

Monday, August 28, 2017

Hooray... Happy Birthday Card by Jennifer


Hello! My name is Jennifer Powell and I am very excited to be one of the new faces on the design team. I am a busy stay at home momma to three kiddos and one very sweet little dog...oh and I can't forget my very understanding husband. Northwest Iowa is the place we have called home for the last eight years. I am a lover of all things coffee, Bible journaling, planning, homeschooling, and making my everyday life a little more beautiful and crafty. I am so looking forward to playing, posting and hopefully providing fun inspiration to get you all up and crafting!

Today I am sharing a birthday card.
I was inspired by the background plaid paper and knew right away I wanted to create a more rugged masculine card. I had these fun wooden star pieces that added to the woodsy feel I was trying to create. I stamped the 'Happy Birthday to you' in a very subtle black and embossed it to create texture. After stamping the word 'Hooray' on the banner in StazOn ink I thought it need just a small punch of color so in came the cute twine bow.

On the inside of the card I used the leftover pieces from the front background paper as well as a SRM birthday clear sticker  


I had so much fun using this Birthday Plans stamp on my card!  


Thanks for stopping by and hope you have a crafty day!
SRM Sticker supplies used:

Friday, August 25, 2017

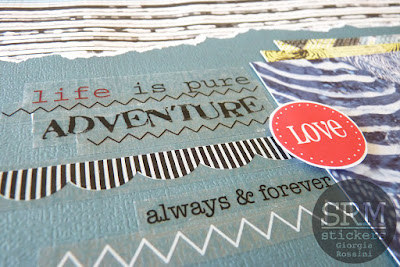
Life is Pure Adventure Layout by Giorgia


Hello SRM friends, Giorgia here and today I am sharing a layout with you.
 I love making layouts.  It is my favorite way to preserve memories.


I scrapped this picture of my hubby in front of a mural.  The picture had great colors and I matched them with papers and SRM stickers. I adhered some of them on white cardstock and then fussy cut them, to make them pop from the background. Use foam tape to adhere to give an extra pop! 


 I adhered one sticker directly on the picture: I love the subtle transparency of SRM stickers!


One of my favorite SRM products are We've got your border stickers. I added a lot of them! 

Until next time,

ciao, Giorgia
SRM products used 

Thursday, August 24, 2017

But first coffee....by Shelly


Hey y'all! Shelly, here.
Today, I'm sharing a sweet little gift with you! 

There are so many fun and new goodies from SRM Stickers, I didn't even know where to start! lol Then as was doing some thinking and looking through things, I came up with a coffee gift idea. 


I started with my tag. I used a canvas tag and stamped on my coffee sentiment, using a brown ink. After, I added a couple green die cut leaves and a wood veneer coffee cup. Once done, I added my '#caffeineplease' sentiment to a piece of white cardstock using brown ink and then trimmed it to into a small banner/flag. 


I then choose a little Kraft window box for my gift, which I added a burlap bag inside of it. (You can add coffee beans, coffee packs, chocolates, etc. inside the burlap bag.) After having my goodies inside my box, I wrapped everything together using all 3 colors of the new jute twine. Simple, yeah?!...

Thanks so much for stopping by!
Enjoy your day!

SRM Stickers supplies used:


Wednesday, August 23, 2017

Mini Calendar Teacher Gift by Karen


Hello!  Karen here today.  I love doing Back to School projects! 


It's almost time! The summer is winding down and school supplies are stacking up. Today, I'm sharing a cute back to school calendar project for your favorite teachers. I started with a mini clipboard that I covered with school themed washi tape.


Then I grabbed all my school themed SRM stickers and the 2017 and 2018 calendar stickers. Using precut 3x4 journaling cards sped up the project and provided additional background color. I used the mini calendar stickers and lots of SRM stickers to create a card for each month. Each month's card is fun and unique.


Happy back to school time!

For this project, I used lots of stickers from these SRM collections:

Tuesday, August 22, 2017

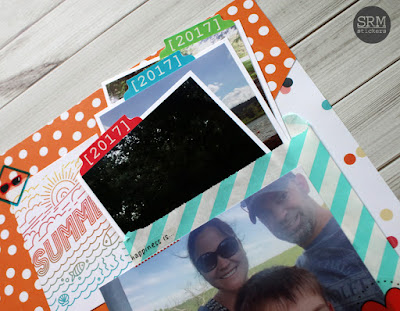
Using Patterned Bags Layouts by Samantha


Hello! Samantha with you today. If you're like me, sometimes you have more photos than you know what to do with. Today I'm going to show you how you can use SRM's patterned bags to get more photos an on layout. 


Every year I have multiple camping photos to scrap. Sometimes the photos feel new and fun, and sometimes they feel a bit redundant. However, they tell the story of our summer and I want to scrap them anyways. 


I start by pulling all of the photos I want to use. Then I pick my favorite one (like this group shot of us hiking up a tower) and make it my focal photo. All the other photos will go in the patterned bag. I build the layout around my focal photo, and use the patterned bag as a layering piece like I would a piece of patterned paper. Adhere your bag directly to the layout and layer your photo on top.


When your layout is finished, add your extra photos to the patterned bag. I like to back my photos with a bit of card stock, and I used Year of Memories Stickers to add tabs to the tops of my photos. These aren't necessary, but add a fun design element and help draw your eye to the fact that there are photos in the patterned bag. 

I also used stickers from Calendar Companions,  Stickers by the Dozen ValentinePlanner Icon Stickers, and We've Got Your Borders Bright to embellish my layout.


The best part is, SRM carries a wide variety of sizes, colors, and patterns in patterned bags, so you're sure to find something that works well on any layout. The small bags (like I used here) work great for 4x6 or smaller photos. The medium patterned bags work well for 5x7 photos, and the large bags are perfect for 8x10 photos. 


Using patterned bags on a layout is a fun a versatile way to add more photos to your layout!

Monday, August 21, 2017

Journal Set by Tangii


Hey yall!  Tangii here with my very first DT post.  To be honest, I made this for me, yes for me!  Lol, I really want to start Journaling for a few reasons and if I have this pretty display sitting on my night table, I'm much more likely to grab it!  And just to show that I'm not a total "Greedy Gertie", I also made a gift set.  Here's mine…


I bought this pretty little journal at Target.  SRM carries these Le Pen fine point pens in 4 pretty sets, this is the Neon set.  The cute little bag is perfect for keeping my journaling goodies together, and by just attaching the tag with a dab of glue to the bag, I can tighten or loosen the drawstrings without disturbing my tag.


This is the set for a giftie, everything is the same just a bigger tag.


For the gift tag, I used the "hi" stamp from Big Hello stamp set, I love the chunky look!  The flowers are from Just Believe, and while I LOVE this set, the individual stamps are so great to mix up with other sets! I stamped them, colored with markers then cut them out and attached them with Foam Dots.  I also added a flower to the bag, just to tie it all together. I used some Jute Twine for the bow at the top... love this chunky texture!!


This is my tag, the "Be Happy" are from the Everyday Plans set... this set gets A LOT of use, lol!  I also added another flower from Just Believe and a woodchip heart (colored with a marker) and another Jute bow.

For these projects I used Everyday Plans, Big Hello & Just Believe stamp sets, Le Pen 4 Piece Fine Point pen set in Neon, Cotton Bag with silver dots and Olive Jute.
Happy Journaling!

Friday, August 18, 2017

Coffee Plans Gift Idea by Angie


Hello SRM friends! Angie here with you today to share a cute gift card holder using the Coffee Plans stamps!


I started with the medium kraft pillow box. I used the coffee plans stamps and some brown ink to stamp different images and words all over the pillow box. I heat embossed the 'But first, coffee' sentiment using Versamark ink and black embossing powder. 


I tied some black jute twine around the end of the pillow box 
and added a tag.


I wanted to make the enclosed gift card a little more fancy, so I wrapped it in a 
doily and then added a 'Just for you' sticker and some more jute twine

This gift idea was so quick and easy--and it's super cute! Any coffee lover would love it! 

Thursday, August 17, 2017

Back to School! (Already?) by Michele


It is hard to believe that back to school is right around the corner! Which means this gal right here is back to work soon! ;)  I used the new Fall Plans Clear Planner Stamp to create this card for my son. 
I stamped the checks  in a horizontal pattern.


I broke up the checks with my sentiment, the row of apples, and the glittery strips.  I used my Mini Misti to line my apples up.  (Otherwise they definitely would have looked wonky!)  I added black  jute at the top and 3 epoxy circles to balance the card.  


To create a bit more interest, I added glossy accents to each apple. I also used a white gel pen to add the highlight. 


Thank you so much for stopping by today!!

Wednesday, August 16, 2017

Shout! Bible Journaling Page by Karen


Hello!  Karen here today I'm having fun with SRM's new Sermon Notes Stamp


We attended our church's Vacation Bible School recently and this story in Joshua
was the focus for one of the day's activities. Through the power and might of God alone, Joshua and the Israelites took the city of Jericho. God showed his mighy power as He caused the walls of the city to fall flat. "Shout, for the Lord has given you the city." -Joshua 6:16. 


For this page, I used the flat end of a make-up sponge and grey ink to create a brick-look background in the margin. The speech bubble stamp on the Sermon Notes Faith stamp set was perfect for the "SHOUT!" title made with stickers. 


Inside the speech bubbles I used a combination of stamps and handlettering to repeat the phrase echoed by the children during Vacation Bible School, "Shout! God is mighty, the victory is won!"

Thank you, Lord, for the victory won through our Savior, Jesus Christ.