Showing posts with label Watercolor Twist Pencils. Show all posts

Monday, May 21, 2018

Walk by Faith Bible Journaling & Card by Karen


Part of the process for me as I Bible journal is prayer. Oftentimes I have specific people in mind as I reflect on scripture and use the Word I am reflecting on as part of my prayers. That was true as I reflected on Psalm 18 and prayed for a friend who was battling cancer. After my prayer and Bible journaling time, I wanted to send a note to my friend to encourage her and let her know I was praying for her. I decided to use my Bible journaling page to create a greeting card.


For my page, I used the spear-like arrow stamp on the Walk By Faith stamp set. I think it's the perfect visual for verse 39 "For you equipped me with strength for the battle." I colored in my sketch with ColorIn Watercolor Twists.


The process is very simple. I scanned my page (you could also take a photo) and imported the file into a word processing document so that I could resize it and print it on my color printer. After that, it was simply layering cardstock on top of a 5x7 card base.


Watch this quick video to see it all come together.


For this project I used:
Watercolor Twists | Child of God Stamps | Walk By Faith Stamps

Thursday, May 3, 2018

Grad Card Season by Shanna


Hi SRM family!  Shanna here today to show you a couple creative cards to celebrate that special graduate in your life!  My oldest is about to finish her junior year in high school...so NO graduating this year (this mama can't even!) but she does have a few good friends who will be graduating.  I took the opportunity to create a couple cards utilizing her school colors, black and purple, but they could be easily modified to whatever color scheme needed. 


 I discovered I don't own many graduation stamps, but I really wanted to stamp on these cards. So I sifted through my SRM stamps and came across my Birthday Plans set...BINGO!  This set worked perfectly to create some backgrounds to die cut out for my cards!  I first stamped out "panels" of the images I intended to die cut, and then ran them through the big shot with my die of choice.  I grabbed my Take 2 Stickers by the dozen/Graduation stickers for my medallion sentiments and my cards were complete!
 I used the celebrate border stamp, hooray, and the balloon icon to make a total of 3 panels.


Take a look and let me know what you think!


I really wanted a bolder splash of color, so I chose to watercolor the balloons purple with my watercolor twist pencils.  Easy peasy and just what I had envisioned!
Supplies used:
Miscellaneous purple twine
Versafine Black ink

Thanks for stopping by!
Until next time,


Thursday, April 19, 2018

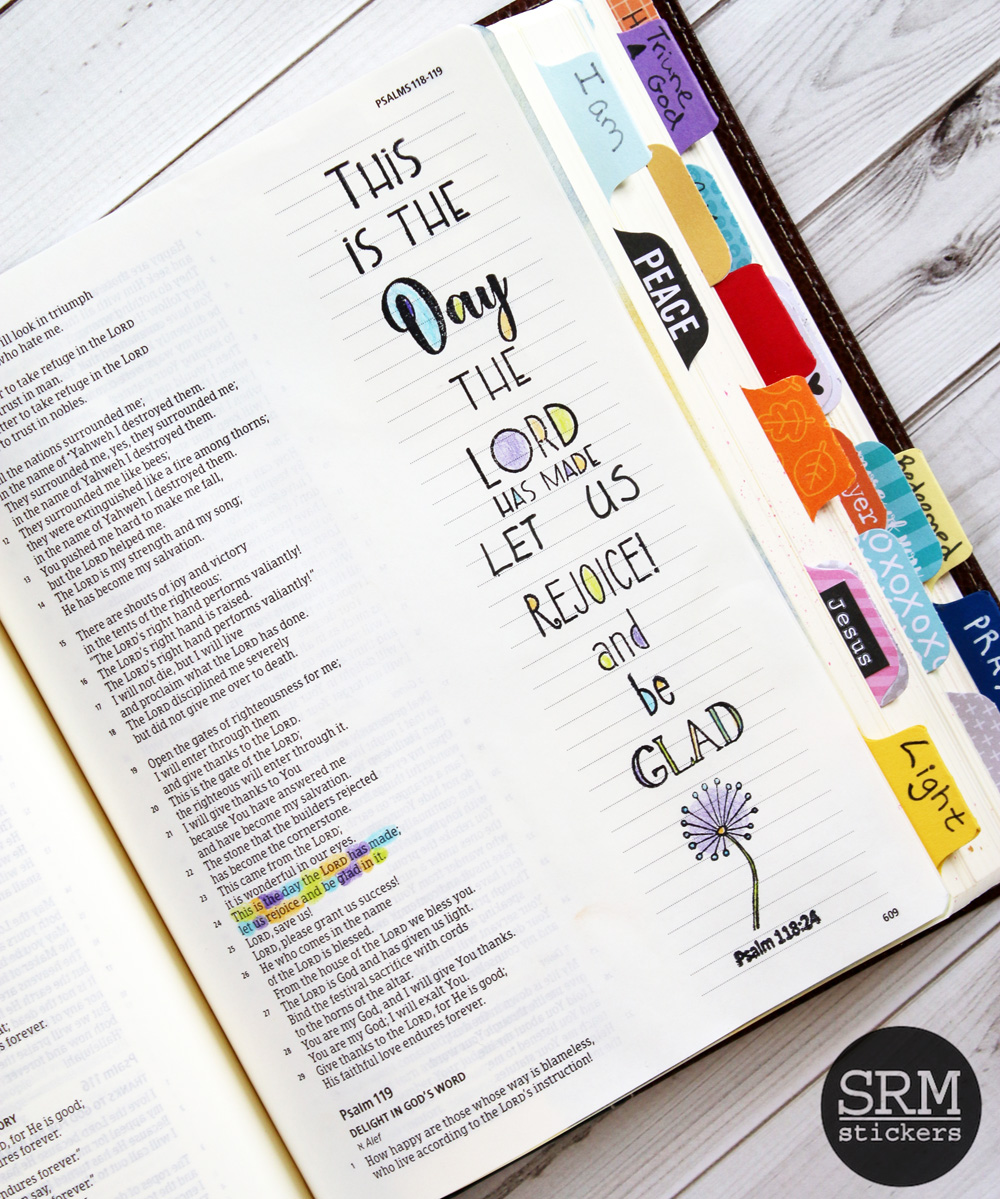
Masking Bible Journaling Stamps by Samantha


Hello! Samantha here with you today to share how masking Bible journaling stamps can add even more options to your Bible journaling. 


For this page I used Bible Margins Rejoice Stamp SetWatercolor Twist Pencils, and a black Marvy Le Plume pen. 


For this page, I wanted to use both the This is the Day stamp (the center stamp) and the words "Rejoice," "and," and "be glad" from the Be Glad stamp (the far right stamp). 


Before inking my stamp, I line it up where I want it to be. Then, I place a sticky note to cover the whole area that I don't want stamped. 


Ink your stamp, and stamp in your Bible. The post it note will mask the area that you don't want inked. 


I repeated the process until I had everything stamped. Then I used my Watercolor Twist Pencils to color in the stamped image and highlight my Bible Verse. 


Masking Bible journaling stamps will have you looking at your stamps in a whole new way! 

Friday, March 30, 2018

Spring Planner by Angie


Hello SRM friends!! Angie here with you today to share some spring inspired planner pages!  My planner pages are for March, but you can use this format for 
any month.

What makes you think of Spring? For me, it's the beautiful colors of new flowers growing, singing birds and amazing sunsets. I just love all of the pretty colors!!

Those colors inspired my planner pages!! I hope you will get inspired by spring and create some beautiful projects of your own. SRM has plenty of products to help you do just that!


To make the watercolor on my planner pages, I used the watercolor twist pencils. I simply scribbled the pencil onto some plastic packaging, added some water and then mashed the packaging down on my pages. I added some splatters of the color as well. I used the same process to color the stamped images seen on my pages. Those stamped images are from the Just Believe stamp set and are probably my favorite stamp set from the store. 


The 'March' sticker is from the small months sticker set.


I hope you enjoyed my planner pages! Grab some products from the SRM store and create something amazing today!!


Other products used:


Monday, March 26, 2018

Watercolor Spring Bouquet Card by Emma


Hello there!  Emma here today to share a sweet and easy Spring card using SRM supplies.

After a long hard winter here in southern Ontario, I'm sure I'm not alone in looking forward to Spring!  (As I'm typing this, it's actually snowing outside again, so yes, REALLY would like to see the end of that as soon as possible..)


So to start this card, I stamped some flowers onto watercolor paper from the SRM "Just Believe" stamp set.  As some stamping ink reacts with water, I recommend a waterproof ink such as Versafine or Ranger Archival.  I wanted to use a colored ink, so for this I used "Warm Sunshine" crisp ink by Altenew.


To color the flowers, I used the Watercolor Twist pencils by Marvy, and a waterbrush.  It makes it so easy to get a nice soft watercolor effect.


Once this was dry, I fussy-cut the flowers out of the paper and set aside.  I adhered a couple of pieces of co-ordinating patterned paper on a white card base, then used a Kraft embossed paper bag.

Inside the top of the bag, I cut freehand some green 'leaves' and arranged them.  I then adhered my watercolor flowers on top of the leaves to make a Spring bouquet!  I tied some jute string around the bag for an extra fun element.

As finishing touches, I added 'Hooray!' from Sticker Sentiments "Thinking of You" and 'Spring' from Express Yourself "Easter" stickers.


So there you have it, a very cute card to send to a friend who is happy that Spring is here (or almost..)!
Happy crafting,

~~ Emma ~~


Supplies:
White watercolor paper
White cardstock
Green cardstock
Patterned paper
Glue dots / liquid adhesive


Thursday, February 1, 2018

Water Color Thank You by Michele


Good morning friends!  Michele joining you today with a fun card today that was a result of just playing around with water color twist pencils.  I "smooshed" a bit of the water color pencil on to an acrylic block and mixed it with water.  I used the wet on wet technique, meaning the paper was also wet.  This gives a lot of movement to the colors, which I like a lot! Once all of my various pieces were dry, I cut them into diamond shapes and placed them on the edge of the card. I cut the excess off.   


I added glossy accents to the diamonds and set aside to dry.  Once it was dry, I added a strip of silver sparkly paper and SRM's thank you sticker.  I adhered a few rhinestones and a simple knotted ribbon.  


Thank you so much for stopping by today!

Thursday, January 4, 2018

Thank You Notes by Shantaie


Hello!  Shantaie here today to share my Thank You notes. 


My Mother used to say you are never too broke, busy or important to say "thank you" :). As I look back on her no nonsense simple approach to life and manners in general I tend to agree with her. However grateful we are when we open our gifts, it is easy to forget to say a proper thank you. That is why I have made it a priority to have thank you cards on hand all year but especially during the holidays.
The BIG Thank you stamp set is one of my favorites, and embossed in white on kraft it is the star of the show on this card set.  

I also stamped some branches in green, and a few scattered flowers, colored in with the watercolor twist pencils in shades of red. This type of coloring goes quickly and the result is beautiful. To finish the cards I added a little border sentiment from the brights border and mounted onto a strip of white cardstock.
No matter the reason, having a set of "thank you's" ready to go is really helpful!

Tuesday, December 26, 2017

Bible Journaling Worship & Praise by Karen


One of the main reason I Bible journal is because it gives me the time to meditate on specific words of scripture. While I am coloring or painting or stamping, I am repeating scripture in my mind and contemplating the meaning of these precious words. The creative process draws me in and allows me to linger longer in the Word. 


My page today gave me the chance to target specific words and think about the many reasons to worship and praise our amazing God.


Psalm 29 is a psalm of worship and praise. It wasn't difficult to find many of the words used in this psalm in stamp form on SRM's two "wordfetti-style" faith stamp sets - Daily Devotion and Scripture Notes. These two sets contain multiple words that can be used in a variety of ways. 


After lettering "worship" and coloring it in with marker and watercolor twists, I added several word stamps to emphasize some of the words in the Psalm. I also added a star stamp from another set, Child of God. I created the background using the watercolor twists and a water brush. Then, I added a few highlights with my white pen. I really like how this page turned out and am grateful for the time to worship and praise God through Bible journaling. Be blessed!

For this project I used:

Thursday, December 14, 2017

Bible Journaling Worship & Praise by Karen


Hello!  Karen here today to share some of my Bible Journaling with you. 


One of the main reason I Bible journal is because it gives me the time to meditate on specific words of scripture. While I am coloring or painting or stamping, I am repeating scripture in my mind and contemplating the meaning of these precious words. The creative process draws me in and allows me to linger longer in the Word. My page today gave me the chance to target specific words and think about the many reasons to worship and praise our amazing God.


Psalm 29 is a psalm of worship and praise. It wasn't difficult to find many of the words used in this psalm in stamp form on SRM's two "wordfetti-style" faith stamp sets - Daily Devotion and Scripture Notes. These two sets contain multiple words that can be used in a variety of ways. 


After lettering "worship" and coloring it in with marker and watercolor twists, I added several word stamps to emphasize some of the words in the Psalm. I also added a star stamp from another set, Child of God. I created the background using the watercolor twists and a water brush. Then, I added a few highlights with my white pen. I really like how this page turned out and am grateful for the time to worship and praise God through Bible journaling. Be blessed!

For this project I used:

Tuesday, November 14, 2017

Mini Desktop Calendar by Emma


Hello sticker fans!  Emma here today to share this cute and simple to make mini desktop calendar.  This would make a lovely gift for anyone who has to sit at a desk all day - why not give them something nice to look at?  (Bonus!  It's also useful!)


To make this item, I have used the #1 top seller on the SRM Store, the 2018 Mini Decorative Calendasticker set.  This set is so versatile, it can be used in so many ways.  The stickers are clear, so you can add them to any colour paper you like.


I have also used the 2018 Year of Memories sticker sheet to add the year onto my calendar:


So to start, I took a piece of cardboard box and folded into an 'A' shape, and covered with cream cardstock.  I then made a small pocket from the same cream cardstock, big enough to hold a small post-it note pad.  I covered the pocket and the upper part of the calendar with a Turquoise Striped Patterned Bag.


 I cut the individual months from the calendar sticker sheets, and adhered them to white paper.  (Tip: you can also get a cutting die which matches the shape of the calendar stickers perfectly!). Using some strong double-sided tape, I adhered the months together at the top, to create a 'tear-off' effect.  To finish off the calendar, I used the beautiful 'Just Believe' stamp set, and coloured the images with the Marvy Color-In Watercolor Twist pencils.  


 And there you have it, a sweet and easy gift for the desk-bound loved one in your life.
Happy crafting!
Emma


Wednesday, September 27, 2017

Bible Journaling with Stamps by Karen


Hello!  Karen here today with some Bible Journaling with SRM Stamps. 


In the Book of Exodus, God tells Moses,
"Say this to the people of Israel: 'I AM has sent me to you'" (3:14). 
God, I AM, is past, present, and future. 
He is, as the verb indicates, the essence of all being. 
God is Father, Son, and Holy Spirit, three in one. 


For this page, I began by stamping Father, Son, & Holy Spirit in yellow. I felt it was a little too light, so I added darker yellow/gold layers with my ColorIn Watercolor Twists and waterbrush. I repeatedly stamped "I am" over the yellow and added the "amen" block stamp throughout the page.
I repeated the element of 3 with three mixed media leaves.


We are so incredibly blessed by a God who wants to be, and is, present with us. He meets all our needs because He is all things. Be blessed today as you reflect on the great I AM.

For my bible journaling page I used:

Tuesday, September 19, 2017

Watercolor Techniques by Christine


Options abound when it comes to watercolor techniques and we have all kinds of products for you to play with too!  Christine joining you today with a set of techniques for you that work great using the Watercolor Twist Pencils!  The Watercolor Twist Pencils come in three different sized packages, 12, 24, and 36.The video below features several ideas with tutorials on how to do each:


Here's a card that showcases how I used one of the backgrounds I created.


I punched the two leaves out from a watercolor background I made.  Doesn't it add a lovely, whimsical element?  The more I play with watercolor, the more I love the softness it adds.


The sentiment comes from the Child of God stamp set which is a versatile set great for cards and so much more. 

Wednesday, August 2, 2017

Coffee Plans Gift Box by Emma


Hello!  Emma here, and welcome to my first post as a member of the SRM Stickers Design Team.  Here's a bit of info about me: 

"Hi, I’m Emma Ivemey, and I am a British-Canadian gal based in Oshawa, Ontario. I am the proud mother of 4 beautiful children, and married to a wonderful husband. I LOVE to craft, and I’ll try anything once! My favourite crafts are scrapbooking, cardmaking, knitting & crochet, colouring, mixed media and trying to find fun ways to upcycle junk into home decor."

I am excited to share my idea for a sweet and easy gift card holder, using the 4 1/8" kraft window box and the NEW Coffee Plans stamp set.


So first of all, I folded together the kraft box, and created an insert slightly smaller than the box to go inside.  I used 110lb cardstock to create the insert, which will serve as a platform to hold my envelope with the gift card inside.


I then folded my envelope, and stamped the front with the 'But first, coffee...' sentiment, coffee cup and beans (so cute!)


Next, to add a little colour, I used the ColorIn Watercolor Twist pencils to add a little blue, green and yellow as if it were a landscape.  These pencils are so great, and so easy to carry around in the handy dandy case.  To finish, I used white ink and stamped the small coffee words and images around the edges of the box window.


On the back of the box, I used a To / From sticker from the Labels by the Dozen Everyday Pastels sheet so that a personal message can be added.


So there you have it, a thoughtful gift for a coffee pal!  I hope you've enjoyed this project as much I as I had fun making it.  


Happy crafting!  Emma x