Showing posts with label Emma Iverney. Show all posts

Friday, May 25, 2018

Origami Dress Card by Emma


Hello again, SRM friends!  It's Emma here to share a fun and easy card that I made for Mother's Day, or any other special woman in your life.  You can tweak the sentiment and make it into any kind of card you like  So fun!


 SRM has these beautiful patterened paper gift bags, in many different designs.  I thought it would be fun to use the paper bags to make a folded origami dress for my card.


I used this template, and traced my dress outline on one of the lovely pink striped paper bags.  (You can download the PDF template HERE).


Once the design was traced, I then cut the pieces out, and folded the pleats of the dress.Next, for the card background.  I used a white paper doily, and gently highlighted the texture with some pink ink.


To finish the card, I adhered the dress pieces to the doily, and stamped a Mother's Day sentiment.  But you could do a birthday sentiment and that would work too!


So there you have it, a really easy card, and an alternative use for the lovely paper bags available from SRM.  You could even use one of these bags as your envelope!


I hope you've enjoyed my project!  What will you create with SRM's patterned paper bags?
Happy crafting!
~~ Emma ~~

Supply list:

Patterned Paper Bags - SRM Stickers
White Paper Doily - SRM Stickers 
Ivory Card Base


Tuesday, April 24, 2018

Stamped & Foiled Thank You Card by Emma


Hello SRM fans!  It's Emma here today to show you how to use the wonderful textile foil and your SRM clear stamps to make simple and cute cards.


For this card, I am using the BIG Thank You clear stamp set as it gives us nice large letters to foil.

The trick with foiling, is to use something heat-reactive that will cause the foil to stick to the design when passing through a laminator.  There are several options, such as cuttable adhesive sheets, heat-reactive adhesive gel, or toner from a laser printer.  You can also get toner paper sheets that can be cut into a design and then foiled.


For my card, I am going to stamp the THANKS sentiment with Decofoil Transfer Gel.
Use a sponge dauber to dab the gel onto the surface of the stamp.  Stamp the image onto your cardstock, and allow to dry for about an hour.  I know it is slightly tedious to wait, however the gel is heat-reactive so it does not help to use your heat gun to set it.  (I know, I tried!)  My advice is to stamp the same sentiment several times, in case the first one doesn't stick to the foil as well as you hoped.  (Use more transfer gel each time you stamp the image).


Now, lay the foil sheet over the stamped images, completely covering them.  I chose this funky purple holographic style, as it's so cool.


Now, fold some plain kitchen parchment paper (NOT waxpaper!) around your stamped paper and foil.  This is another good tip - I have tried using cardstock or heavier paper around my project previously, and found that it did not work.  Switch on your laminator, and once it has reached temperature, feed your project through.  My laminator is an inexpensive $35 model - I know that some craft-specific ones can run to $200 or more.  For this model, I chose the higher 5mil temperature.  Please always follow the instructions for your own machine carefully.


Here are our foiled Thank Yous!  As you can see, the foil hasn't taken fully on a couple of the images, so now I can pick the best one.  I used a rectangular die to cut my chosen image from the sheet.


Now for the background.  I decided it would be fun to use the rest of the stamp set behind the main sentiment.  So for this, I have stamped the images with embossing ink, and used clear embossing powder.  


The embossing technique creates a cool 'watermarked' effect.  You can still see it, but it doesn't overshadow the foiled main sentiment.


Here is the finished card!  I think it looks simple but effective.
I hope you enjoyed my project, and are inspired to try heat foiling with your stamps too.

Happy crafting!
~~ Emma ~~

Supplies:
  • SRM Clear Stamps - BIG Thank You
  • SRM Textile Foil
  • Decofoil Transfer Gel
  • Tim Holtz Embossing Ink
  • Close to My Heart Clear Detail Embossing Powder
  • Scotch Laminator
  • Parchment Paper
  • Craft heat gun
  • Smooth white cardstock

Monday, March 26, 2018

Watercolor Spring Bouquet Card by Emma


Hello there!  Emma here today to share a sweet and easy Spring card using SRM supplies.

After a long hard winter here in southern Ontario, I'm sure I'm not alone in looking forward to Spring!  (As I'm typing this, it's actually snowing outside again, so yes, REALLY would like to see the end of that as soon as possible..)


So to start this card, I stamped some flowers onto watercolor paper from the SRM "Just Believe" stamp set.  As some stamping ink reacts with water, I recommend a waterproof ink such as Versafine or Ranger Archival.  I wanted to use a colored ink, so for this I used "Warm Sunshine" crisp ink by Altenew.


To color the flowers, I used the Watercolor Twist pencils by Marvy, and a waterbrush.  It makes it so easy to get a nice soft watercolor effect.


Once this was dry, I fussy-cut the flowers out of the paper and set aside.  I adhered a couple of pieces of co-ordinating patterned paper on a white card base, then used a Kraft embossed paper bag.

Inside the top of the bag, I cut freehand some green 'leaves' and arranged them.  I then adhered my watercolor flowers on top of the leaves to make a Spring bouquet!  I tied some jute string around the bag for an extra fun element.

As finishing touches, I added 'Hooray!' from Sticker Sentiments "Thinking of You" and 'Spring' from Express Yourself "Easter" stickers.


So there you have it, a very cute card to send to a friend who is happy that Spring is here (or almost..)!
Happy crafting,

~~ Emma ~~


Supplies:
White watercolor paper
White cardstock
Green cardstock
Patterned paper
Glue dots / liquid adhesive


Wednesday, March 21, 2018

Modern Wedding Favors with Heat Transfer Vinyl by Emma


Greetings, fellow crafty people!  Emma here today to share an awesome idea for wedding favors with a twist, of course using SRM supplies.

When my husband and I got married 14 years ago, Pinterest didn't exist (I know, the horror!)  So, this kind of inspiration for cool and modern wedding accessories only appeared in expensive bridal magazines.  At the time, although I longed to create something like that on the glossy pages, it seemed very out of reach.  Well, not any more!

SRM stocks these amazing fabric bags, which are perfect for all kinds of embellishments.  For this project, I'm using a cool metallic orange heat transfer vinyl.  


My wedding favors are going to contain tea bags, as I thought it was a fun theme.  I cut the vinyl with my Silhouette Cameo machine and applied it to the fabric bag.  The font I used was called 'Sign Painter', and the swirls were available in the Silhouette Design Space software.  (Remember to flip your design to a mirror image before cutting!  Otherwise the letters will be back-to-front when you apply the design..)


So, of course my wedding was a while ago now, but maybe one day I'll get to use some of these crafty ideas for one of our children's weddings.  It's certainly fun to create things and share them with you!

Happy crafting!

~~ Emma ~~

Supplies:
Metallic orange heat transfer vinyl
Silhouette Cameo / Design Space
Craft iron

SaveSave

Tuesday, November 7, 2017

Thank You Card Set by Emma


Hello again crafters!  Emma here today to show you a quick and easy set of Thank You cards, with a gift box.  This set is the perfect hostess gift, or just handy to keep around for that 'I need a thank-you card' moment.


First of all, paint an A2-sized kraft window box with turquoise paint, or whatever colour you like.  The kraft surface will look amazing with any colour, or you could even leave the kraft as is.


SRM has so many 'Thank You' stickers to choose from!  I used several of the available sets: Thank You SentimentThank You Stickers by the DozenWe've Got your Border Thank You, and the Fancy Sentiment Thanks.


Cut and fold 6 card bases measuring 4"1/4 x 5"1/2, to fit inside the kraft box.  Select some patterned paper, and cut a rectangle of each to adhere to the front of your cards.  Decorate each card with the Thank You stickers however you like.


 Add a couple of stickers to your gift box, and there you have a set all ready to give away.


Thanks to YOU for visiting the blog today! 
Happy crafting :)
Emma 

Thursday, October 12, 2017

Soccer Champ Layout by Emma


Hello SRM fans!  Emma here today to share a quick and easy soccer-themed scrapbook page with you.  You may have read in my bio that I am originally from England, having moved here to Ontario, Canada over 10 years ago.  Soccer (or football as we prefer to call it) is a huge part of a lot of British people's lives, as the most popular sport.  It's fair to say I am a big fan, and have followed my London-based team, West Ham United, for over 35 years.  They aren't the most successful team (to put it mildly), but I can't imagine supporting anyone else.  Luckily the TV channels here show a lot of the games, so I don't miss out as often as I did when we first emigrated.
Canada is very focused on ice hockey, but they do also have a lot of kids' soccer programs which is ideal for our family.  My son has played for the past 2 years, and really loves it.  

SRM has some terrific soccer-themed items, so for this project I chose the Stickers By the Dozen pack, and the Express Yourself Everyday Boy set to make my scrapbook page of this year's soccer pictures.


I used a plain blue cardstock background, and some patterned paper from Fancy Pants Designs to complete the page.  The date was stamped using the SRM Today, Tomorrow, To Do clear stamp set.


This was such a quick project to make, all thanks to SRM's products!  Scrapbooking in a jiffy, as we would say in England.  As a Mom, I am hoping for the day I can scrap pictures of my son playing for my beloved West Ham, or indeed for England.  He could even choose to play for Canada if he wanted to, thanks to our dual citizenship!  

I hope you've enjoyed my project, and thanks so much for visiting 
with us today.
Happy crafting,
Emma 


Wednesday, October 4, 2017

Trick or Treat Mason Jar Lantern by Emma


Hello crafty friends!  Emma here to wish you all a happy Fall!  Of course it is sad to say goodbye to Summer, but Fall is definitely my favourite season.

Today I'd like to share an easy project you can make with an empty Mason jar, and a few supplies from the SRM Store.


 Here, in addition to my Mason jar, I have some black vinylorange jute twineblack and orange striped paper bagsorange scalloped circle, burlap ribbon, ink spray and a battery operated votive candle.


 First, I sprayed the inside of my empty jar with some purple alcohol ink.  You could also use other colours, or leave the glass clear if you like.  I set the ink using a heat gun, and I love the gnarly look it takes on.


 Using the SRM black vinyl, I cut the phrase 'Trick or Treat' using my Silhouette Cameo, and adhered it to the jar.  I advise using transfer tape with vinyl lettering when applying to other surfaces; it saves a lot of time and heartache!


Next, I used the orange striped paper bag to decorate the top of the lid.  The black striped bag was used on the side of the lid, and I then added the orange twine wrapped around several times.


 After placing an orange scalloped paper circle in the bottom of the jar, I then put in the battery powered votive candle.  A Fall leaf from an old wreath sets off the lantern perfectly.


 So there you have a finished lantern all ready to use in your Halloween decorations!  You could easily make several with different phrases or other colours on the glass.

Thanks so much for joining me today, and happy crafting!
Emma 

Monday, August 14, 2017

Bags of Fun Mixed Media Tutorial by Emma


Greetings to you, crafty friends!  Emma here, and today I am going to share a little mixed media piece using one of these wonderful SRM linen & lace bags, enhanced with lace.  They have a wonderful texture, which is just perfect for an art journal page.


 I know that being faced with a blank page is pretty daunting when beginning a mixed media piece.  The trick is to remember that you can build layers of colour, stamps, texture and embellishments to create your page.  This type of art isn't supposed to be "perfect", as it is a reflection of your current mood, or the inspiration you found.

To start, I picked some supplies to go with the linen bag:


Here, I have 4" white lace doilies, green jute twine, 2" punched scallop circle, and two stamp sets, Big Hello and Bible Backgrounds.  I really love the images on the backgrounds stamp set, especially the clouds!


To build the colour of the background, I have used Marvy ColorIn Watercolor Pencils.  


They blend beautifully!


 Now, to use the stamps to build up other elements in the background.  I used the clouds, springs and arrows in random areas.  Then, I stamped and embossed the 'hello' using white embossing powder.


Now, I have added the linen bag (I used strong double-sided tape such as SookWang to hold it down).  Bursting from the bag are three paper doilies, that have folded into tube shapes and embellished with a little gold and copper gilding wax.  This really makes the texture in the doilies pop!  Lastly, I created a flower shape with the scalloped circle, and added petals and a bling rhinestone to the centre.  The green jute serves as a stem for the flower.


 I hope you've enjoyed my mixed media project, and that it inspires you to try something like this too!  It's so fun to let your creativity run wild.  (PS - I heard you can even use these linen bags to put things in, too!  So versatile! 😉)


Best wishes to you all! 
Emma 


Wednesday, August 2, 2017

Coffee Plans Gift Box by Emma


Hello!  Emma here, and welcome to my first post as a member of the SRM Stickers Design Team.  Here's a bit of info about me: 

"Hi, I’m Emma Ivemey, and I am a British-Canadian gal based in Oshawa, Ontario. I am the proud mother of 4 beautiful children, and married to a wonderful husband. I LOVE to craft, and I’ll try anything once! My favourite crafts are scrapbooking, cardmaking, knitting & crochet, colouring, mixed media and trying to find fun ways to upcycle junk into home decor."

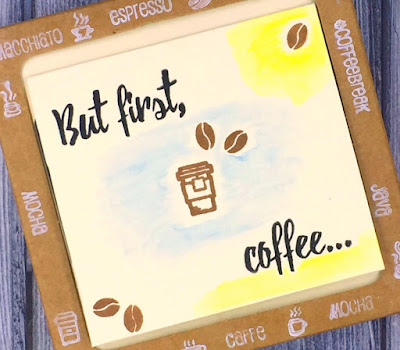
I am excited to share my idea for a sweet and easy gift card holder, using the 4 1/8" kraft window box and the NEW Coffee Plans stamp set.


So first of all, I folded together the kraft box, and created an insert slightly smaller than the box to go inside.  I used 110lb cardstock to create the insert, which will serve as a platform to hold my envelope with the gift card inside.


I then folded my envelope, and stamped the front with the 'But first, coffee...' sentiment, coffee cup and beans (so cute!)


Next, to add a little colour, I used the ColorIn Watercolor Twist pencils to add a little blue, green and yellow as if it were a landscape.  These pencils are so great, and so easy to carry around in the handy dandy case.  To finish, I used white ink and stamped the small coffee words and images around the edges of the box window.


On the back of the box, I used a To / From sticker from the Labels by the Dozen Everyday Pastels sheet so that a personal message can be added.


So there you have it, a thoughtful gift for a coffee pal!  I hope you've enjoyed this project as much I as I had fun making it.  


Happy crafting!  Emma x