Showing posts with label Coffee Plans. Show all posts

Monday, October 30, 2017

October Planner Pages by Tangii


Hey yall, Tangii here.  For today's post I did some playing with some Halloween stickers and Planner stamps (all items used are listed at the bottom of my post).   You could use this format for any month.  Just change up the stickers that you use.  This is my Daughter's planner and is actually a 1/2 sheet size, so 5 1/2" x 8".  I also used the Coloring Book Watercolor Pencils (12 pack).


My daughter struggles when Monday strolls around, and being the coffee lover that she is, I used the Coffee Plans, Clear Planner set on Mondays.  I also had some fun with the 31st, she still LOVES dressing up for Halloween, lol. 


I used Everyday Plans, Clear Planner set for Pay Day's & Date Nights.  For the cute lil Piggy & Heart I just stamped them in black and used the Coloring Book Watercolor Pencils to color them in, I did NOT add water since this is not the correct type of paper.  I also added some "List" categories for her on the far right!  Thinking I should have added a "Clean your room" under the first category! lol


Her planner also has weekly layouts, but when I decorate my Monthly views I always make sure there is still room for writing things in!  Thanks for stopping by!

Happy Crafting!

Friday, October 13, 2017

But First Coffee....by Michele


Good morning crafty friends!  
I will be the first to admit that I am a bit addicted in love with coffee!
I love everything about it....the smell, the taste, the comfort it provides.
I know I can't be alone in this sentiment.....please tell me I am not alone! ;)
I used SRM's Coffee Plans set for my card today.

I used my Silhouette to cut the word coffee.  I stamped the coffee bean in a light brown on cream colored card stock.  I adhered the die cut.  I stamped the words, but first and #caffeine please, using my Mini Misti for proper alignment. 


I added little red punched hearts and adhered tiny flowers to the centers using glossy accents.  I also added glossy accents to the sentiment. Once it was dry, I used a bit of black dimensional accents around the hearts. 


Thank you for stopping by today!
Michele

Friday, September 22, 2017

Mixed Media Project Life Cards by Shanna


Happy Fall Y'all!!  Fall brings some of the best things in life back to me.....including my beloved Pumpkin Spice Latte!!  It's like fall in a cup!  I decided to scrapbook my first PSL of the season this year, and to commemorate it I chose to make a mixed media project life card utilizing some of my favorite SRM products!


Here is what I used:

** SRM Sticker Products**
Coffee Plans  Clear stamp set
BIG Numbers Clear Stamp set

**Miscellaneous Craft Supplies**
Matte Gel Medium
Glass Bead Gel Medium
Decorative Stencils (Brick Motif and line-dots)
Distress Oxide inks in: Marmalade and Vintage Photo
Glossy Accents
Adhesive of choice


I love how the layers all came together to make this card complete... It makes my pumpkin-spice-loving heart happy! I made a quick digi journal card and inked it to match the 4x6 card.  I love the set and can't wait to use it in my album!


My crafty friend Carrie gave me a delicious recipe for an amazing homemade Pumpkin Spice Latte....hop on over to my blog and check it out!

Do you have a favorite fall drink??  Tell me about it in the comments!!

Until next time,

Friday, September 15, 2017

Coffee Lover's Blog Hop - Project by Shanna Slater


Hello, Shanna here with a fun caffeinated card using SRM Stickers Coffee Plans clear stamp set.  SRM Stickers is a Super Sponsor for this year's Fall Coffee Lover's Blog Hop, be sure to "hop" over and check it out!


 I simply adore this set for it's tremendous versatility (it is a go to set for me frequently!).  In this particular project I used nearly every stamp in the set! 


I stamped all of my images using my stamp positioner for precision placement using Versamark ink


 I heat embossed all of my stamped images in a white detail embossing powder, allowing them to all stay front and center after inking over them with Distress Oxides in Vintage Photo.  The coffee cup you see in my pictures isn't just a prop...It's a TOOL too!  I watered down some walnut stain Distress ink and dipped the bottom of my cup in the ink.....stamped the "coffee ring" around my panel and again on the inside of my card to frame out my sentiment! 
 I love how the regular Distress ink and Distress Oxides collide and look.  


Everyone needs a little encouragement....and caffeine generally helps too! 


Supplies used in this project:
Versamark Ink
Distress Oxide in Vintage Photo
Distress Ink in Walnut Stain
WOW Super Bright White Detail embossing powder
Recollections Clear embossing powder
Tim Holtz Stamp platform
Miscellaneous puffy heart stickers
Coffee Washi (Recollections I think)

 As avid coffee addict drinker I love everything about this card... 
                                              What about you??  


And remember what coffee says... "You can do it"!!!

Until next time, stay happily caffeinated!!

Tuesday, September 12, 2017

Guest Designer - Amy Tsuruta


Today SRM is excited to welcome Amy Tsuruta to the SRM Blog.   Here's a little bit about Amy in her own words: 
"I live in the beautiful state of Washington and work part-time for a Seattle biotech company.  I've always been crafty but discovered a passion for stamping in the early 2000's.  I love the Paper Crafting Community!"


Amy is a BIG coffee fan and an avid card maker.  She even has a blog that's all about coffee and card making called Coffee Loving Cardmaking.   Four times a year she puts together a blog hop and the Fall one is just around the corner.  It begins September 15th. Be sure to check it out! 

Today Amy shares with us two darling cards with us using SRM's new 
Coffee Plans Clear Stamp.  


With so many fun expressions, Amy chose two of her favorites and created these fun and fabulous cards.   The cards are perfect for Fall... so warm and cozy!  First up a card that uses one of my favorite expressions:  
"you can do it" ~coffee
Love how it appears that coffee is cheering you on! :)


The second card features the sentiment:  "Caffeine is the new BLACK".  
Every coffee loving carmaker can relate to that! :)  And I love how she has lids for cups of coffee in the photo to "perk" her up! 


Thanks for sharing your darling cards Amy!  And thank you for being a fan of SRM throughout the years!  See you at the Blog Hop!  It is always so much fun! And lots of prizes too!

Thursday, August 24, 2017

But first coffee....by Shelly


Hey y'all! Shelly, here.
Today, I'm sharing a sweet little gift with you! 

There are so many fun and new goodies from SRM Stickers, I didn't even know where to start! lol Then as was doing some thinking and looking through things, I came up with a coffee gift idea. 


I started with my tag. I used a canvas tag and stamped on my coffee sentiment, using a brown ink. After, I added a couple green die cut leaves and a wood veneer coffee cup. Once done, I added my '#caffeineplease' sentiment to a piece of white cardstock using brown ink and then trimmed it to into a small banner/flag. 


I then choose a little Kraft window box for my gift, which I added a burlap bag inside of it. (You can add coffee beans, coffee packs, chocolates, etc. inside the burlap bag.) After having my goodies inside my box, I wrapped everything together using all 3 colors of the new jute twine. Simple, yeah?!...

Thanks so much for stopping by!
Enjoy your day!

SRM Stickers supplies used:


Friday, August 18, 2017

Coffee Plans Gift Idea by Angie


Hello SRM friends! Angie here with you today to share a cute gift card holder using the Coffee Plans stamps!


I started with the medium kraft pillow box. I used the coffee plans stamps and some brown ink to stamp different images and words all over the pillow box. I heat embossed the 'But first, coffee' sentiment using Versamark ink and black embossing powder. 


I tied some black jute twine around the end of the pillow box 
and added a tag.


I wanted to make the enclosed gift card a little more fancy, so I wrapped it in a 
doily and then added a 'Just for you' sticker and some more jute twine

This gift idea was so quick and easy--and it's super cute! Any coffee lover would love it! 

Wednesday, August 2, 2017

Coffee Plans Gift Box by Emma


Hello!  Emma here, and welcome to my first post as a member of the SRM Stickers Design Team.  Here's a bit of info about me: 

"Hi, I’m Emma Ivemey, and I am a British-Canadian gal based in Oshawa, Ontario. I am the proud mother of 4 beautiful children, and married to a wonderful husband. I LOVE to craft, and I’ll try anything once! My favourite crafts are scrapbooking, cardmaking, knitting & crochet, colouring, mixed media and trying to find fun ways to upcycle junk into home decor."

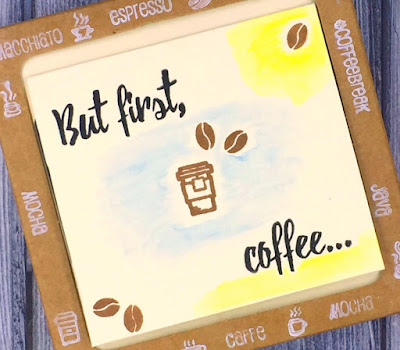
I am excited to share my idea for a sweet and easy gift card holder, using the 4 1/8" kraft window box and the NEW Coffee Plans stamp set.


So first of all, I folded together the kraft box, and created an insert slightly smaller than the box to go inside.  I used 110lb cardstock to create the insert, which will serve as a platform to hold my envelope with the gift card inside.


I then folded my envelope, and stamped the front with the 'But first, coffee...' sentiment, coffee cup and beans (so cute!)


Next, to add a little colour, I used the ColorIn Watercolor Twist pencils to add a little blue, green and yellow as if it were a landscape.  These pencils are so great, and so easy to carry around in the handy dandy case.  To finish, I used white ink and stamped the small coffee words and images around the edges of the box window.


On the back of the box, I used a To / From sticker from the Labels by the Dozen Everyday Pastels sheet so that a personal message can be added.


So there you have it, a thoughtful gift for a coffee pal!  I hope you've enjoyed this project as much I as I had fun making it.  


Happy crafting!  Emma x


Tuesday, August 1, 2017

August Planner with SRM by Shanna

Today we welcome Shanna Slater to our design team.  What a talent she is!  Enjoy her work Here's a bit more information about Shanna in her own words. 

Hello!  My name is Shanna…. I am a blessed wife of 15 years and mother to 3 wonderful (most of the time) children living in Northern California.  In my spare time I love to be crafty!  Paper crafts are my favorite, but I dabble in nearly everything.  I work full time as a registered vascular access nurse and really love my job.  I am a excited to be a part of the fabulously talented design team here at SRM Stickers, and can’t wait to show all of you the ideas I have brewing in my head…. If you like what you see, you can follow my crafty adventures over 
at www.caffeinatedcraftiness.wordpress.com.

-------------------

Hello and Welcome!  
This is Shanna with my first post as a SRM Design Team member.  I'm very excited! 


Today I am sharing with you my August Happy Planner monthly layout!  I love monthly layouts as a tool to get a quick glance at to do's and important dates.  I had a lot of fun using a lot of different products on this layout, and even watercolored a little!  Super fun, and even pretty quick as well.  


I used the Bible Background stamp set to stamp out the clouds in my empty squares at the beginning of the month. I love doing something creative in the blank space and the clouds were a perfect compliment to my layout.  After stamping them I lightly watercolored a pretty shade of blue in the space in between the clouds using Color-in Watercolor Twist Pencils.  Oh my goodness!!  I loved using these!  I tend to not watercolor much in my planner because it warps my pages, but I barely had to add ANY water to get the desired effect with these pencils. I foresee more watercoloring in my future planner pages for sure!


August brings a big event in our house.  With 3 kids all in school this year, Back To School might as well be considered a federal holiday!  I have one entering kindergarten, one in 2nd grade, and a soon to be junior in high school this year. They all attend different schools, and one doesn't start the same day as the other two.  So I turned to SRM Stickers to save me!  I loved how the "First day of School" sticker from the Express Yourself/School sticker sheet fit right in between the 2 weeks so it could label both dates!  I utilized the school year stickers from the Live Life/School sticker sheet to further commemorate the individual grades each of my kids are entering.  This Mama is going to be a big cry baby for the last couple weeks of August!! 


I also love coding things in my planner.  Instead of writing everything out, I choose an icon that relates to the task.  I did this specifically for my crafting swaps I participate in with the calendar icon from the Everyday Plans clear stamp set.  Whenever I see that stamped, it correlates to a due date or event I have marked on my "crafty calendar" I keep in my craft room.  I also utilized a coffee cup from Coffee Plans clear stamp set to help me remember schedule my blog posts on my personal blog Caffeinated Craftiness. You can also spot some of the Coffee Plans set being used to fill in the blank squares at the end of the month.  The little coffee beans included in the set are totally adorable as a background filler and the sentiment speaks to my caffeinated life! 


Rounding off my layout are a few snippets from the Pray, Journal, Repeat stamp set.  I adore this set and it's versatility!  Can you spot everywhere I used it??
(I will help you out some!)


Pray, PLAN, repeat sentiment
 PLAN banner (love those little alphabet letters!)
Circle around the August To Do in the sidebar
Circle around August 19th

I also used the Everyday Plans clear stamp set to create my "payday" icons and my To Do list/ My To do list features check marks that I will color in as I complete each task. Who doesn't like crossing things off a list?? My Neon Le Pens allowed me to add in small details where needed all well.  I loved the "life is good phrase" from the We've Got Your Sticker Plus Birdie sticker sheet, so that got incorporated into my sidebar because well, LIFE IS VERY GOOD!


Here is a quick recap of the SRM products used in this project:


Clear Stamp Sets:

Pens/Pencils:
 Neon Le Pen pens

Stickers:

I hope you all enjoyed my planner layout, and as always....Thank you and God Bless!! 

Until next time,


Thursday, July 27, 2017

Stamped Fitness Tracker Notebook


Hello!  Karen here today to share a fun idea using SRM Planner Stamps and the new Pray Journal Repeat Stamp set. I love all the shapes on that stamp.  I'm going to use it a lot!

So, like many of you, I find myself in a position where I need to pay more attention to my health and fitness. I am trying to exercise more and I thought if I made a notebook to track my progress I would be more motivated. With the help of some SRM stamps, I'd like to introduce my simple fitness tracker traveler's sized notebook.


v

Cute, hey? I used some scrapbook paper and cards from my stash and embellished them with stamps. The new mini alpha, found on the "Pray Journal Repeat" set helped me label my notebook "health and fitness." To remind me to "just do it" I randomly stamped {DO IT} from the "Notes to Self" Planner stamp set on the cover.


On the inside front cover, I couldn't help but use the "You can do it"~coffee stamp found on the new "Coffee Plans" set and highlighted it with a green stamped circle from the "Pray Journal Repeat" set.


I've kept the inside pretty simple (because I need to make time for exercise, right?). I stamped the doodle square (from "Pray Journal Repeat") 7 times on each page and then labeled each square with the days of the week (from Planner Notes to Self).


Each day I exercise I can stamp a thumbs up (yay me!) from the Everyday Plans set and write in my exercise for the day. I may add a page for my eating habits later, but for now it's one thing at a time!

For this project I used: