Showing posts with label Cardmaking. Show all posts

Tuesday, April 10, 2018

Love You Card by Tobi


Hello there!! I'm here to share a colourful card made with Bible Margins: Love clear stamp set. 

Are you wondering how you could use bible journal stamps other than in your bible?  

Not a bible journaler? 

Neither am I, but there are still lots of great ways to use these stamps on cards, tags, and other projects! 


I took the plunge and cut the stamps up to separate the images/words/phrases so I could mix and match for cards and tags. (Make sure you use good scissors if you're going to do this. I used the Tim Holtz large scissors by Tonic. (I actually cut up my stamps often and they are always my go-to scissor. I think it's the serrated edges that make them so good for cutting rubber and photopolymer)


The heart image is what inspired this card, so I stamped it in four different colours (Distress Oxides) and stamped "Love you" (two different stamps) in black ink. 

SRM Stickers Supplies: 
Bible Margins: Love clear stamp set


Monday, March 12, 2018

Textile Foil Cards & Video Using Laser Printer and Laminator by Karen

Hello!  Karen joining you today.  I've been having a great time discovering different ways to use the new textile foils from SRM. Today I'm sharing some of my favorites. 


To make these cards, I found free online images and imported them into a (Word) document. There I resized them and recolored to make sure they would print out dark and black. I printed each image onto card stock using a laser (toner) printer. It is key that the image prints with toner ink (not an inkjet printer).   


I then ran my image with foil covering it through my personal laminator. The heat of the laminator adhered the foil only to the printed image. After a short cooling off, I simply peeled the foil away to leave the shiny image.


I'll walk you through it in this process video. But I have to warn you, though, you may become addicted to this easy and quick foil application technique!


Thanks for watching - I hope you are inspired to use textile foil in your projects!
SaveSave

Thursday, February 8, 2018

Share the Love by Jenn


Hi ya friends, Jenn here! I am going to give you a few fun ideas for your childrens Valentines day cards. These are really quick easy ideas you can whip up and they will look super adorable. Everyone loves the handmade touch! These fun Valentines are a sure way to light up little faces...so lets get started!


Card idea #1: This card I stared with a piece of white cardstock cut to 3.5 inches by 5. I then cut two 1inch slits at the bottom so once completed you can weave the sucker stick between the slits. I simply handlettered a few words and used some adorable stickers from the Stickers by the Dozen set.


Card idea #2: Using a fun colored cardstock I hand drew a simple butterfly wing shape and cut it out. Then I added some fun stickers and a little Valentines message. I cut two slits in the center of the wing shape in order to slide my sucker in. 


Card idea #3: I cut a 3 inch circle out of cardstock paper and punched holes at the bottom and top to slide the sucker stick through. I added a little Valentine sentiment and a couple cute stickers. 


I really love how these turned out and had so much fun making them. My kids loved watching and helping me add the stickers and sliding the suckers into place. This would be such a fun activity to do with your kids. When it comes time to hand out these handmade cards they will be beaming with pride and those sweet ones who receive them will be thrilled! Enjoy your Valentines holiday with those you love. See you next time!


SRM Supplies Used:

Thursday, February 1, 2018

Water Color Thank You by Michele


Good morning friends!  Michele joining you today with a fun card today that was a result of just playing around with water color twist pencils.  I "smooshed" a bit of the water color pencil on to an acrylic block and mixed it with water.  I used the wet on wet technique, meaning the paper was also wet.  This gives a lot of movement to the colors, which I like a lot! Once all of my various pieces were dry, I cut them into diamond shapes and placed them on the edge of the card. I cut the excess off.   


I added glossy accents to the diamonds and set aside to dry.  Once it was dry, I added a strip of silver sparkly paper and SRM's thank you sticker.  I adhered a few rhinestones and a simple knotted ribbon.  


Thank you so much for stopping by today!

Wednesday, January 31, 2018

Jute Heart Card by Tobi


Hello Tobi here.  Bold statements call for bold elements! Today I'm sharing a card made with a large Jute-twine heart that is so easy, I don't know why I haven't done it before! 


You will need:
Jute Twine
Matte Medium (I a local art store's generic brand)


1.  Wrap twine into a circle and tie the ends off. 
2.  Form a heart (or whatever shape... the twine is relatively stiff so it mostly kept it's shape
3.  paint on a generous amount of matte medium. 
4.  re-form the desired shape and allow to dry. (i used a couple of cups and a pincher tool to keep my twine from moving)
5.  once dry, pick away any glue-boogers! 


I adhered the heart to the card with white glue. 

I finished off the project with a big, bold sentiment from the Big Love Clear Stamp set. 

Thank you for stopping by today!

-post by Tobi Crawford

Wednesday, January 24, 2018

Love You Valentine Cards by Shelly


Hey y'all! Shelly, here.
Today, I'm swinging in to share couple simple 'love you' Valentine cards with you! 


Hello!  Shelly here today to share some love! 
I started with my base card, which I centered my arrow in the the middle in my card. Then stamped it with a light grey ink. After I added my 'you' on top of my arrow using black ink. Next, I added 'love' slightly overlapping my 'you' using a red ink. 


To finish things off, I added a touch of black twine and thought it would be sweet to slip them each into a patterned bag. Simple, yeah?!...

Thanks so much for stopping by!
Enjoy your day!

SRM Stickers products:

BIG Congrats stamp set (for the 'YOU')
Walk by Faith stamp set (for the 'arrow' and 'love')

Thursday, January 4, 2018

Thank You Notes by Shantaie


Hello!  Shantaie here today to share my Thank You notes. 


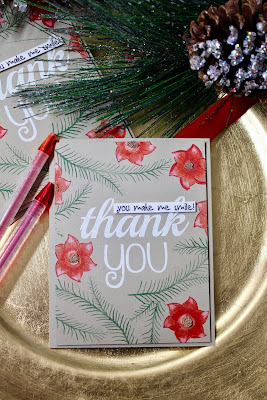
My Mother used to say you are never too broke, busy or important to say "thank you" :). As I look back on her no nonsense simple approach to life and manners in general I tend to agree with her. However grateful we are when we open our gifts, it is easy to forget to say a proper thank you. That is why I have made it a priority to have thank you cards on hand all year but especially during the holidays.
The BIG Thank you stamp set is one of my favorites, and embossed in white on kraft it is the star of the show on this card set.  

I also stamped some branches in green, and a few scattered flowers, colored in with the watercolor twist pencils in shades of red. This type of coloring goes quickly and the result is beautiful. To finish the cards I added a little border sentiment from the brights border and mounted onto a strip of white cardstock.
No matter the reason, having a set of "thank you's" ready to go is really helpful!

Friday, December 29, 2017

Holiday Cheer by Michele


Michele Kovack is so glad she participated in the recent Coffee Lover's Blog Hop!   She used this cute little Coffee Plans stamp set from SRM Stickers!


For her card, she wanted to create a background using the coffee cup.  She stamped it in a brown ink and used Prisma Colored pencils.  Then added a sentiment from the Stickers by the Dozen collection across the front.  She tucked a red die cut leaf behind it.  (After the leaf had been given a coating of glossy accents and glitter!)


Michele added a bit of rustic twine tied into a bow.  She scattered several gems and stars to the front. 


Michele rounded the back panel's edges on two sides and adhered the entire front to a kraft card.


Thank you all for stopping by!  We appreciate your visits!

Wednesday, November 29, 2017

Welcome Baby Cards by Melanie


Hello, Melanie joining you today to share some baby cards. Lately we have had quite a few babies to welcome into our family and circle of friends. I love to have a handmade card to accompany the gift. Here are a couple of baby cards I made to celebrate the birth of new little ones.
 SRM has THE best stickers for making cards! There are all kinds of sizes, fonts, shapes . . . it is awesome :) I love how they can be easily cut apart to fit exactly what you need.

For this Precious Baby card I used the Sentiment/Baby sheet as well as the We've Got Your Border/Pastel for "Hello Beautiful".


The Fancy Sentiments/Baby "Welcome Little One!" is such a sweet way to say just that. I added a bit of buttercream twine at the top of the banner piece for an extra special touch.


To finish off the look for each card, I added a border to the envelopes from We've Got Your Border/Baby Boy


Hope you enjoy these cards and are inspired to make some of your own :)
SaveSave

Monday, November 27, 2017

Ho Ho Ho Christmas Card by Shantaie


Ho Ho Ho Merry Christmas...well not quite yet, but it grows closer with each passing day, and getting a head start is always a good idea!  Hello from Shantaie!


I cut this Santa with my Silhouette and just loved the idea of him holding a sign, I added a clear sticker from we've got your sticker merry to some black cardstock and placed it in his mittens.


I wanted to add something special to the little sign, so I put a layer of glossy accents on top of the sticker and let it dry, the effect is super shiny and dimensional. A bit of sparkly fluff was also added to the beard, and trim, as well as a sprinkling of "snow" in the way of glitter stickles.


To finish the card another clear sticker from Sentiments Happy Holidays was added, and I double wrapped a bow of jute twine, a perfectly fuzzy textured element to top it all off! 

Friday, November 17, 2017

Christmas Joy Card by Jenn


Hi Friends, Jenn here to spread a little Christmas cheer! Today I thought it might be fun to get you thinking about Christmas. It is cold where I live and already I am thinking about package toppers and greeting cards.  If you start right now you can rid yourself of all the Holiday stress that no one needs in their life!

The card base for this card is 4 1/4 by 5 inches. I cut a piece of dark green cardstock for added color and pop. Then I cut piece of white cardstock just a smudge smaller than the card base...I just kinda eyeballed it. I am still really new when it comes to proper procedure.

 For this card I started by pulling out my old thrift store find hymnal. I pulled out a Christmas hymn (Hark the Harold) to cut some simple bunting shapes. I love the vintage look this simple little bunting adds to the card! If you don't have a hymnal I found multiple free clip art hymnal pages over on Pinterest. I wanted to create a little contrast between the bunting and cardstock and between the white cardstock and the dark green card base so I lightly inked the edges with a black pigment ink. 


In the bottom left corner I stamped the word 'Joy' from the big sentiments merry stamp set in Versafine clear ink then dusted it with gold embossing powder. 


Gold felt like the perfect Christmasy addition to the card. I really wanted to add a little stitching just because...so I created a few messy stitches in white. 


Next I pulled out my twines and picked a basic black and red, and added a simple tiny red bow. Adding a few stars really helped pull your eye around the page.


Thanks for stopping by! I hope I gave you a fun new inspirational way to use those gorgeous big stamps and rustic twine.

SRM Suplies Used:

Wednesday, November 15, 2017

Teacher Shaker Card by Michele


Good morning friends!
Michele here with a card that is near and dear to my heart!
I am a 4th grade teacher and I love to recognize other teachers for the hard work and dedication they give every single day. 
My children were blessed to have some pretty remarkable educators in their lives!


I created a shaker card using oval dies and the little apple stamp from the Healthy Plans Clear Planner Stamp.   The apple was stamped repeatedly around the frame, colored in with Copics and given a coat of glossy accents.  Once it was dry, I used the White Reminisce Gel pen to add a highlight to each apple.  


I filled the center with coordinating colors!  I used the teacher sticker from the Quick Cards Back to School Stickers. 


Thank you so much for popping in today!
Have a great day!!

Monday, September 25, 2017

Back to School Card Set by Tobi


Hi there, it's Tobi Crawford here! As a teacher I always have a need for school-related cards, especially at the beginning and the end of the year. Councillors, admin, and fellow teachers need a special "kudos" this time of year, and small little note-cards are the perfect token of appreciation. 


Each card is a little different (that's for me - so I don't get bored), but also because I wanted to switch up the sentiments slightly to be a little more personal. 


The formula is easy: 

 1) ruled patterned paper
2) lined patterned paper
3) apple stickers (Live Life: School)
4) sentiments (Fancy Sentiment: Thanks)
5) twine (Solid Maraschino)

Thanks for stopping by!  See you again soon!

Tuesday, September 19, 2017

Watercolor Techniques by Christine


Options abound when it comes to watercolor techniques and we have all kinds of products for you to play with too!  Christine joining you today with a set of techniques for you that work great using the Watercolor Twist Pencils!  The Watercolor Twist Pencils come in three different sized packages, 12, 24, and 36.The video below features several ideas with tutorials on how to do each:


Here's a card that showcases how I used one of the backgrounds I created.


I punched the two leaves out from a watercolor background I made.  Doesn't it add a lovely, whimsical element?  The more I play with watercolor, the more I love the softness it adds.


The sentiment comes from the Child of God stamp set which is a versatile set great for cards and so much more.