Tuesday, April 11, 2017

Walk by Faith Bible Journaling by Karen


Hello friends from Karen!  Today I'm sharing a recent Bible journaling entry I created using some of the new Faith stamps. I'm finding lots of inspiration in these new sets and enjoying fitting them together to emphasize scripture verses and tell a story or lesson learned. 


Today my entry is in Genesis 50. Many of you may know the story of Joseph, whose brothers sold him into slavery because they were jealous of the attention and gifts he received. Joseph's life was turned upside down and he didn't understand why all this was happening to him. But God knew how to take this bad and use it for good. After many years, Joseph was able to fully forgive his brothers and said to them in verse 20, "As for you, you meant evil against me, but God meant it for good...."


I created a dusty background with acrylic paints, symbolizing that we do not always see clearly. I started with the Walk by Faith set and added a few words from other sets to complete my entry. I really like the "spear-like" quality of this large arrow and the mini arrow cross found on the In Jesus' Name set. To finish off the page, I used a black pen to box in the main sentiments and added dots and highlighting with gold and white gel pens. Then I added my own prayer. We don't always understand why bad things happen, but we can continue to step out in faith, trusting in the Lord who sees all, knows all, and will do what is good and right for us. 

For this project I used:

Monday, April 10, 2017

Let the Earth Be Glad by Michele


Good morning! Michele here with a card using SRM's new set called, Heaven & Earth.  I decided to stamp the trees in a rainbow pattern....because who doesn't love rainbows?  I used my Mini Misti to line up the sentiment.  I wanted the bottom portion to stamp directly over the bottom of the trees.


Once the stamping was complete, I used Stickles on each of the trees to give it shimmer and dimension.   


I tore the top of the card and backed it with a piece of black card stock to make the image pop a bit.  I adhered several rhinestones and tied Marigold twine vertically. 


Thank you all for stopping today!


Friday, April 7, 2017

Walk with Jesus Card Set by Shelly


Hey y'all! Shelly, here! 
Today, I'm sharing a simple and fun card set with you!

This card set came to me when I was looking through my SRM Stickers clear stamps. Lately, I've been doing a lot of 'make your own background' on my cards, so I thought I'd do the same with these. 


I used the arrow from SRM Stickers Walk By Faith stamp set and randomly stamped them on my card base. After, I added my sentiment pieces from the same set, in the center of my card. I did this for all my cards, using different colors.


One of things I love is the fancy/script writing, though as for me actually writing like that...not happening. lol But with these clear stamps that offer fancier or even bold words, I simply traced over the word with a gold pen and ta-da...done. :) 


To finish my card set off, I bundled them all together using a piece of white lace. After I placed the set in a clear container. Simple, yeah?!...


Thanks so much for stopping by!
Enjoy your day! 

SRM Stickers supplies used:

Calligraphy Gold pen
White Lace

Thursday, April 6, 2017

Let the Sea Resound by Karen


Hello friends! Karen here with another Bible journaling page.
Psalm 99 is an amazing song of praise to the Lord. In verse 7 we read, "Let the sea roar, and all that fills it; the world and those who dwell in it!" 
With that powerful imagery in mind, I created a powerful wave on my Bible page with acrylic paints, a LePen fine point black pen and the new Marvy Reminisce white gel pen.


The stamp set Heaven & Earth provided a few more details - the jumping fish and sentiment.  To fit the sentiment in my Bible margin, I snipped it into two pieces and then stamped it in the middle of the wave. Perfect fit!


The Amen stamp is from another new set, In Jesus' Name.


I love how this page turned out and that I can shout my praises to the Lord and use my creativity to do it!

For this page, I used:

Wednesday, April 5, 2017

Triangle Treat Box for Spring from Michele!


Good morning! Michele here with a Triangle treat box! 
I love this little clear box all ready to be filled with sweet treats! I folded a doily over the back half of the triangle box to sort of "ground" my eggs. 


The eggs were cut from a die and given color with the Watercolor Twist Pencils.   I then applied a thin layer of glossy accents over the eggs and sprinkled it with a clear coarse glitter.  I adhered the eggs to the box with dimensional foam tape.


The sentiment is from the Spring collection. I tied black and white twine and adhered it to the corner of the sentiment.  As a final touch, I placed a gemstone in the center of the bow. 


All that is left to do, is fill it up with some candy!
Have a great day friends!

Tuesday, April 4, 2017

Thank You Gift by Amber


Hello everyone! It's Amber here, today I'm sharing this cute little clear tote and watercolored/embossed tag I created. 


I started by assembling one of the Small 4"x 2"x 6" Clear Totes, which took about 2 seconds to assemble. These clear containers are super easy to fold up and assemble. You can find a variety of different shapes and sizes in the SRM Stickers shop HERE. Once my container was folded and assembled I filled it with some colorful gummy candy and set it aside to work on my tag.


I die cut a large tag out of some watercolor paper, stamped some flowers towards the bottom half of my tag, and masked them off so I could heat emboss the word Hello in clear embossing powder across the rest of my tag. After I had all my heat embossing done I started watercoloring my tag with some watercolor pencils. Once my tag was completely dry I attached it to my small clear tote with some pale pink ribbon and my little gift was complete.

Monday, April 3, 2017

Baby Layout by Christine


 I'm a pen addict, there's just no getting around it!  Christine joining you and now that we have established that I am going to focus on the new white gel pen from SRM Stickers!  I'm also going to add in some jute twine and lots of stickers and you can check all of them out up close in a process video for this baby layout!


Here's the process video for this layout:


I used the Gel Reminisce White Pen to decorate all the little rectangles along my patterned paper.


It worked beautifully for making that patterned paper have a different look and a one-of-a-kind look!  I also incorporated some Black Sticker Stitches to create a border along my layout. I tucked some light pink Jute Twine underneath the pictures to add a touch of whimsy.


I incorporated some phrases from the Express Yourself/Everyday Girl sticker set to be subtitles throughout the layout.

Thanks so much for joining us today!

Friday, March 31, 2017

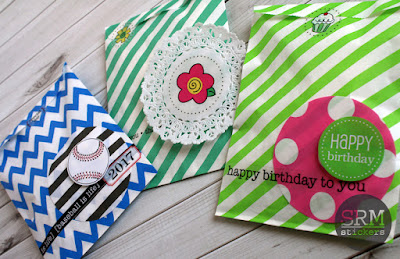
Goodie Bags for 3 Spring Occasions by Samantha


Hello! Samantha with you today with a project using the new patterned bags. I have a bit of Spring fever, so I thought I'd style goodie bags for 3 Spring occasions. 


I used the same layout for embellishing all of my bags, but as you can see, they all have a very different feel. 


My first bag was decorated for Opening Day! Whether you'll be headed out to the ball park or watching from home this decorated bag is a great way to turn peanuts or popcorn into a special treat. I used a blue zigzag patterned bag, layered on a circle cut from a black striped patterned bag. I embellished with baseball stickers from Take 2 Stickers By The Dozen Baseball and a 2017 sticker from Year of Memories 2017. I sealed the bag shut with a sticker from Calendar Companion


My next bag is a Spring themed thank you bag. It's great for a small teacher or hostess gift. You can slip in a gift card, a handmade bar of soap and some lotion, or some pretty nail polish. For this bag I started with a striped bag. Then I added a 4" White Doily. I embellished the doily and the bag with stickers from We've Got Your Stickers Thanks


For my last bag I created a Spring birthday bag. You could slip a little birthday treat in here or a gift card to go out to eat, some tea bags, or even some packs of seeds. I started with a bright green striped patterned bag, then I layered on a circle cut from the pink polka dot patterned bag. I embellished with stickers from Take 2 Stickers By The Dozen Birthday and Sentiment Happy Birthday. I sealed the bag shut with a sticker from We've Got Your Sticker Happy


...and there you have it: goodie bags for 3 Spring occasions. I love how these patterned bags can make a little gift extra special! What would you stick in these patterned bags?

Thursday, March 30, 2017

Spring Vinyl Home Decor by Shantaie


Hello!  Shantaie here today with a vinyl project. 
Creating a home we love is universal, almost every person has a place that evokes the feeling of home and warmth. Decorating is as deeply rooted as any nesting behaviour through the centuries and fills our hearts and homes with uniqueness and happiness. 


I have not escaped the gravitational pull of seasonal decorating, as I'm sure many of you enjoy alongside me! Adhesive vinyl is a decorators best friend for the changing seasons,  easily added or removed to allow for a new look using the same piece is my favorite aspect of vinyl. 


I adore this galvanized flower bucket, it works in amy room, for every holiday or season. For spring I have added a heart shaped butterfly design with pastel patterned vinyl cut with my Silhouette Cameo, remember you do not need a cutting machine to use vinyl, you can use punches, dies, or hand trim simple shapes or graphic designs. 


Applying vinyl to a surface that is not flat takes a little adjustment, start in the center and slowly work out pressing into the hills and valleys with your fingers as you go. 


Use a burnishing tool to smooth out any wrinkles, bubble or loose edges, and peel away transfer tape.

If you have a section that does not adhere, simply place the transfer tape back down and press firmly along the cut, take your time and burnish all cuts, this will only take a few extra moments and it will make your vinyl project a big success!

Fill with flowers, branches, or cotton and enjoy all spring! 

Wednesday, March 29, 2017

Faith Cards & Process Video by Christine


Hi there crafty friends!  It's a busy time of year for my family so I wanted to create some cards that I could grab and send for encouragement.  Christine joining you today and I'm using some Bible Journaling stamps and the Gold Calligraphy Paint Pen, I came up with some quick and easy ones.  I also created a video for you to show you how I made them!  Here's the cards!


Here's a quick walk thru how I made these cards:


As you can see each card has the same basic design but I changed up the words and borders. 


All three cards use the Big Faith Stamp Set and the hearts are from Child of God clear stamp.  The border on this one comes from The Lord is Kind Stamp Set. 


The border on this one also comes from The Lord is Kind Stamp Set.


The border for this one comes from the New Testament Clear Stamp.