Showing posts with label Chalkboard Markers. Show all posts

Wednesday, May 18, 2016

Bible Journal Art by Shannon


Good morning, Shannon here, sharing yet another bible journaling page with you! I'm offering you a little bit of ingenuity this morning.

Have you ever thought to add chalkboard markers to your journal entries?

The journal entry you'll see below was used using the BISTRO Chalkboard MARKERS above.  This entry also has LePen or two, of course!

The following pages are journaling the readings for April 30, 2016. I highlighted the text that I wanted to focus on, I also drew some arrows, well, seven...because when I journal, I try to focus in on the 7 gifts of the Holy Spirit. Fun Fact about me: Seven is a special number in my life as well, Paddy and Mack were both born on the 7th, and we adopted 2 of our 3 dogs on the 7th..and the other was actually born on July 7th...so you will always find seven somewhere in the things I share with you.


Here is a close up of the entry. You'll notice that the "chalkboard" is not a perfect, straight line, I don't do perfect, I can't draw a straight line with a ruler. It's just "not a thing" in my life, and I don't even attempt to try.

I added a lot of "dots" of various sizes and colors. I outlined my text too, I felt like alone it didn't stay out enough, so I went back after looking at it awhile, and committed to the outline. The beauty in using something like a chalkboard marker, you can go over it in black and begin again. It's "smeared" a little, because I wanted texture.


Here's an additional close up, you can see the outlines. The only thing I used that wasn't SRM, was a gold marker to add a bit of sparkle to the page as well.


Thanks for letting me share with you! ❤ 

Thursday, August 20, 2015

DIY Menu Board by Christine


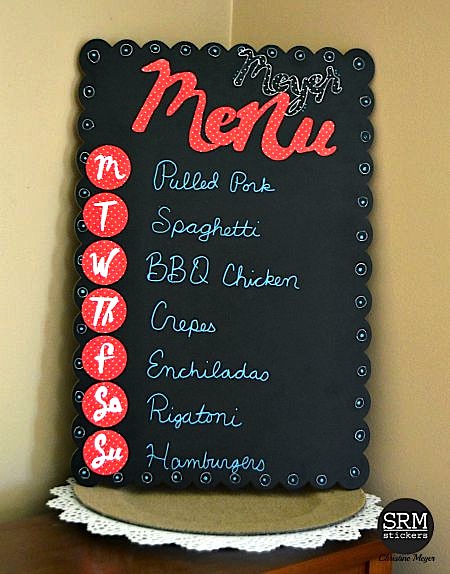
Who loves Vinyl? I do, I do! Who loves Patterns? I do, I do! SRM's new patterned vinyl combines both of those and it is fabulous!  Christine joining you today to share a DIY menu board that uses the new patterned vinyl along with out chalkboard markers!

SRM Stickers Blog - DIY Menu Board by Christine - #patternedvinyl #vinyl #chalkboard #markers #DIY

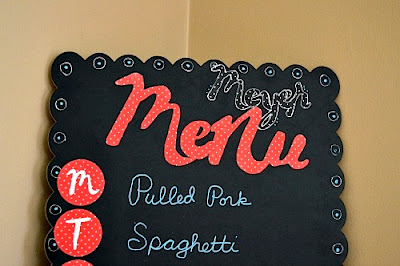
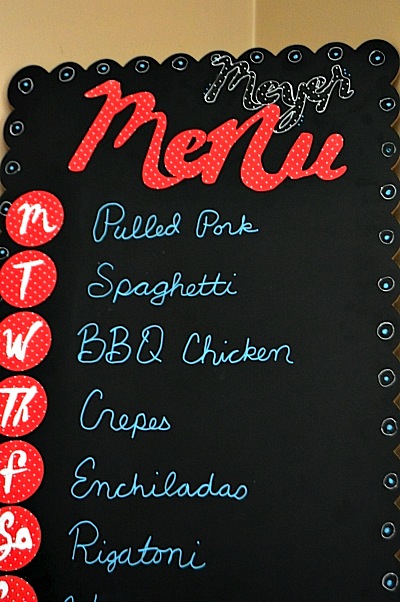
I purchased a black scallop chalkboard from the craft store to use as my base.  I then busted out mil Red Dots vinyl to use for my title and days of the week.  They cut perfectly on the Silhouette Cameo!

SRM Stickers Blog - DIY Menu Board by Christine - #patternedvinyl #vinyl #chalkboard #markers #DIY

I wanted to add our family name to it and thought the Black Dot vinyl would look neat.  It didn't have the contrast I was hoping for so I outlined it with a White Chalk Marker.

SRM Stickers Blog - DIY Menu Board by Christine - #patternedvinyl #vinyl #chalkboard #markers #DIY


There are several Chalk Marker colors available from the store.  I decided to go with a blue for a patriotic color scheme for now.  But later in the year you could change it up with colors to fit the season we are in! As you can see, I added a little doodling too!  

This was a super simple project that could be well utilized in any home.  Check out all the different patterned vinyls to find one that would fit your style!

Tuesday, June 23, 2015

Wall Glass Calendar by Cathy Andronicou


Hello!  Cathy Andronicou With you today!  Family lives are so busy these days it is often difficult to keep track of all that is going on. At our home we have added a glass panel to our wall with an acetate square calendar month behind to help record all the important events for the month.  I'll be using SRM's new Chalkboard Markers

I was so excited to discover that my chalk markers work beautifully on the glass.  The thicker markers are great for adding symbols and bold lettering and the fine ones are just perfect for recording events.  And what makes them even more perfect for the job is that the writing wipes off easily with a dry eraser or a damp cloth!


SRM Stickers Blog - Wall Glass Calendar by Cathy - #calendar #chalkboardmakers #fluorescent

On this project I used SRM's Bistro Florescent Chalk Markers both the 6mm & the Fine Tip

I have also done a little video showing how easy it is to write on and wipe off.
Enlarge to view and Enjoy!


Here's some of the products I used on today's project.  And a few others that I plan to use in the future! :)


Thanks for stopping by.  And happy crafting!

Monday, June 22, 2015

❤{Olive You}❤ by Shannon


Hello!  Shannon here today to share a special project that's all about love using SRM's Bistro Chalk Markers!

SRM Stickers Blog - ❤{Olive You}❤ by Shannon - #homedecor #sign #chalkboard #markers #fluorescent #DIY

These markers are wonderful. I really, really mean it! I love the consistency and different sizes you have to work with. You can use them for so many things.

I repurposed a sign for my kitchen. I filled in the middle of the sign with my very cool BIG Easy Chalkboard Marker before creating the design.  Since the sign was going to hang in my kitchen and I am a lover of food puns, it has a cheesy smiling food pun. Olives, to be exact!

Even more awesome, you have the availability to create texture with these markers. I blended my olives with my fingers, creating shadows and texture. You can also create a relief, using a wet Q-tip. I created the smiles by simply using a wet Q-tip to erase the green. It may take a few Q-tips to get down to black, but with a little patience, you can create a great design.

SRM Stickers Blog - ❤{Olive You}❤ by Shannon - #homedecor #sign #chalkboard #markers #fluorescent #DIY

Here's a close up of the details on this sign: 

SRM Stickers Blog - ❤{Olive You}❤ by Shannon - #homedecor #sign #chalkboard #markers #fluorescent #DIY

Materials Used: 

Bistro Chalk Marker Fluorescent 6mm Tip

Thank you for letting me share!  What would you make with these chalkboard markers?  The possibilities are endless!


Wednesday, May 27, 2015

Hello Chalkboard Card by Lorena


Good morning, friends! Lorena here playing with  the super fun chalkboard markers that SRM carries. They can be used on lots of non porous surfaces... but remember that you can also use them on paper! Today I bring you an easy technique that combines chalkboard markers and stamping. It replicates the look of masking, but without the effort of using a mask. 

SRM Stickers Blog - Hello Chalkboard Card by Lorena - #card #chalkboard #chalkboardmarkers #janesdoodles #doodleflowerclearstamps #whitechalkmarker

First of all, I traced a rectangle in the middle of a stitched die cut panel. That gave me a guide to stamp the flowers and leaves from the Doodle Flowers stamp set. No need to mask, just stamp the whole image.

SRM Stickers Blog - Hello Chalkboard Card by Lorena - #card #chalkboard #chalkboardmarkers #janesdoodles #doodleflowerclearstamps #whitechalkmarker

Once the stamping was done, I went in with the Easy Chalkboard Marker and filled the rectangle I had previously traced. I wanted a whimsical look, so I didn't follow the edges accurately. The marker completely covered the stamped areas I didn't want to show, so I ended up with a perfect floral frame.

SRM Stickers Blog - Hello Chalkboard Card by Lorena - #card #chalkboard #chalkboardmarkers #janesdoodles #doodleflowerclearstamps #whitechalkmarker

Next, I colored the blooms and leaves with watercolor pencils. Remember that with this kind of pencils, the less water you use, the more intense colors you get. When everything was colored, I hand wrote the sentiment in the middle of the chalkboard rectangle using a pencil, and then traced it with the fine tip Bistro Chalk White Marker. I love how bold it looks! Finally, I adhered the focal panel to a card base using foam tape.

SRM Stickers Blog - Hello Chalkboard Card by Lorena - #card #chalkboard #chalkboardmarkers #janesdoodles #doodleflowerclearstamps #whitechalkmarker

That's it from me today! I encourage you to try combining stamping and the chalkboard markers, because the results are fantastic. Thanks for stopping by and happy crafting!

Wednesday, May 13, 2015

Guest Designer: Kathy Racoosin


We are so excited to welcome Kathy Racoosin back to the SRM Blog today as a guest designer.  Kathy was on the very first SRM Design Team back in 2010 and she brought to our blog such amazing talent.  Since that time, Kathy has continued to blossom and grow into one of our industry's most talented crafters. 

SRM Stickers Blog - Guest Designer:  Kathy Racoosin - #cards, #minicards #janesdoodles #stamps #twine #kraftwindowbox #cardset #gift  #chalkboard #chalkboardmarkers

Today Kathy is playing with a Jane's Doodles "Doodle Flowers" stamp and some of SRM's new chalkboard markers and SRM's new square kraft window box and the results are stunning.  

Want to create this set of beautiful set of cards all wrapped up in a kraft window box?  Read on for the instructions in Kathy's own words! 

SRM Stickers Blog - Guest Designer:  Kathy Racoosin - #cards, #minicards #janesdoodles #stamps #twine #kraftwindowbox #cardset #gift  #chalkboard #chalkboardmarkers

 "Stamp flower with some black dye ink on each card. Cut the sentiment to fit the card base and stamp the dot boarder with white ink plus part of the sentiment. Stamp the other half of the sentiment in black ink. Color the flower with SRM's new chalk board markers. Add some black lines to the leaves and petals with a sharpie marker. Draw some circles inside the white dot boarder. Add some white dots with a white gel marker. Embellish the flower if you want by adding some white and black dots to the  inside the petals. Add twine to the white card base. Use foam tape to pop the front of the card. Score a back for the card and attach." 

SRM Stickers Blog - Guest Designer:  Kathy Racoosin - #cards, #minicards #janesdoodles #stamps #twine #kraftwindowbox #cardset #gift  #chalkboard #chalkboardmarkers

 Stamp a strip of card stock to decorate the box and enclose the set of cards.  Wrap strip around the box and embellish with some twine. Perfection! 

SRM Stickers Blog - Guest Designer:  Kathy Racoosin - #cards, #minicards #janesdoodles #stamps #twine #kraftwindowbox #cardset #gift  #chalkboard #chalkboardmarkers

And here are some of the supplies Kathy used in creating her project:  


Thank you Kathy for inspiring us with your beautiful work.  It's stunning!  And be sure to join Kathy on her blog "The Daily Marker" where you will find  lots more inspiration.  

Plus….leave a comment on the SRM blog for a chance to WIN the stamp, markers and kraft window box that Kathy used in her project.   


Monday, April 20, 2015

Chalkboard Teacher Thank You Card by Christine


Teacher Appreciation Day is coming up soon! 
May 5th is the day set aside to make sure and thank our teachers!  Now is the time to get working on those special cards for those people who take special care of your kiddos and SRM has all that you need to make teacher cards! Christine joining you today to share one of my teacher cards!


SRM Stickers Blog - Chalkboard Teacher Thank You Card by Christine - #card #teacher #thankyou #stickers #chalkboardmarker #Blackboard #DIY

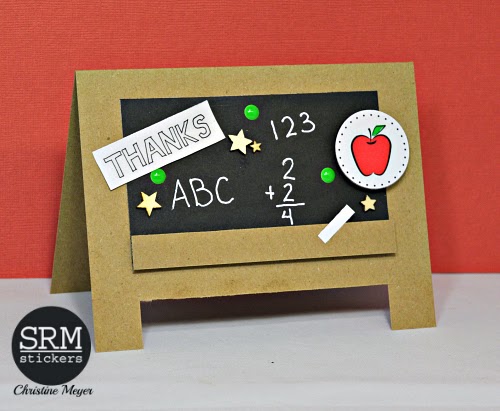
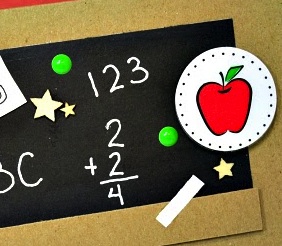
The new Chalkboard Marker makes it easy to make a personalized card! After cutting my card to be shaped like a chalkboard easel, I used the Easy Chalkboard Marker to create my own chalkboard. 

SRM Stickers Blog - Chalkboard Teacher Thank You Card by Christine - #card #teacher #thankyou #stickers #chalkboardmarker #Blackboard #DIY

I added some Abc's etc with the Bistro White Fine Tip Chalk Marker.
A "Thanks" from the Sentiment: Thank You stickers works perfectly for adding the thank you but with a different medium.  And of course what teacher card would be finished without an apple on it - the one from Quick Cards/Teacher is perfect!

SRM Stickers Blog - Chalkboard Teacher Thank You Card by Christine - #card #teacher #thankyou #stickers #chalkboardmarker #Blackboard #DIY

Easy as ABC.. Easy as 123!  Get yourself some of these amazing markers and have yourself some fun making your own Chalkboard projects!

Thursday, April 16, 2015

❤{Oh SRM, I Love You So..}❤ by Shannon


Hello!  Shannon here today sharing some SRM goodness.  Whenever I sit down to start a layout, I always find myself reaching for my SRM Press products.  They are created to amaze.  I find myself using a plethora of products from SRM on my layouts, cards and altered projects. 
❤ I created this layout using quite a few SRM goodies.

SRM Stickers Blog - ❤{Oh SRM, I Love You So..}❤ by Shannon - #layout #love #labels #twine #chalkboard #blackboard #stickerstitches #stickers

Take a look at this close up, each box features a product that you can find in the SRM store! The top left...is the brand new *{CHALKBOARD MARKERS}*! They are so versatile, you an use them on all kinds of surfaces and for all kinds of ideas! I actually used the markers to create my title for this layout. Jump to the top right box, you'll find some *{Sticker Stitches}*, look at the seamless way it marries the paper to the photo! If you look at the bottom left, you'll find yourself looking at two awesome SRM products...*{Labels By The Dozen}* (in black and white) and *{We've Got Your Sticker/Sweet}*. If you look to the last corner, you'll find some Twine, more stitches and another sweet sentiment. ❤
SRM Stickers Blog - ❤{Oh SRM, I Love You So..}❤ by Shannon - #layout #love #labels #twine #chalkboard #blackboard #stickerstitches #stickers

Have you tried the new EASY Chalkboard Marker yet?  You can create a little blackboard wherever you like!  I simply LOVE this idea! What an amazing product!

Here's a look at the little blackboard I created on my layout for my title.

SRM Stickers Blog - ❤{Oh SRM, I Love You So..}❤ by Shannon - #layout #love #labels #twine #chalkboard #blackboard #stickerstitches #stickers

Don't you just love it?  I do!
❤