Wednesday, February 8, 2017

Happy Chinese New Year by Tobi


Nihao, it's Tobi Crawford here with some custom-cut vinyl pieces for cards. Did you know that Chinese New Year was January 28th? Until I moved to China I had no idea how big of a deal it is... If possible, it's bigger than Christmas! The country (yes, of 1.5 billion people) literally shuts down so people can go spend time with their families and for two weeks you will be hard-pressed to find a corner store open for business... So it was no surprise to me to get a couple of requests for CNY (Chinese new year) themed cards.


When I first got the request I immediately knew I'd use red and gold, but I didn't have anything stamp or die-cut related to China or CNY. Enter in Cameo and vinyl!! 


It is really hard to show that the cuts are indeed GOLD, but you can see the gorgeous detail I got, and then since it's basically a sticker, I just adhered it to the cardstock. 

Here's another version: 


This is more traditional with the CNY lanterns. 


Lastly, this is a thank you for a Yoga teacher made with the same supplies, but just a different color-scheme. 


Supplies: 

Tuesday, February 7, 2017

Valentine Gift Tag by Michele


Good morning! Michele here with an altered birch wood disc.  I used a sunburst stencil and texture paste.  I sprinkled yellow glitter over it.  I glued some pink and orange pom pom trim to the perimeter of the circle.  


I cut an orange felt circle for the middle of the sun and adhered two stickers from the Valentine Sticker by the Dozen collection  I also added a few sequins, white thread with a clear sequin. 


I thought this a perfect decor item or gift bag tag!   


Thank you so much for stopping by today!!

Monday, February 6, 2017

Love & Kisses by Amber


More "love" from our Design Team today on Day #3 of Valentine Week #2! 
There's plenty of time left to make some of the amazing creations that we've been sharing with you!

------------------

Hello everyone! It's Amber here, today I have this fun little Valentine's Day card to share. I used these two little sheep from My Favorite Things BB Ewe Are the Best stamp set and paired them with some Valentine's Day themed pattered paper, sliver heart sequins, and SRM's Sentiment/Love sticker sheet. 


To begin I started with an A2 sized white card base and adhered a slightly smaller piece of patterned paper to the front. I cut a second piece of pattered paper into a strip and adhered it right over the first piece of patterned paper I added to my card base towards the top half.  I die cut a large stitched circle out of some white cardstock to stamp my images onto, cut a little heart out of some gray paper, and cut two different sized banners out of some pink paper to add to my card later.


I stamped the two adorable little ewes towards the top center of my stitched die cut circle, colored them in with some Spectrum Noir Markers, and adhered the die cut to the middle of my card base right over my two layers of patterned paper. I adhered the little grey heart I cut to the left of my circle die cut and adhered the large pink banner with the "Love & Kisses" sentiment to the right of my grey heart right below my two images. I added the second pink banner I created towards the top right of my card base and finished my card with some sliver heart sequins. I hope you enjoyed my card today! 
Thanks for visiting!

Friday, February 3, 2017

From the Heart by Shannon


Good morning, Shannon here..sharing a Valentine's Day inspiration post with you. 

In a world of digital everything, there's something to be said about a handmade card or note. When you take the time to send a heartfelt note, it can make all the difference in someone's day. ❤

I created some festive, fun Valentines using SRM stickers, doilies, twine, punched paper pieces and labels!


Take a look at the set of three below: 


I love Stickers by the Dozen! They are ideal for invitations, thank you notes, greetings for family and friends. I am instantly transported to my childhood using doilies, how awesome are these Red Heart Lace Doilies?!?!? 
Punched Paper Pieces add the perfect pop of color to these greetings. 


SRM Labels by the Dozen can serve so many uses, as an actual label, a gift tag, or a super cute embellishment! A go to sticker for me in pretty much every project, Sticker Stitches...you can find them on 99% of my projects. The other one percent? I blame my children and their friends for horribly distracting me!


A Valentine wouldn't be a Valentine without a sweet sentiment, SRM has so many ways to express yourself, even the We've Got Your Border Stickers have sentiments and heartfelt wishes on them! And twine is always a perfect addition to anything ❤

Thank you for letting me share these sweet valentines with you today! 

SRM PRODUCTS USED:


Wednesday, February 1, 2017

Jesus Loves Me Valentine by Christine


As soon as I got my hands on my new Bible Journaling stamps I knew I was going to have design a Valentine with them for my kids to make!  Christine joining you today with a quick and easy Valentine to stamp with your kids!


This was super easy to make and I create a process video to walk you thru how I did it!


Here's a closeup look at the Valentine and bag.


To create my Valentine I used a sentiment from the Child of God Stamp Set.  The background is made with a border stamp from the New Testament Stamp Set.


I tucked the Valentine into one of the brand new patterned bags and then sealed the whole thing with a heart sticker from the Stickers by the Dozen Valentine set.


Tuesday, January 31, 2017

Valentine Card by Michele


Welcome back to day #2 of Valentine Week #2!  So much love....

-----------------

Good morning!  Michele here and I have a fat layered card for you today!  I went a little nuts with the layers of "stuff" and glitter!  I had all of these scraps on my desk from other projects and instead of throwing them away, I cut them up and glued 'em together! 


For the center of my flower, I rolled this pom pom trim I had into a cluster. I also added a bit of pink and white twine under it.  I used SRM's Stickers by the Dozen Valentine sentiment to peek out from under it.  


One last look at my lumpy bumpy Valentine's card! ;)


Thanks so much for stopping by!
Have a great day!
SaveSave

Monday, January 30, 2017

Valentine Cocoa Station by Shantaie

Well, we have more wonderful Valentine projects for you so we begin Week #2 of Valentine fun!  Today Shantaie shares with us a treat!

Wintertime is the perfect time for a hot cocoa bar, and although I have seen dozens of them decorated for Christmas a Valentine's themed cocoa station is exactly what I wanted for my kitchen!  Shantaie here today to share my Valentine hot cocoa bar idea.


I cut a sweet vinyl saying with my Silhouette using black matte SRM vinyl  and sized it to fit my two tier tray. I layered the saying at the top, but of course you can do it however you like! 
So let's talk about the good stuff, what I added to my cocoa station!


I made a set of TUBES filled with cocoa mix, chocolate chips and two little pink heart shaped marshmallows ( I can't handle how cute these are!) A We've got your border sticker was wrapped around each lid and a layered punched piece is topped with a heart sticker from stickers by the dozen Valentine and tied on with baker's twine.


I used a fine point chalk marker in fluorescent pink to write on the label of this candy jar of marshmallows, an essential ingredient to a Valentine's cup of hot chocolate! 


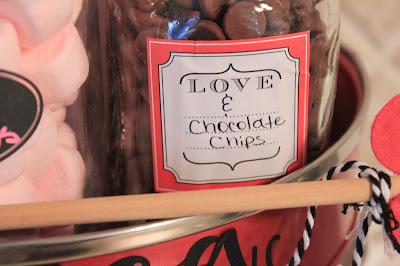
Speaking of Labels....I added this one to a ball jar and wrote "& chocolate chips" after the word love. I think little details like this make your station warm and inviting, as well as exciting! 


Love is sweet!  And I think that these TUBES would be a wonderful Valentine to classmates, teachers, or just about anyone who could use a warmed heart!!! 


I will be stalking pinterest and instagram to see your spin on the Valentine's cocoa bar and the Valentine's cocoa TUBES!!!! Make sure to tag SRM in your photos!!! 

Friday, January 27, 2017

CAS Love Card by Melanie


Hey there! Melanie here today and I have a clean and simple card to share with you today. With Valentines Day right around the corner, LOVE is in the air :)


SRM stickers come in THE best fonts and have such a variety. I love to combine them together to get the message across! Since they have a clear backing, layering them is such an easy thing to do. I used some phrases from the Love/Sticker Sentiments sheet.  It's never been a secret that I love Sticker Stitches as well ;) I used a stitch from the Black sheet to connect my patterned papers. Then to add some texture I glued a length of black jute twine  on top of the sticker stitch. 
Thanks for stopping by! Have a "Love"ly day!

Thursday, January 26, 2017

Valentine Party by Michelle Bertuzzi


We were so excited to see this amazing Valentine Party ensemble by Michelle Bertuzzi. It's picture perfect!

So it's Day #4 of our Valentine Week and today is Throwback Thursday.
These crafty creations from Michelle are among my most favorite ever!  
Sit back, relax and enjoy as Michelle inspires us with lots of wonderful 
Valentine party ideas!


Let's take a closer look at each piece.
Stickers and twine!  That's all you need to create this wonderful card!


Stickers, Twine and Glassine Bags to create treat bags!


Border Stickers, Glassine Bags and Tins for this darling card!


And clear pillow boxes, Stickers by the Dozen for these sweet treats!


Michelle used our Valentine stickersglassine bags and pillow boxes for her invitations and favors. Gorgeous, don't you think?! And I love the heart-sticker googly eyes!

Wednesday, January 25, 2017

Valentine Treat Boxes by Shelly


Hey y'all! Shelly, here!  It's Day #3 of Valentine Week here on the SRM Blog.
Today I'm swinging on in to share some easy and fun Valentine treat boxes!


To start, I used some kraft pillow boxes. Which I chose a large one and a small one. Once having my pillow boxes chosen, I added some fun arrow paper to each of them. 


After, I added my red jute twine and my sentiment pieces. (for my sentiment pieces, I added each sticker to cardstock and then simply cut them out.)


So what do you think?!...Fun and easy, yeah?!...

Thanks so much for stopping by!
Enjoy your day and see you soon!

SRM Stickers supplies used: