Wednesday, October 15, 2014

Mini Birthday Box with Tags by Cathy H.


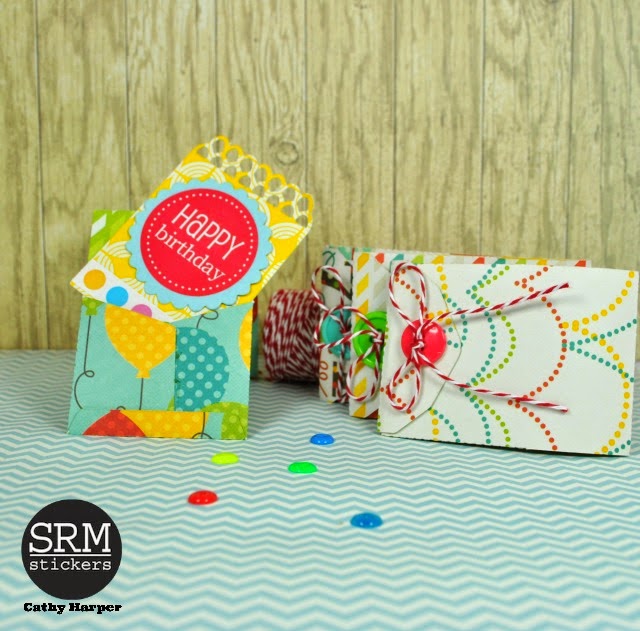
Hello from Cathy Harper!  I have a fun little box full of Birthday Tags to share with you today.  I created this little gift to add to a friend's Birthday Box.  It's a way for her to have Birthday tags to add to presents right at her fingertips.  I used SRM's Clear Rectangle Box to hold my tags and decorated it with Birthday Take 2 StickersBlack Sticker Stitches, and a medium teal Punched Piece.  I just adhered the stickers around the bottom of the box and added a bit of yellow washi tape for more color.  Next, I created a paper bow using my Silhouette Cameo and tied it together with Maraschino Baker's Twine and added the scalloped punch tag!

SRM Stickers Blog - by Cathy Harper - #stickers #birthday #box #cards

Adorable! Next up, I created all the little tags and envelopes to fill my box, again using my Silhouette Cameo.

SRM Stickers Blog - by Cathy Harper - #stickers #birthday #box #cards

I made a set of six tags to go inside, all using the same tag and envelope.  I just alternated patterned papers!  All of the tags are decorated with Birthday Take 2 stickers and Medium Scalloped Punched Pieces in different coordinating colors.

SRM Stickers Blog - by Cathy Harper - #stickers #birthday #box #cards

Once my tags were all tucked inside the mini envelopes, I added a button with a Maraschino Baker's Twine bow to each envelope! Before I filled the little box I added some yellow crinkle paper for a pop more color.  Now my friend has a stash of Birthday tags to add to her gifts.  

SRM Stickers Blog - by Cathy Harper - #stickers #birthday #box #cards

I love how this little gift turned out and I might even make her a set of Christmas Tags.  

SRM Stickers Blog - by Cathy Harper - #stickers #birthday #box #cards

Wouldn't it be fun to have a whole row of these little boxes, full of tags for all of your gift giving occasions?  Thanks for stopping by and be sure to come back again soon for lots more SRM inspiration!

Tuesday, October 14, 2014

Spooky Treat Box by Annette


Trick or Treat SRM Stickers Friends!
It's me, Annette Allen and today I'm playing with SRM's new Kraft Box which is a total treat!  I love that it's a blank canvas just waiting for me to embellish it to create a gift box or even a mixed media project! 

SRM Stickers - Spooky Treat Box by Annette - #kraft #box

First I wanted to add a little color to the background so I used my watercolors and splashed some orange, yellow and brown. Then used my Silhouette Cameo to cut out this spooky pattern.  Now to make it even more spooky I added a spooky spider from Stickers By the Dozen Trick or Treat to a white Punched Piece and a fun border from SRM's Halloween Border set.  That big, bold HALLOWEEN is a sticker too!

SRM Stickers - Spooky Treat Box by Annette - #kraft #box #halloween #stickers

To create this spooky banner on the outside edges I used: SRM's Stickers by the Dozen Spiders and Candy Corn Halloween BordersWe've Got Your Stickers Treats and Punched Pieces in white, black and orange.

SRM Stickers - Spooky Treat Box by Annette - #kraft #box #halloween #stickers

You thought I was done, right?
Well I had to put something inside. I used my Silhouette Cameo to made these fun mummy treat boxes and added sentiments from SRM's Stickers By the Dozen Halloween.

SRM Stickers - Spooky Treat Box by Annette - #kraft #box #halloween #stickers

Yummy things come in small packages!

SRM Stickers - Spooky Treat Box by Annette - #kraft #box #halloween #stickers

Thanks for letting me share my spooky treat.  I love the way it turned out and can't wait to make more of these fun krafty boxes.  Believe me, I've got a million ideas about how to use them! :)

SRM Stickers - Spooky Treat Box by Annette - #kraft #box #halloween #stickers

Hope you have a crafty sweet day.

Monday, October 13, 2014

Mini Calendar by Cassonda


Greetings fellow SRM Sticker fans!  Cassonda Tadlock here today.  Are you already thinking about the new year? I tend to plan things in "quarters" so I am already looking at plans for January and beyond.  I wanted to give my niece a little calendar book she can keep in the small pocket of her backpack to use at school. This "krafty" calendar is actually made from one of SRM's chevron embossed kraft bags.


Want to make one of these little cuties?  Here's how!  Using one of SRM's Embossed Chevron bags, I cut all the sides off of one of the kraft bags and then cut in half so you have 2 long strips. Accordion fold your strips so you have 6 squares on each strip. 


Place your mini calendar stickers on some pretty paper (The stickers are clear so the paper shows through!), cut with a trimmer and adhere to the accordion folded strips. (I adhered the back of June and July together so the calendar would be one long strip.)


Fold the calendar up, tie a ribbon around it and add one of the Year of Memories Calendar Sticker Tags. Place it inside a decorated glassine bag for a pretty gift presentation. I used the Valentine and Birthday Birdie Stickers to decorate the front of the glassine bag.


These would make such cute stocking stuffers for your friends! I plan on creating a bunch more before Christmas. I hope this also helps you get ready for the new year! 


Here's the embossed kraft bag that I used for the base of my calendar.


And here's the glassine bag that I tucked it into.  


So how many of these fun little calendars do you want to make?
Thanks for stopping by!

~Cassonda~

Friday, October 10, 2014

★{May Your Days Be Merry & Bright…}★ by Shannon


Christmas is coming and there's nothing better than a homemade project. Shannon Morgan here today to get you started on your Christmas crafting!  The ornament I'm sharing today can double as a money holder or sweet treat holder.  You can present it as is...or leave it for someone to find nestled in the branches of the tree Christmas morning!


I'm going to show you how to create this cute ornament with some really great tips! 


It's an ornament that packs in a lot of detail, but is simple and clean!  I've given you a little tutorial on this project below.


Want to know how to create this little cutie?  Read on for a step by step tutorial! It's like taking a class with me guiding you all the way!  Click on the photos to see a larger image.

1.  Assemble your SRM Square Box. Take an 1/8" Hole punch and punch a hole on two sides on the flaps so you can close the box, have the twine lay right and hang it from the tree. Grab three equal lengths of twine. I chose red, green and pink. Thread the twine through one of the punched holes, tie all three into a knot and repeat on the other side. Your ornament is now able to hang from a tree, a hook, a door knob, depending on the length. 


2.  Pick a side and begin covering. I cut a 2X2 piece of vellum and adhered it to the panel with a few foam dots. I kept them towards the middle so the wouldn't show through the vellum. The next thing I did of course is add an awesome SRM Sticker, Take 2: Stickers By The Dozen/Christmas

3.  I then added sequins in a "perfectly random" pattern. I used clear glue for this, just a dab!

4.  For the second panel I used the red strip of We've Got Your Sticker in Merry, I used two strips because I needed six to cover the panel. I saved any that I had leftover by re-sticking it to the sticker sheet.

5.  The second part to this panel is adding a little detail. Santa's happy face works just perfectly for this. Sticking with the light and airy feel, I turn again to the vellum. Santa's on that same We've Got Your Sticker MerryCut a 1X1 square of vellum, place Santa in the middle and fold over the top right hand corner as shown. Place a foam square on Santa's beard and adhere it to the box as shown. If you'd like a more uniform look, place it in the middle. There's no wrong or right way to do this. 

6.  The third panel is super fun because it's exactly what is says it is: merry & bright! Take a "merry & bright" label from Labels By The Dozen/Christmas. Add a cheery little Gingerbread Man as shown from Stickers By The Dozen/Gingerbread Man. Glue on some more sequins. The heart is a mini punch. I punched out glitter paper and added a foam dot to the back. Adhere it amongst the sequins. (If you don't have a punch, you could use a tiny wood veneer.)

7.  This last panel is mimicking the 2nd panel in it's clarity. The great thing about SRM is that there's a variety of fun patterns and fonts to choose from. Even better? They all coordinate with each other so well! Begin by selecting "Merry Christmas" from Stickers By The Dozen/Christmas. Cut it in half so you have two words instead of one long sentiment. Place the merry in the upper left corner as shown. Place Christmas right under it, this can be imperfect so don't worry about straight lines.  Select "merry & bright" from We've Got Your Border/Christmas. Trim off one sentiment from the border strip. Adhere it to the panel as shown just below Christmas. Grab a red "noel" from We've Got Your Sticker/Merry and adhere it slightly overlapping the "merry and bright". Tuck any overhang onto the bottom. Select "joy" from the same sheet and adhere it to the lower left hand corner. It's ok if most of it ends up on the bottom part of the box. Grab a stocking from Say It With Stickers/Christmas. You're going to cut out the stocking and add it to the top right. I added sequins again and used clear adhesive as mentioned above. I also punched out another heart and placed it next to noel. 

 Thanks for letting me share with you! I hope you have a wonderful day & get inspired!  How many of these little cuties do you plan on making?

Thursday, October 9, 2014

Halloween Doily Tutorial Treat by Shantaie


Hi!  Shantaie here with a fun new way to use SRM's 6" doilies.  I'm always looking for fun new ways to package and present treats, and really could a doily jack-o-lantern be any cuter? Want to see the trick to this treat?  They are really quite easy. 

SRM Stickers - Halloween Doily Tutorial Treat by Shantaie - #srmstickers #stickers #halloween #doilies #punchedpieces

1.  Start with a shallow container big enough for the 6" doily to fit into and fill it with 1" of water and squeeze several drops of orange food coloring into the water and mix.

2. Dip one doily at a time into the dye and let sit for a few seconds. Gently remove doily and let excess liquid drip off, lay flat on a scrap paper.

SRM Stickers - Halloween Doily Tutorial Treat by Shantaie - #srmstickers #stickers #halloween #doilies #punchedpieces

3.  Lightly spray with a shimmer mist and let dry completely. Totally dry!

SRM Stickers - Halloween Doily Tutorial Treat by Shantaie - #srmstickers #stickers #halloween #doilies #punchedpieces

4. Cut out a cute or creepy Jack-o-lantern face from SRM's black Vinyl and transfer it to the center of the doily.

5. Stitch along the outer edge of the doily beyond the lace, leave a small area open to fill with candy, and close.

6. Fold a green Punched Piece into thirds towards the center and fold back the right side, attach with a tiny staple, add a leaf and ribbon, make a bow from gold bakers twine and pop a flower in the center. 

7. Add a little tag embellished with a trick or treat sticker and your Pumpkin doily is ready to give!

SRM Stickers - Halloween Doily Tutorial Treat by Shantaie - #srmstickers #stickers #halloween #doilies #punchedpieces

Thanks for stopping in today, hope you will give these a try! 


Wednesday, October 8, 2014

Paint Chip Inspired Mini Calendar by Lorena


Hey SRM friends! Lorena Cantó here with a fun and easy project starring the awesome Standard Mini Calendar Stickers for 2015 and the medium sized glassine bags. My idea was inspired by simple and graphic design that is still very visually appealing. Think paint chips and Pantone :)  


Ok, let's get started! 
Here's a view of the finished project packed inside a glassine bag and embellished with graphic strips that I cut and adhered to a cardstock rectangle. I added the year with the We've Got Your Number small stickers in black and attached everything together with a mini clothespin.


I wanted to make a calendar that could be pinned to a cork or bulletin board and changed every month. No bulk, perfect for the office. So I started die cutting 12 tags and adhering a 1/2 inch color strip to each. The idea was to use a color that matched each month. Once I had all my strips, I adhered the calendars making sure the characters were perfectly lined with the strips, and finished each tag with a matching hole reinforcer.


Inside the bag I also added a clear tack and matching punched circles for each month. This way, the recipient can adhere the coordinating circle to the tack when he or she (because this gift is also perfect for a guy!) changes the monthly tags.


And although this project was intended to be a gift... frankly my dears, I am very tempted to keep it for myself!


Thanks for visiting!  Now go have yourself a crafty day!

Tuesday, October 7, 2014

October 31st Card by Cathy H. & WINNERS!


Happy Halloween greetings fellow SRM Sticker fans!  Cathy Harper here. My favorite paper crafting season is upon us! I love creating cards, layouts and fun little projects for Halloween.  SRM has all of the perfect Halloween Stickers to embellish your spooky projects this season.

SRM Stickers - October 31st Card by Cathy H. - #halloween #card

I created this layered card using my Silhouette Cameo and then embellished with 3 different sets of SRM Stickers and one of SRM's medium orange Punched Pieces.  The new Halloween Stickers By The Dozen, Take 2 are just perfect for this card added to the punched piece and layered with a pennant flag from SRM Halloween We've got Your Border.   This set is full of fun accent borders.  So cute!


And then I added one more piece to layer with an October Calendar from the Mini Calendar Decorative Set.  

SRM Stickers - October 31st Card by Cathy H. - #halloween #card

Just think of all the other things you can do with the other months.  Birthday cards, layouts, Project Life …and the list goes on!  I love using them for Baby Cards or Wedding enclosures.  Just circle the special date. 


 As you can probably tell, I Iove all of SRM's Halloween products!  You can bet I will be using lots them during this spooky paper crafting season!

World Card Making Day WINNERS! 
Congratulations Ladies!  Please send me an email with your mailing address and your prize package will be on the way! 
susan@srmpress.com 

WINNERS
Post #1
Dawn


Dawn said….
Such an inspiring card, Shannon! I just love al of your pretty layers. Happy WCMD! ♡Dawn

Post #2 
Beth


Beth F. said...
Wow! This card is just full of awesomeness! The vellum, the doily, the stitching stickers, staples, sequins...ALL of it is fabulous!

Post #3 
Janis
Janis said...


Hearts, SRM stickers, doilies, sequins, vellum.....Can life get any better???? Wonderful card!!!

Post #4 
Pam
Pammejo said...


So Cute!!!

Post #5 
Jingle 


Jingle said...
This is a super fun collage card! Love it!

Post #6 
Debbie


Debbie Fisher (debbiedee) said...
love all the cards and use of bling!

Monday, October 6, 2014

Christmas Shaker Ornaments by Michele


Good morning crafty friends! 
 Michele Kovack here with a fun shaker Christmas ornament to share! We are less than a hundred days from Christmas, so I thought I'd get a jump start on some gifty items.  I had these wooden ornaments in my stash and thought they would make a cute shaker ornament.

SRM Stickers - Michele Kovack - #christmas #shaker #ornament #stickers #twine

The ornament was painted white, coated with glossy accents and sprinkled with mica flakes for a snowy appearance.  I had this shaker circle in my stash as well. I punched the SRM sticker out from the Take 2: Christmas Stickers by the Dozen and used my circle dies to frame the shaker and sticker.

SRM Stickers - Michele Kovack - #christmas #shaker #ornament #stickers #twine

I filled them up with coordinating sequins and glued everything in place.  I added ribbon, red Shimmer Twine and jingle bells to finish it off.

SRM Stickers - Michele Kovack - #christmas #shaker #ornament #stickers #twine

I hope you love this project as much as I do!  Have you started any of your holiday cards or projects yet?  No time like the present to get started!  ;)

Saturday, October 4, 2014

World Card Making Day #6 with Shannon Morgan


Welcome back!  This is the final post for SRM on World Cardmaking Day and we've had such fun sharing the wonderful cards from Shannon Morgan along with the clear container that she decorated to hold her set of cards.  What a wonderful gift that would be! 

Thank you to Shannon for her talent and her love of all things SRM.  She's such a treasure.  Not to mention a World Class Cardmaker!  Fitting for World Cardmaking Day, don't you think?  :) 

For her final card Shannon used a Silver Doily from SRM.  Love that!  And she used lots of vellum as one of the layers of her card.  This time she put her clear  thank you sticker from SRM right onto the patterned paper.  


I think that Shannon's style tells us to be free when we create.  Don't worry about trying something completely new!  That's how we grow in crafting.  So get out your supplies, layer like crazy, be sure to include some shimmer and shine, use lots of vellum and tons of SRM Stickers and Doilies and you will be able to achieve this very same look!  

Want to WIN all the SRM products used on this card?  Just leave a comment on this post.  


For more chances to win hop on over to the Paper Crafts blog.  Also, you will find a tutorial for making one of Shannon's cards over on the Crafters Home Blog.  And don't forget to join the Operation Write Home Blog Hop today where lots of companies and individuals will be sharing some awesome cards!

And as a special treat, here are all of Shannon's Cards and the A2 Clear Container together!  Enjoy!  Click to enlarge.


And thank you for joining us today!  We've enjoyed this celebration of all things cards!  And be sure to come back where 5 days a week our talented design team will show you more fun and fabulous things to do with SRM products!  

World Card Making Day #5 with Shannon Morgan


Ready for another card from Shannon Morgan?  I am!  The ingredients of this card are the same as the other cards from Shannon's set but she's changed up the colors.  On this one she's using a SRM Gold doily.  YUM!  And by the way, that punched gold textured heart was made using the middle of one of those gold doilies.  What a great idea! 


Shannon's work is all about textures and layers and fun little tricks that make her crafty creations really pop!  Sparkling sequins carry on the metallic theme on this card.  Shannon has spritzed with turquoise which is picked up in the sequins and twine.  Delicious!

And her use of vellum for placing the clear SRM stickers is fabulous!  Let's face it, the entire card is fabulous!  Want to WIN all the SRM ingredients used on this card?  Simply leave a comment on this blog post.   


And also check out the Paper Crafts Blog and the Crafter's home Blog for more prizes and tutorials on Shannon's cards.  Do you know that Operation Write Home is having a huge blog hop today?  Check it out HERE!

Hope you are having a very crafty day!