Showing posts with label Transfer Tape. Show all posts

Wednesday, February 14, 2018

Vinyl Valentine by Tobi

Hello!  Susan here to wish you a Happy Valentine's day and to thank all of our wonderful design team members for creating so many fabulous Valentine's projects.  Hope they have inspired you! 

====================

Hi there! Tobi here today sharing a valentine idea using one of SRM's most versatile products: vinyl! It's not just great for home decor, it's fabulous for cardmaking too! 


Once you cut out the shapes you want, think of the vinyl as a read-to-go sticker! Transfer tape (the red grid) makes it easy to transfer your design to your project without worry!


I chose to mount my vinyl to vellum to create a quasi-window card. You have to rub the vinyl into the paper and carefully lift the transfer tape to reveal the design!


And here's a look at the card with a little light streaming through the vellum... Pretty, right? 


Thanks for stopping by! 


Friday, August 11, 2017

Personalized Boxes Tutorial by Shanna


Hello SRM friends!! Shanna here, and today I am showing you a wonderful option for back to school organization that will give you what you need to keep your child's keepsakes for the school year all stored together neatly.  Of course I needed to personalize them, and SRM vinyl was the perfect choice!

First...you need to buy the containers... ready for your craftiness!


I decided to buy containers this year to store all the artwork and school projects that my boys will inevitably bring home that I cannot bear to part with... (Yes, I am one of "those" mamas that saves nearly EVERYTHING!) In order to pick what size container I needed, I looked at what my first grader brought home last year....He attends a Waldorf school, and they have a large focus on arts. It is a wonderful program, and he brings home a ton of great projects that he is very proud of.  The largest tends to be the watercolor paintings they do, so I kept that paper size in mind and went with the Sterilite 23 Qt. boxes that come with lids that snap on.  I found them at my local Walmart.

I love how you can fit so many things on one sheet of vinyl! After I designed and sized my files, I moved them around so I could save time and vinyl and fit everything on one 12x12 piece of vinyl.


I grabbed my matte white vinyl from SRM and an adorable black and white pin dot vinyl printed vinyl and designed a cut file in the software for my Silhouette Cameo. (I will list the design files at the bottom of the post).  I sized the files according to the measurements of my containers and VOILA! 


After the cameo has finished cutting, it's time to weed the excess vinyl away. Then all you need to do is cut around the words use transfer tape to adhere the words to the boxes!

 I always have enjoyed layering vinyl to give it an extra "pop", and chose to do that to the grade icons this time around.  I love the end result!  If layering vinyl intimidates you, there is no time like the present to start!  I am here if you have any questions along the way as well!


Easy peasy, and super functional storage for the upcoming school year's compendium of paper! 

I love how these turned out!


 How do you keep all the sweet things your child brings home organized??
 Any tips or tricks??  
Until next time,
Shanna

Materials used:
      (2) Sterilite Storage containers (your choice of size)
      SRM Patterned Black/White dot Vinyl
      SRM White Matte Vinyl
      Transfer Tape
      Silhouette Cameo
      Silhouette Design Store cut files:

Wednesday, October 26, 2016

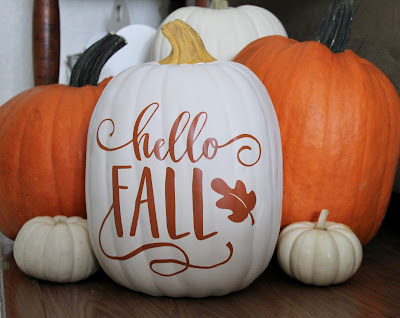
Hello Fall Vinyl Pumpkins by Shantaie


Hello Fall! Shantaie here today to tell you I love this time of year!


That pretty much says it all doesn't it?
Create your own pumpkin patch for Fall with a mixture of real and decorator pumpkins, here I have used a Silhouette cut file in pastel orange vinyl  for a fun grouping add an image or several sentiments and gather them all together! 


My "pro tip" for applying vinyl to a ribbed shape like a pumpkin is to absolutely always use transfer tape, start in the center and slowly apply with your fingertips in a vertical direction, and follow one side all the way to the edge, then the opposite side, pushing the vinyl into the ridges as you go. You will have some "wrinkles" or bubbles but work those carefully with your bone folder, your fingertips or a plastic smoothing tool. It's really simple and look at the transformation!!

Monday, February 29, 2016

SRM Vinyl Fun by Annette


Happy Day SRM Stickers Friends...
Annette Allen here with you today.


Today I am getting crafty with...


I love playing with vinyl and using my silhouette makes it so easy to design fun images and sayings just like this one. You can find this saying in the Silhouette store.


Now it is time to do away with the negative space of the vinyl. I used some fine pointy tweezers but you can use anything sharp just make sure to only get rid of the vinyl that will not be used. 


Oh I love it…


Now it is time to use that handy dandy Transfer Tape. This helps with keeping the vinyl in place so you get the perfect transfer. I also used a scraper just to make sure I did not get any bubbles.


Final step place on your surface and rub again with finger or if you have something flat use that. I am putting this fun saying on my planner cover and the best thing is if I want to change it again I can. All I have to do is peel it and make another. That's the fun of vinyl.


Thanks for stopping by.
Happy Vinyl Crafting.

Tuesday, May 26, 2015

Vinyl Home Decor by Christine


I love how vinyl allows us to personalize home decor. SRM has such a fabulous selection, it makes it easy to make it work for your home. Christine joining you today with a special home decor piece that I created.  My husband and I get asked all the time "Where are you from?" because we are not native to the area we currently live.  Between the two of us we have lived in 9 different states, either together or growing up!  So I thought it would be neat to make a piece that shows our "homes."

SRM Stickers Blog - Vinyl HomeSRM Stickers Blog - Vinyl Home Decor by Christine - #vinyl #matte #glitter #homedecor #transfertape #silhouette Decor by Christine - #vinyl #matte #glitter #homedecor #transfertape

I created a one of a kind Silhouette cut file to make my heart.

SRM Stickers Blog - Vinyl Home Decor by Christine - #vinyl #matte #glitter #homedecor #transfertape #silhouette

I first made a big heart and then added each of the states that we have called home, either individually or together.  It was interesting to puzzle piece those together but it totally worked!  I then filled in some of the holes with hearts.  I cut this out using the Glitter Vinyl in Cherry Red for this step.

SRM Stickers Blog - Vinyl Home Decor by Christine - #vinyl #matte #glitter #homedecor #transfertape #silhouette

I then cut out my quote in Matte White.  Now this whole thing would have been a pain to put together if not for Transfer Tape. Transfer Tape ensures you have accurate measurements for placement and keeps the whole process from being a mess!

We'd love to see what you are creating with SRM's vinyl too!  Be sure to share on our Flickr or on our Facebook Vinyl page.

Monday, February 16, 2015

All About the GREEN by Annette


Good Morning sweet SRM Friends... 
Annette Allen here with you today to share a fun way to use Vinyl, in plenty of time for St. Patrick's Day!

SRM Stickers Blog - All About the GREEN by Annette - #vinyl #stpatricks #altered #stickers #transfertape

 and Vinyl Transfer Tape AND SRM Stickers Birthday Sticker Sentiments I have gone a little Irish. I used my Silhouette Cameo to cut these fun images that can be found in the Silhouette library. The jar is from my local craft store. Using the Vinyl Transfer Tape makes it so easy to place the Vinyl Sheets on most surfaces. Plus makes for fun projects.

SRM Stickers Blog - All About the GREEN by Annette - #vinyl #stpatricks #altered #stickers #transfertape

I also added this striped straw which I might add is totally fun.
It is all about the green.

Happy Crafting!

Tuesday, November 25, 2014

Holiday Sign Making by Shantaie


 Happy Holiday time from Shantaie! Today I have a home decor seasonal project using SRM vinyl that is sure to wow your guests and stop Santa in his tracks!  First let's talk about what supplies you will need to make your own.

SRM Stickers Blog - Holiday Sign Making by Shantaie - #christmas #homedecor #vinyl #transfertape #DIY

1. A 6 ft X 12" wood board of course you can use another size if desired
2. A small can of dark stain and a small can of white paint 
{craft paint could also be used}
3. A rag and a pair of disposable gloves to apply stain
4. 3 sheets of 12X24 SRM matte vinyl in any color
5. 1 sheet of SRM transfer tape 
6. sandpaper, an ecutter, or printed letters to trace and hand cut.

I started with a decent quality common wood board that was smooth, straight and already cut to size. It cost just under 15.00 and saved me from any additional work to prepare the sign. I stained both sides and all edges with a dark walnut stain and let dry completely {this was the hardest part of the project for me ;)

SRM Stickers Blog - Holiday Sign Making by Shantaie - #christmas #homedecor #vinyl #transfertape #DIY

I cut my vinyl letters and the sentiment on the Silhouette, (you can also print or draw your letters and trim by hand). It doesn't matter what color you use as you will be using the vinyl as a stencil. Place letters evenly spaced onto your board and burnish really really well! For the best results use transfer tape to apply, I never ever do a vinyl project without transfer tape! 

Now for the fun part! Paint over the letters, cover the whole front with a thin (almost dry brushing) coat of white water based paint and allow to dry. Once dry peel away the vinyl, don't fret if its not perfect you can sand away any imperfections and give your sign a rustic look! Now add a clear coat either spray or brush it on and it will last for seasons to come! 


An alternative is to paint your sign in the desired color and apply the shade of Vinyl you wish and clear coat over the vinyl, its a few less steps and has a less rustic appearance for a more modern or crisp decor! 

This was honestly quite easy, and took almost no time at all other than the dry time. The total project cost is less than a fraction of what some (not to be mentioned brand) signs would set you back..
see it pays to be a crafty type! :)

Happy sign making! And hope you have a crafty day!

Tuesday, September 30, 2014

Princess Christmas Ornaments by Tessa


Hello!  It's Tessa Wise with you today, sharing some Christmas ornaments personalized with SRM vinyl I made with my little girls.  They are 7 and 9 and love to do crafts, especially ones we can display!  These will be proudly hung on our Christmas tree this year.

SRM Stickers - Tessa Wise - #srmstickers

 I picked up these clear plastic ornaments at the craft store along with a pink feather boa and some jewel stickers.  I took the tops off the ornaments and let the girls stuff part of the pink boa in each of them. 

SRM Stickers - Tessa Wise - #srmstickers

I found this cute crown file in the Silhouette store and cut it, along with each of the girls' names out of a SRM White Glossy Vinyl Sheet.  I used Transfer Tape cut to size to adhere the cuts to the front of the ornaments.   I let the girls add the jewels over the top.  They loved it!

SRM Stickers - Tessa Wise - #srmstickers

We had so much fun creating these!  I can't wait to see what they look like on our tree!

Thursday, August 7, 2014

Chalkboard Vinyl Countdown Board by Christine


Do you love adding vinyl projects to your house?  I do!  Christine Meyer joining you today with a very simple vinyl project that can be easily done in any home using SRM's Chalkboard Vinyl!  Pair it with one other type of vinyl and create your own Countdown Board!

SRM Stickers Blog - Chalkboard Vinyl Countdown Board by Christine - #vinyl #chalkboard, #transfer tape #home decor #countdown

My daughter is a planner and loves to know exactly how many days until .... So I thought this would be a perfect addition to our kitchen wall!  The nice thing about this project is that you don't need anything extra - just the vinyl and some chalk (or a chalk marker).  

SRM Stickers Blog - Chalkboard Vinyl Countdown Board by Christine - #vinyl #chalkboard, #transfer tape #home decor #countdown

I cut out the chalkboard shape and the words using an electronic die cutting machine.  Using Transfer Tape I added the Bubblegum Vinyl portion. Then I went to town decorating with my chalk marker.  Chalk marker is just a little more neat than regular chalk and comes off with water.  When I created this my husband was out of town so we started with that countdown!  Now we're counting down to vacation as seen in the first picture. Drawing and decorating is a little out of my normal comfort zone but it is fun to just doodle and see where things go!

SRM Stickers Blog - Chalkboard Vinyl Countdown Board by Christine - #vinyl #chalkboard, #transfer tape #home decor #countdown

I went with the Bubblegum Vinyl for a couple of reasons - I knew the lighter color would really pop against the black and I knew if I overshot on erasing it wouldn't mess with the pink too much!

Did you know we have an All Things SRM Vinyl facebook page???  If you haven't checked it out - you should!  Even better - share a project with us!

Monday, June 2, 2014

Vinyl Subway Art by Juliana


Subway art is all the rage and Juliana Michaels has created a fabulous project using SRM's Matte Vinyl and Transfer Tape.  Not only did she create this gorgeous project but she also created some digital cutting files just for you!  Go to Juliana's blog to get that digital file.  

The inside finished size of this project is 11" x 14".  Juliana cut the subway art from white matte vinyl and adhered it to the glass.  She then covered a piece of cardboard with burlap.  The cardboard was cut to 11" x 14" to fit inside the frame.

SRM Stickers Blog - Vinyl Subway Art by Juliana - #vinyl #white #subway #art #framed #Oracal #631

What a stunning project!  Juliana's husband loved it so much that he wants to hang it in his office.  Juliana thinks that she might have to make another one just for her! :)


SRM Stickers Blog - Vinyl Subway Art by Juliana - #vinyl #white #subway #art #framed #Oracal #631

Do you play with vinyl?  SRM's vinyl is from Oracal, made in the USA and of the finest quality.  Check out all of our vinyl HERE.

Thursday, January 2, 2014

New Product Week: Day 4 - Vinyl


The biggest surprise from SRM is that we are now offering Vinyl.  It is such an interesting and versatile craft product and SRM is offering the largest selection of vinyl in the industry that includes Matte, Gloss, Glitter, Metallic, Chalkboard, Dry Erase, Stencil and Transfer Tape.  

Look at the beautiful wedding favor that Juliana Michaels created using one of SRM's clear pillow boxes, our new Take 2 Stickers by the Dozen Wedding and some beautiful teal vinyl. {{SIGH}}


Here are all the colors offered for Matte & Gloss.  Just think of all the school, sports and wedding colors that you can match!  And the SRM design team will be showing you new and innovative ways to use this product making cards and containers combining vinyl with stickers and twine as well!  Click on the image to see all the colors.


In addition to matte & gloss SRM is offering the following: 

Glitter 
Metallic 
Chalkboard 
Dry Erase 
Stencil 
Transfer Tape. 

What do stickers and Vinyl have in common?  Well, they both have adhesive and they are both very fun.  And they are both totally crafty!  I think that we are going to have lots of fun with Vinyl, don't you?  What's your favorite color?  What's your favorite style?  

Want some inspiration?  Check out my Pinterest for Vinyl.  You'll be surprised at what you can do with it!   And don't forget to leave a comment for a chance to win some Vinyl of your very own!

Coming soon to a store near you and online HERE.