Showing posts with label Bookmarks. Show all posts

Monday, May 28, 2018

Bags & Bookmarks by Giorgia


Hello SRM friends, Giorgia here again and today I have for you an idea for an handmade gift and how to package it.  I love to create handmade bookmarks to give away to friends and family, they are easy to make, cute and always put a smile on who receive them! I used a bookmark template to trace the bookmark shape on heavy white cardstock, then I created a panel with patterned paper. I added SRM Stickers and a sequin, then I laminated the bookmarks with my laminate machine to make them more resistant, I added twine and a charm to decorate.  If you want to see the tutorial on how to make them, you find it here on my blog.


To package them I used SRM bags: they come in many different type (patterned, glassine, kraft, embossed...), sizes and colors, so you can always find the one that suits for your needs!
I chose kraft bags: I closed them with a SRM paper doily and I added a banner made with patterned paper, a butterfly and a sticker. Then I used SRM stitched Stickers to decorate.


I am in love with these bags: they are perfect for packing little gifts!

Until next time,

ciao, Giorgia

SRM products used 

Tuesday, April 3, 2018

Faith Bookmarks by Shelly


Hey y'all! Shelly, here.
Today, I'm sharing some simple faith bookmarks with you.


I started with making my bookmark by using a die and chose a simple patterned paper to use with it. After I used my die once more with regular cardstock and then adhered the two papers together. 


Once done, I stamped on my faith sentiments using a dark grey ink. Then I added some twine and a wooden button at the end. Easy peasy, right?!...


Thank you so much for stopping by!
Enjoy your day!

SRM Stickers supplies:

Monday, January 8, 2018

New Product Introduction - Bible Margins Stamps


Hello and welcome to a week of new product introductions.  SRM offers two main sections to our line:  SRM BASICS:  stickers, stamps, bags, containers, twine, doilies and more!  And SRM VINYL: offering the largest selection of Vinyl including Matte, Gloss, Heat Transfer, Glitter, Chalkboard, Fluorescent, Glow in the Dark, Textile Foil and more!

Today we focus on a product that is a new addition to SRM BASICS.  
It's a new stamp style called "Bible Margins". This is a unique design, with each stamp having three separate panels so that you can stamp each of them in your Bible and then embellish with pens and markers.  Or you can create bookmarks or faith cards.  For non-artists and artists alike! 


The first Bible Margins stamp is all about love!  It features familiar bible verses about love with added graphics and embellishments to use in your Bible Journaling, Faith Planners or on Faith cards. 


The second Bible Margins stamp is all about Light.  Wonderful fonts and graphics are sure to make this one a favorite.  I know it's mine!  I can't wait to see what our team does with this design!


The third design is focused on rejoicing.  Again, a combination of special fonts, enbellishments and illustrations are just waiting to receive the perfect touch.  I'll be using my Watercolor Twists to color these in or to give them a watercolor background.  


Karen Hunter loves using her Watercolor Twists  in her Bible Journaling and she loves how easy it is to add her Bible Journaling in the margins with SRM's new Bible Margins stamps.  And as a little extra touch she used some Sticker Stitches!


But these stamps are not just for Bible Journaling... Love what Christine Meyer has created playing with her new Bible Margins stamps including these fun DIY bookmarks using watercolor twists to create the watercolor backgrounds and lots of delicious twine to make the tassels on her bookmarks.  


And using the another Bible Margins stamp she created beautiful cards all about love!


  How about this beautiful Valentine's card from Karen Hunter using one of the same LOVE Bible Margins design as Christine did but oh so different!  LOVE it! 


Be sure to stop by tomorrow to see more new product! 
Be sure to leave a comment for a chance to WIN one of our new Bible Margins stamps!

Thursday, November 17, 2016

Brush Lettering Bookmarks by Christine


Hello!  Christine here sharing something I made.  Last week as I was doing our homeschool routine with the kids, I realized I needed some bookmarks to help me keep track of where we were at in books.  Why not make those bookmarks inspirational!?! And why not make them myself and have fun doing it!?!  That is of course where SRM came in!  I combined a couple of the new Marker Sets and Bible Journaling stamps to create some lovely bookmarks!


I created a video showing how I made a couple of these bookmarks!


I don't talk too much about how to do the brush lettering in the video but Susan has a great video that she recently created showcasing that!


Let's take a closer look at the bookmarks I made:


This first one uses the stamp set Amazing Grace and focuses on the verse Psalm 46:10 and the flowers come from Just Believe.


This one uses an older stamp set Words of Faith and focuses on Psalm 107:1 - the butterfly stamp comes from Just Believe and the little flower comes from Amazing Grace.


Everything on this bookmark comes from the Amazing Grace stamp set and it focuses on Matthew 28:20.


Last up I used the Trust in the Lord stamp set and focuses on 1 Thessalonians 5:18

These are going to be great reminders as I go about my day to day work!

Friday, September 16, 2016

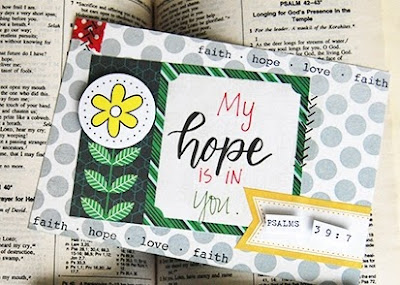
Psalm 39:7 by Tenia


Hey Y'all!!!

Tenia here today showing y'all some Bible Lettering.....CHECK IT!!!


I love doing brush stroke lettering and this Bible Journaling card was so very fun to create!!! I used the following SRM goodness: 

 Words of Faith stamp set 

Here's a closeup of all the details.


Thanks for stopping by and have a great day!!!

-t
SaveSave

Friday, March 12, 2010

Tutorial by Tanis


Hi there! Glad you stopped by today! It's Tanis here, and I'm going to share a tutorial with you today. I decided to make a bookmark, walk you through the steps, and show you a little "trick" for dealing with loose ends of your machine-stitched threads. Let's get started!


Supply List:
Finished project measures 7 3/4 x 2 1/8"

2 colors of card stock
an old dictionary, book, or text paper
stamps (using a tall image works best)
SRM stickers: SCHOOL
Pigment Inks
Sewing machine
Ribbon scrap
Mod Podge
old paint brush


1. Cut a piece of text paper to the size that best fits your image, allowing space on the bottom for the sentiment stickers. I tore one edge of my text paper for an aged look. Stamp your images.


2. Trim card stock to mat the text paper. Adhere text paper to card stock.


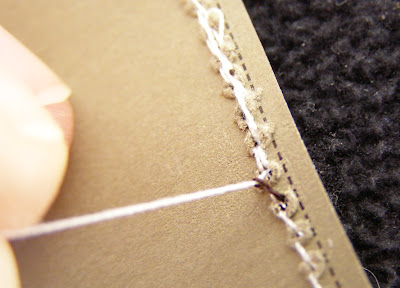
3. Stitch edges of text paper with machine. Pull ends of thread to the back of the text panel. Pull the thread end on the back side, so the front stitch loosens. Grab this loosened thread with your fingers and pull until the front thread end comes all the way through to the back, as shown in the photos.


4. Adhere stickers to card stock. Cut into strips. Adhere to front of bookmark. Stitch and pull thread ends through. Paint entire panel with a coat of mod podge. Allow to dry. Stitch ribbon tag to top.


5. Trim Card stock base slightly larger than text panel. Trim threads and adhere panel to base, making sure threads are completely tucked in.


Hope you enjoyed this and it has inspired you to create! Leave any questions you might have in the comment section and I'll answer them for you! Thanks again for coming to look!


tanis