If you enjoy creating your own Easter greeting cards, you'll love these ideas from our Designers!
Valerie Mangan had this to say about her adorable Easter chick card; The little chick from the Quick Cards - Easter set was the perfect addition to this big flower. The flower, made from a die rescued from a clearance bin, is made with a line of coordinating papers to take out the 'pattern matching' guess work. To give the flower some extra dimension I sewed around the edges of each layer and also added some dimensional adhesive here and there. I stuck the chick sticker down to white cardstock, ran it through the die cutting machine then stitched around that as well."
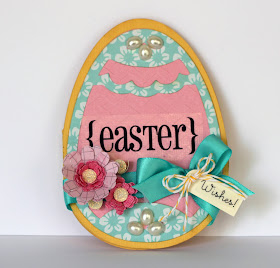
Shantaie Fowler explains how she created a fun egg-shaped card; "I just adore shaped cards, they often convey a big part of the message all on their own. Pair a shaped card with a fabulous sentiment and you have a winning combination! I used my Cricut to cut the egg shaped card, and embossed the pink layer with a chevron patterned cuttlebug folder. Classic Easter! Easter is my absolute favorite holiday, I just swoon over all the gorgeous spring colors! I really like the way the Easter sticker parades across the egg shaped card to fill in that open space. By trimming the the word "wishes" and adding it to the tag, I have a complete greeting that finishes the card."
And here's Christine Ousley with a step by step tutorial on created this gem! "Here is a quick Easter card that you can make in 5 minutes or less. All you will need is some scrap pieces of patterned paper, some twine, a couple of punches and of course some SRM Stickers."
1. Cut a piece of light pink cardstock 4 1/8 x 5 3/8 inches.
2. Cut a piece of patterned paper for your background 4 x 5 1/4 inches. Adhere these paper together.
3. Cut two pieces of coordinating patterned paper 1 x 3 1/4 inches. Corner round bottom right corner on one piece and top right corner on the other.
4. Cut one piece of coordinating patterned paper 1 1/4 x 3 1/4 inches. This will be placed in the middle as shown.
5. Adhere patterned paper pieces.
6. Wrap twine around card base twice and tie bow.
7. Place SRM Sticker on white cardstock and punch out with a 1 1/4 inch circle punch.
8. Layer on 1 3/8 inch circle punched from light pink cardstock. Then adhere to punched scalloped circle.
9. Adhere to card layers on top of twine with foam dots.
10. Adhere card layers to card base.
11. Place SRM sentiment stickers onto card.
Take a look at our Easter products, HERE!


These are all great! I really love Valerie's card! Just gorgeous!
ReplyDeleteawesome easter cards...loving all the spring colors..
ReplyDeleteThese are wonderful! Great Easter inspiration here! Love em!
ReplyDeleteLove these Easter cards. Great work.
ReplyDeleteFantastic easter inspiration ladies, love the pretty colours, the gorgeous stickers and fab ideas!
ReplyDeleteGreat Easter cards! TFS! ;o)
ReplyDeleteSweetly simple....love 'em!
ReplyDeleteLoving all these beautiful Easter cards! Great job, ladies!
ReplyDelete