Hello SRM fans! It's Emma here today to show you how to use the wonderful textile foil and your SRM clear stamps to make simple and cute cards.
The trick with foiling, is to use something heat-reactive that will cause the foil to stick to the design when passing through a laminator. There are several options, such as cuttable adhesive sheets, heat-reactive adhesive gel, or toner from a laser printer. You can also get toner paper sheets that can be cut into a design and then foiled.
For my card, I am going to stamp the THANKS sentiment with Decofoil Transfer Gel.
Use a sponge dauber to dab the gel onto the surface of the stamp. Stamp the image onto your cardstock, and allow to dry for about an hour. I know it is slightly tedious to wait, however the gel is heat-reactive so it does not help to use your heat gun to set it. (I know, I tried!) My advice is to stamp the same sentiment several times, in case the first one doesn't stick to the foil as well as you hoped. (Use more transfer gel each time you stamp the image).
Now, lay the foil sheet over the stamped images, completely covering them. I chose this funky purple holographic style, as it's so cool.
Now, fold some plain kitchen parchment paper (NOT waxpaper!) around your stamped paper and foil. This is another good tip - I have tried using cardstock or heavier paper around my project previously, and found that it did not work. Switch on your laminator, and once it has reached temperature, feed your project through. My laminator is an inexpensive $35 model - I know that some craft-specific ones can run to $200 or more. For this model, I chose the higher 5mil temperature. Please always follow the instructions for your own machine carefully.
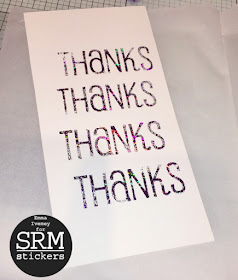
Here are our foiled Thank Yous! As you can see, the foil hasn't taken fully on a couple of the images, so now I can pick the best one. I used a rectangular die to cut my chosen image from the sheet.
Now for the background. I decided it would be fun to use the rest of the stamp set behind the main sentiment. So for this, I have stamped the images with embossing ink, and used clear embossing powder.
The embossing technique creates a cool 'watermarked' effect. You can still see it, but it doesn't overshadow the foiled main sentiment.
Here is the finished card! I think it looks simple but effective.
I hope you enjoyed my project, and are inspired to try heat foiling with your stamps too.
Happy crafting!
~~ Emma ~~
Supplies:
- SRM Clear Stamps - BIG Thank You
- SRM Textile Foil
- Decofoil Transfer Gel
- Tim Holtz Embossing Ink
- Close to My Heart Clear Detail Embossing Powder
- Scotch Laminator
- Parchment Paper
- Craft heat gun
- Smooth white cardstock


