Wednesday, May 31, 2017

May/June Planner Spread by Christine


Anybody else feel like summer requires even more planning than the rest of the year? Christine joining you today to show how I am getting summer ready with my planner and some handy supplies from SRM Stickers!


If you are like me, you love both stickers and stamps for your planner and SRM has you covered all around!


Since it was a week that overlapped both May and June I added some Mini Calendar 2017/Decorative stickers so I could better keep track of my dates. I also pulled out my Notes to Self Planner stamp set and did some stamping in there.


I love the Freestyle/Summer sticker set and try to use each different set each season (yes! There's one for each season!)  My Black Le Pen is seriously one of my all time faves in my supplies.  May it never run out of ink or get lost, I may cry ;)!


You can use this awesome little Wafer Die to cut out these calendars or trim carefully with your scissors.  How are you decorating your planner these days?  Jump on all these fun summer stickers and stamps to make your planning time both fun and creative!

Tuesday, May 30, 2017

Soccer Layout by Samantha


Hello! Samantha here today to share a soccer layout using lots of SRM stickers. 


One of the best things to me about SRM stickers is that you can mix and match them. I made a soccer layout, but used lots of non-sporting stickers too!


I used my Silhouette Cameo to cut a large star from a white piece of 12 x 12 card stock. I then backed the negative space with some soccer themed patterned paper. 


 I used the soccer word and soccer ball stickers from Take 2: Stickers by the Dozen Soccer to create a line across the layout that draws your eye to the photo. 


I used a flag shaped sticker from Labels by the Dozen Made By to create a journaling tag. Instead of traditional journaling, I added the soccer season (spring) with a sticker from Live Life Calendar Years and the year (2017) with a sticker from Year of Memories 2017.   I decided my layout needed a little something more, so I used a ruler and black Marvy Le Plume Marker to create a border around the whole page. 


 Layering stickers from lots of sticker sheets is a great way to create embellishments for any layout, not just a soccer layout. Do you like to mix and match your stickers? 
 

Monday, May 29, 2017

Teacher Gift Set by Karen


Hello!  Karen here today with some fun ideas for Teacher Appreciation. 


Whether it's for Teacher Appreciation Week or as an end of year thank you, teachers everywhere need to be recognized for all the work and dedication they've shown this past school year. You don't need to spend a lot of money. Even something small can say a big thank you. 


SRM tubes are perfect for a little thank you and when filled with a sweet treat, it fits the bill for cute and satisfying. Use stickers from any of SRM's adorable and inspiring school-themed sets to decorate any size tube. Using an awl, I poked a hole in the top of my lid and attached several lengths of twine to create a few hanging tags. The tags are stickers on a semi-clear plastic backing.


The bright red chevron paper bags are perfect for teacher appreciation, too. I cut out an apple shape in the front layer and inserted a piece of printed acetate inside. I shaped a stem and leaf by hand from cardstock and used a marker to outline it. Give your favorite teacher a gift card, decorated cookie, candies, or like me, a set of colorful pens. A small clothespin clip decorated with more stickers keep them secure. One more sentiment sticker across the bottom sends the message that we appreciate our teachers!


Don't forget to say thanks to the great teachers who have helped you or your kiddos grow this year!

For these projects, I used:

SaveSave

Friday, May 26, 2017

Chore Board by Melanie


Hello!  Melanie here today with something I made to simplify chores around my house.  I saw this frame with chicken wire at the craft store a few months ago and knew exactly what I wanted to do with it ;)  My kids are usually pretty good about doing chores when I ask them. Every once in awhile though an extra incentive is helpful. So I put this chore board together.


The SRM Labels by the Dozen/Black and White were perfect to write the chores on. I matted each label on cardstock then clipped it with the incentive to the wire.


Different incentives work for my kids--cash, gift cards, candy, gum . . .let me know if you have more ideas :)


I had so much fun creating this and my kids love the idea too!  
Around my house we call that a Win-Win!

Thursday, May 25, 2017

Rainbow Hearts by Michele


Good morning friends! Michele here with a fun rainbow card using the cute little heart from the Birthday Plans stamp set.  I repeated the heart in a cascading pattern and colored them in rainbow order.  I added clear Wink of Stella and then glossy accents over each.  I added some dots in between the hearts for a bit more interest.  I stamped the sentiment in black ink.


I adhered a few coordinating rhinestones and clear dew drops.  I adhered my panel to bright pink card stock and thought it needed a little somethin' somethin.'  So I added some faux stitching around the panel with my 


When I am feeling a bit creatively challenged, I tend to go to my favorite stamping technique....repeating a small stamp!  (And rainbows never hurt either! LOL) 


Thank you so much for stopping my sweet friends! 

Wednesday, May 24, 2017

Adventure Heat Transfer Bag by Shantaie


Hello!  Shantaie here with a fun vinyl project!


Lately I have been rocking the work girl life! You know... long hours, little sleep, and knocking out those to do lists on my planner like a pro!  The thing that has kept me motivated and going other than ice coffee and music is our upcoming family vacation. I'm so thankful for a chance to catch a quick breather, and a little forced downtime! I love traveling I wish I had more time to, however I don't love packing, so I treated myself to this ca-ute little carry on and added a 
heat transfer quote in gold glitter.  Who's excited to pack now!!!? Oh yeah!! 


Look, I'm going to be super honest here, this was a 10 minute project. ten. minutes. No matter how crazy life is, you can squeeze in 10 minutes to make something fabulous for yourself, you totally deserve it! Happy ironing!


A few tips: Cut your design in reverse with die cutting machine, make sure you can use the hottest setting of your iron without melting the bag you are embellishing, no polyester, or plastic, or you'll have a mess. Use a pressing cloth, or a tea towel over your heat transfer vinyl when pressing. 
I cut mine at 6"

Enjoy!!

Tuesday, May 23, 2017

Crafting with Kids by Shelly


Hey y'all! Shelly, here!
Today, I'm sharing what my kids made with some SRM Stickers goodies!


I gathered some SRM Stickers supplies together and then let them one by one create a card and a bag to put it in. In this case they chose to make Mother's Day cards, though you could do this with any theme you like. :)


Thank so much for stopping by!
Enjoy your day!

SRM Stickers supplies used:

Little Borders-Gold
Patterned Bags
Watercolor Twist  Pencils

Monday, May 22, 2017

Spring Shaker Cards by Christine


Spring is in full swing and Summer isn't far off!  Christine joining you today with some cards that can work perfectly for Spring or Summer depending on what you need!  I love that the stickers from SRM Stickers are clear and using them on a Shaker Card can really highlight just how awesome they are!


Using clear Keepsake Envelopes from Scrapbook Adhesives by 3L helped make this job a little easier.  I simply slid my patterned paper into it and added some sequins.


Topped the whole thing with a spring sentiment from the Sentiment/Spring sticker set and there you have it! A quick, whimsical card sure to make anyone smile.


And if pineapples aren't your thing, how about flamingos?  Same process for this card but a different look with a different paper and sticker.


The circle stickers have long been a favorite in my stash!  This one also comes from the Sentiment/Spring set.  Now if you are thinking, I don't have time to get a spring card done, you can easily swap out the spring stickers for these: Sentiment/Summer and have it work just as well!

Friday, May 19, 2017

Be Happy Card by Amber


Hello everyone! It's Amber here, today I have this cute little card to share that I created with some cardstock, patterned paper, pastel green twine, yellow glimmer mist, a "Be Happy" border sticker, and some fun dragon stamps.


I started with a 4.5' x 4.5' white card base and distressed around the outside edges. Next I cut, misted, and distressed a slightly smaller piece of pastel green cardstock and adhered it to the center of my white card base. After I had my cardstock adhered to my card base I adhered a strip of black and white chevron pattered paper with some pastel green twine warped around it to the left side of my card base and then moved on to my stamping. 


I die cut a double stitched square out of some white cardsock, stamped two different dragon images right in the middle of my die cut, and colored them to match my cardstock with some Spectrum Noir markers. Once my images were colored I added a fun little "Be Happy" sentiment from the We've Got Your Border/Pastel sticker sheet. I adhered the stamped panel to my layered card base before adding a bow out of the same pastel green twine I used before to the upper left side of my stamped piece. Easy peasy, Right? I hope you enjoyed my card today. Thanks for visiting!

SRM Sticker Supplies
Green Twine

Thursday, May 18, 2017

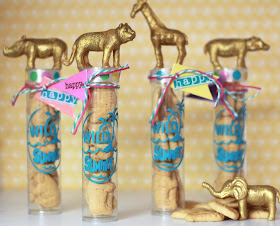
Party Animal Vinyl Personalized TUBES by Shantaie


Hello!  Shantaie here with a wonderful way to personalize your SRM Tubes! 


Summer is on the horizon and that is something to celebrate! I have a super fun end of the school year favor for all of your party animals! Adding vinyl to a 4" TUBE is such a great way to personalize any idea you may have. How could I resist these little gold animals to top off my TUBE?!! I just knew animal crackers were the perfect little treat for a wild summer going away gift!


I added the vinyl first, then filled the TUBE with animal crackers...minimal snacking occurred, so I had plenty to fill them all up! :)
A bit of twine in two colors was used to tie on the little tags that came with the golden wild animals, and a cut section of border on each lid and tag finished them up! 

I know some of you are excited about summer, and some of you may be counting the days until school will start again before it's even out, either way I hope you make it a wild summer to remember!

Oh Happy Day! by Amber


Hello everyone! It's Amber here, today I have a fun Summer themed card and gift bag to share


. Summer is officially here in Arizona. I have enjoyed the warmer weather these last few weeks but this weeks forecast is hot and I mean really HOT. For those of you still experiencing a cooler forecast this week or even snow I hope my little card warms you up.


I started with A2 sized light pink card base and die cut a slightly smaller piece of colorful patterned paper with a pierced rectangle die for my background. I adhered the patterned paper to my pink cardbase and moved on to stamping. I stamped one of the adorable little penguins fonto some watercolored paper that I die cut with a smaller pierced rectangle die and watercolored him with some watercolor pencils.

Once I had my penguin image and background watercolored I let it dry before adding one of the "Oh, Happy Day!" sentiment stickers from the Stickers By The Dozen/Birthday Birdie sticker sheet below my image. 


The last few projects I have shared have featured a matching gift bag or box so today I thought I would create one to go along with my card as well. I filled one of the 4.75" x 6.75" Embossed Chevron Glassine Bags with some candy and then folded the top of the bag over and decorated the outside to match my card. I added two little banners to my gift bag with a mini black close pin and added a little "Many Thanks" sentiment sticker to a scalloped circle I die cut out of white cardsotck and watercolred. 


I hope you enjoyed my project. Thanks for visiting!

SRM Sticker Supplies
Black Jute Twine

Wednesday, May 17, 2017

The Lord is Kind & Merciful Bible Journaling by Samantha


Hello! Samantha with you today to share what I've been doodling in my Bible lately. This week I have a page I did from Psalms. Here's my The Lord is Kind and Merciful Bible journaling. 

You'll only need a few supplies for this page:

The Lord Is Kind and Merciful Stamp Set
Color In Watercolor Pencils
Reminisce White Gel Pen 

Waterproof Black Ink
Light Blue Ink 


I started by blending a little light blue ink over the entire page. I intentionally left the color uneven and not blended well. I like the faded look it gives the background of the page.  Next I stamped my words on with waterproof black ink. I did cut apart some of my stamps. For example, "the LORD is" is one stamp. I cut the words apart so I could stack them up instead of using them in a line. Just make sure you use a strong, sharp scissors to cut them apart if you choose to do so.  

Next, I used my watercolor pencils to doodle some vines on my page and color in some of my stamped words. You guys, I have no artistic talent. I'm crafty, but I can barley draw stick people, so believe me when I tell you, doodling these vines is really, really easy.   
I finished up by using the white gel pen to add some buds dots to my vines and color in a few of my stamped words. The white gel pen helps brighten up the page a bit and makes the stamped words pop a bit more.  


The Lord is Kind and Merciful Bible journaling is a nice way to try your hand at drawing in your Bible if you're a bit hesitant about your drawing skills. It's also a fun way to combine stamping and drawing in your Bible journaling.  

Tuesday, May 16, 2017

Happy Graduation...Congrats! by Shelly


Hey y'all! Shelly, here! 
Today I'm sharing a fun graduation card and gift with you! 


I kept things pretty simple and straight forward. I stamped on my congrats using a green and dark blue ink. After, I added my happy graduation sticker, some wood veneer stars and a tiny touch of gold glitter paper on the side. Simple, yeah?!...


For my bag, I went with the same thing...simple. I added some dark blue twine and then stapled on my 'tags'. Which I used stickers for and just simply added them on black cardstock. That's it. Easy peasy, right?!...


Thanks so much for stopping by!
Enjoy your day!
SRM Stickers supplies:

Patterned Bag

Design Team Call - 2017 - 2018


SRM Stickers, a leading paper crafting manufacturer with a focus on stamps, stickers, vinyl, doilies, containers, twine and calendars, is hosting a Design Team Call! Some of our current group of amazing Designers will stay on with us but we are looking for some new fresh faces and talent to add to our team to embark on a 12-month term to begin on August 1, 2017.  If you love working with stamps, stickers, doilies, containers, vinyl and twine, or if you love working in planners, creating with your Silhouette or if you love bible journaling, keep reading because we may love working with you! We're looking for crafters of all types: card makers, layout specialists, vinyl experts, planner people, bible journalists, altered artists, DIYers, Makers, party planners, gift wrappers and specialists in all things home decor to join our Design Team as we head into the second half of 2017 on a mission to dazzle, inspire and create. You're a perfect fit if you love stickers, doilies, vinyl, containers, packaging, parties, blogging, and inspiring others through your work. Now for the details

Design Team Requirements

You will be required to submit 2-3 assigned projects per month using SRM Stickers.

You will be asked to remain active at the SRM Stickers Blog as well as the Private Design Team Member blog.

You may be asked to participate in special events.

Your term will be for the period of one year; August 1, 2017 through August 1, 2018.

The Perks

You will be provided with ample product to create your samples including new releases and a wide variety of complimentary product like Stamps, Stickers, Vinyl, Doilies, Tubes, Pillow Boxes, Glassine Bags, Twine, calendars and more!  

You will be provided with a SRM Stickers Design Team Badge to proudly display on your blog.

You will be designing for a manufacturer and your photograph/bio will appear at the SRM Stickers Manufacturing Blog.

Your work will be promoted to our retailers and in magazines across the world.

You may be offered additional design team work for special shows, promotions, or publication materials.


Apply Now!

If this sounds like just the opportunity you've been seeking, please email us at susan@srmpress.com ("DT Application/Your Name" in the subject line) with the following;

-- your name
-- your email address
-- your blog address
-- your current design teams
- your past design teams
-- why SRM?

Deadline

Please direct your applications to susan@srmpress.com no later than June 19th at Midnight, PST. New Design Team members will be chosen and notified by June 25th then revealed at srm-stickers.blogspot.com on June 26th, 2017. 

Our new Design Team Members will become part of a company intent on making a continued splash in the online paper crafting community and as such, we are asking that only those with active blogs please apply.  No prior Design Team experience is required.  

Prior SRM Design Team members may apply. 

Good luck! We can't wait to hear from you!