Monday, October 31, 2016

Halloween Treat Box by Michele


Hi there! Michele here with a fun Halloween treat box!  

Does anyone else love the Dollar Spot at Target? I just can't help browsing through all of their cute things!  I picked up a package of precut pie boxes.  


They are perfect for sneaking some treats into!
I applied glue to the top of the box and sprinkled on glitter to resemble candy corn. I topped the box off with a die cut flower that was colored and heavily glittered. 


A few leaves, twine, and of course a Stickers by the Dozen Halloween sentiment from SRM!


Thank you so much for popping by today!!

Friday, October 28, 2016

Uplifting Autumn card by Tanya


Hello everyone!
Tanya here today to share an uplifting Autumn card with you...
I created a colorful fall wreath using a couple of leaf dies and cardstock in pretty shades of autumn. Gold twine tied into a bow finished up my wreath perfectly.


I used 3 stamps from the lovely Trust in the Lord stamp set to create my sentiment.


For the finishing touch, I placed a few enamel dots around my sentiment.

Thank you for stopping by today.
Have a blessed day and I hope to see you soon!

Thursday, October 27, 2016

Crafting with my Daughter by Melanie


Hello! Melanie here to share a project my daughter made with some SRM products. She had some surprise treats for a friend in one of her theater productions. We picked out Halloween papers and SRM stickers. 

  
I tried really hard to let her do her own thing :) Sometimes that is hard to do! She asked me for suggestions a couple of times but I really wanted it to be her own creation.


She decided to use the Halloween Border stickers and "TREATS" from the Treats We've Got Your Sticker sheet.


To add some depth and texture, she added a strip of burlap with trimmed edges. Then she layered the pumpkin sticker on top of a large black scallop punched circle. She wrote her friend's name in white ink on a medium black scallop circle and tied it onto the bag using Black shimmer twine.


Love those green Sticker Stitches from the Halloween Border Stickers along the bottom! 

Thanks for joining us today and have a very Happy Halloween!


Wednesday, October 26, 2016

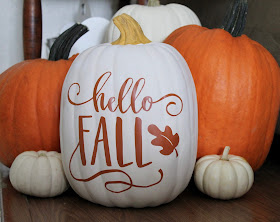
Hello Fall Vinyl Pumpkins by Shantaie

Hello Fall! Shantaie here today to tell you I love this time of year!


That pretty much says it all doesn't it?
Create your own pumpkin patch for Fall with a mixture of real and decorator pumpkins, here I have used a Silhouette cut file in pastel orange vinyl  for a fun grouping add an image or several sentiments and gather them all together! 


My "pro tip" for applying vinyl to a ribbed shape like a pumpkin is to absolutely always use transfer tape, start in the center and slowly apply with your fingertips in a vertical direction, and follow one side all the way to the edge, then the opposite side, pushing the vinyl into the ridges as you go. You will have some "wrinkles" or bubbles but work those carefully with your bone folder, your fingertips or a plastic smoothing tool. It's really simple and look at the transformation!!

Tuesday, October 25, 2016

Fall Bible Journaling by Samantha


Hello. Samantha up today with some fall Bible journaling. I don't know about you, but I don't usually get my ideas for journaling from one place. Sometimes it's from that week's sermon, sometimes it's a Bible study, sometimes it's just a verse that pops into my mind...for this entry I took my inspiration from the fall season and the changing leaves around me. 


I started by literally highlighting the verse I was doing my journaling about with an orange Marvy watercolor pencil. Then, I started building my background by dotting my Bible page all over with fall colored pencils. 


I started by dotting the entire printed text area with an orange pencil, then I followed up with a yellow pencil, next I filled in more of the white space with a red pencil, and finally I finished up with a brown pencil. It did take a bit of time to do, but I love the overall look. The colors blend and look almost like a bunch of fall leaves all over my page. 


I used the same orange watercolor pencil to color the journaling edge of my Bible. The I used a mix of the Shine Your Light Sentiment stickers and my own journailing with a Marvy Black Color In marker to add parts of the verse to the margin. 


A little fall Bible journaling about thanks and praise completed. Do you ever take your cues from nature or the seasons when Bible journaling?

Monday, October 24, 2016

Thanksgiving Table Turkeys by Karen


Kids won't mind getting assigned to the "kids table" when they are greeted with these fun little turkeys! 


Start with a clear triangle box. Assemble and fill it with shredded paper (or maybe little treats for your little guests). Use a sharp craft knife to cut 3 "x" marks on each side. This is how you'll insert your crayons (the turkey "feathers") as shown below. They should fit nice and snug.


Decorate the front with a fun little turkey (mine is cut with my die cut machine) and clear border stickers. Don't forget to provide some paper or coloring sheets for the kids, too! For mine, I used a few stamps from the SRM-Faith collections to spell out "Give thanks to God" and will ask the kids to write or draw what they are thankful for. I can collect these and easily add them to my Thanksgiving scrapbook page along with photos of the kids. It will be a sweet way to remember the blessings of the day.


Thanks for visiting. Hope you are inspired to create something wonderful today!

For this project I used:

Thursday, October 20, 2016

Birthday Wishes by Amber


Hello everyone! It's Amber here, today I thought it would be fun to share this Birthday watercolor card set I created for a friend. 


I started by gathering all my supplies, cardstock, watercolor paper, stamps, stickers, watercolor pencils, embossing folder, thread, and sewing machine and started assembling my cards. I created four cards in total using the same layout for each one to save time.

I started with a plain white card base and adhered a pink piece of distressed, embossed, and stitched cardstock right to the center of my card front. For the focal point of my card I stamped this beautiful floral postage stamp from Penny Black that I've had setting in my collection waiting to be used for some time now onto some Ranger Distress Watercolor Cardstock. I cut the image out, distressed the edges and quickly water colored the entire image with some Marvy Watercolor pencil and a water brush. After my stamped image dried I adhered to my card front with some foam adhesive and attached my sentiment. I used the Birthday Wishes sticker from SRM's Fancy Sentiment/Birthday sheet and adhered it to the bottom left to complete my card front.


I thought it would be fun to dress up the envelopes included in my card set so I stamped all four of them to match my cards. I stamped each one with the fun border stamp and large Hello sentiment from SRM's Big Hello Clear Stamp in some lime green ink. 


Once I had all my cards assembled I put together a clear A2 Card Box from the SRM Stickers shop, filled it with some white tissue paper, and added all four of my cards and matching envelopes. For the outside of my clear container I used some burlap ribbon, lime green ribbon, and a matching tag. I used the same watercolor cardstock, stamp, and sentiment sticker that I used for my cards to create my gift tag. I hope you enjoyed my card set today. Thanks for visiting!

SRM Stickers Supplies
Burlap Ribbon

Wednesday, October 19, 2016

Do Everything in Love by Michele


Good morning!  I have a card to share with you that uses SRM's new stamp set called, Love One Another.   With all that is going on in the world, this sentiment really spoke to me.


The background is a combination of a stencil and water colors.  I slipped doilies in between the two layers.  I stamped the sentiment in black and inked the edges a bit.  I added glitter to the hearts and a bit of glossy accents.


 I also added faux stitching along the perimeter.  For my final touches I adhered sequins and tied a vertical silk ribbon. 


Enjoy your day......and remember to do everything in love! :)

Tuesday, October 18, 2016

Halloween Treat Bag by Shelly


Hey y'all! Shelly, here! 
Today, I'm sharing a little Halloween treat bag with you! 


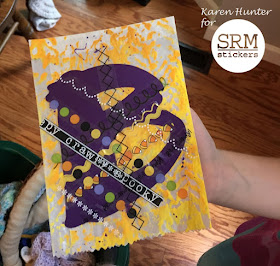
I was staring at some glassine bags and thought it would be fun to add some texture to it. After a little bit of thinking, I thought using a stencil and embossing paste would be fun! :) 


I started with my bags and added my stencil over it and then the embossing paste. Afterwards I let them dry. Once done, I started on my little tags. Which I did some die cutting with and then simply placed a sticker on top. 


Once having all my bags and tags done, I filled each bag with a few candies and a few little stickers. To finish things off, I folded the top of my bag and used a mini staple to add my tag. Simple and fun, yeah?!...

Thanks so much for stopping by! 
Enjoy your day and see y'all soon! 

SRM Stickers supplies used:

Monday, October 17, 2016

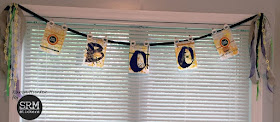
Crafting with Kids - Boo Banner by Karen


Do you like to craft with your kids? I love to craft with my daughter, but I have to admit - sometimes it's really hard to let her do her own thing without me "directing" her. This month SRM asked me to create a project with kids and let them have fun! And guess what? We both did!


For this "Boo Banner" project I used 5 embossed glassine bags as the banner bases. I added some acrylic paints in yellow and orange for color and texture and let it dry. I let my daughter pick out a font for the letters and cut them out with my die cut machine. 


Then I gathered all my Halloween themed stickers from my SRM stash and handed them over to my daughter. Seriously, her eyes got as big as saucers at the sight of those stickers in her hands! 


I told my daughter to use the border stickers to decorate the bags and then we would add the letters on top. My idea was to keep everything in nice straight lines, but she had her own ideas. So, with a deep breath, I stepped back and let her create. As you can see, she piled on stickers and borders in all directions and you know what? It's awesome! Each piece is fun, colorful and original - just like her.


We attached the pieces to a long black ribbon with mini clothespins. On each mini clothespin we attached a white card stock circle with a happy little spider sticker. For each end of the banner we gathered several lengths of coordinating ribbon.


Letting your kids into your crafting stash can be scary at times, but it's also a wonderful way to celebrate and teach confidence in their own style and creativity. Plus, you'll both cherish the time you get to spend together and have a great project to show off and talk about!

For this project I used:

Friday, October 14, 2016

Halloween Treat Bags by Samantha


Happy (almost) Halloween! Samantha here today with some fun Halloween treat bags that are cute and quick to make! 


I have some teenage nieces and nephews, who may be too old to trick-or-treat, but I still love dropping a little something off for them. Being the crazy aunt has some perks! SRM's embossed kraft bags paired with a variety of Halloween stickers make for a super easy way to package up a little candy for them (or anyone you want to treat this Halloween). 


I chose the 4 x 6 chevron embossed bag, but there are a ton of fun ones to choose from! For decorating my bag, I chose the Halloween Take 2 Stickers By the DozenTrick or Treat Stickers by the DozenHalloween We've Got Your Border, and Halloween Stitches stickers. 


What really makes these bags quick and easy is that creating the Happy Halloween tag takes all of 30 seconds. 


I simply took an orange "Happy Halloween" sticker and a black "Happy Halloween" sticker from Halloween Take 2 Stickers By the Dozen, stuck them back to back, and punched holes through them. It's really that simple! I finished them up with a little black twine to hold everything closed. I added my sticker choices to the front and back side of the bags to make them treat ready. 


Do you have anyone you like to make special Halloween treats for? These Halloween treat bags will make the perfect packaging! 

Thursday, October 13, 2016

October Planner Pages by Shantaie


I am a planner. True story. 
I am not organized by nature and work quite hard work to keep track of my daily and weekly tasks...well I don't work hard anymore because planners keep me on track and more productive than I ever thought I was possible of. 


I used to keep a "to do list" with lines and line of things to do {more busy work than actual productivity} There are tons of planners, and articles on how to use planners, I have read more than my share of them,  but......I have a secret to confess. I have not made my planners fun or used my creative supplies before now!!! { I know!!!!} 


How is it possible that a long time paper crafter like me has resisted this awesome creative outlet? Fear. I was kind of intimidated by the idea of pairing my super structured planner with fun and art. {trembles in her chair}


This is my very first attempt, and although I could have reworked it to be perfect for this assignment, I chose to show you how easy it is, and even though I'm not a pro page planner designer just yet, I'm still super happy with it!!!


How is it possible that a long time paper crafter like me has resisted this awesome creative outlet? Fear. 
I was kind of intimidated by the idea of pairing my super structured planner with fun and art. {trembles in her chair} This is my very first attempt, and although I could have reworked it to be perfect for this assignment, I chose to show you how easy it is, and even though I'm not a pro page planner designer just yet, I'm still super happy with it!!!


I am totally committed to using my SRM planner stamps every week, and I can't wait to share my pages with you in the future!!!!! 

Planner stamps, SRM stickers, and LePlume markers made my page quick, fun, and useful.  Here's a list of the SRM stickers and stamps I used: 

Wednesday, October 12, 2016

Love by Shelly


Hey y'all! Shelly, here! 

Today, I'm sharing a simple and fun watercolor art project! 


Remember when you were a kid and use to do the whole 'butterfly technique' (at least I think that's what it was called?...) Where you take a piece of paper and put some paint on one side of it and then fold it in half while it's still wet and then open it back up...and ta-da, you have a image on both sides of the paper?! 

Well, I took that technique and used it for my image. Though, instead of folding my paper, I just laid my other sheet on top and pressed it down, while rubbing my fingers over it as well. It took my several times to figure out what worked best and what I liked best because every time it was different...though, fun! 


Now because I used watercolor pencils, it took some trail and error to figure out the 'transferring' part. So what worked best for me, was to take my pencil and draw the image on a piece of watercolor paper. Which, I repeatedly went over the same line several times. After, I spritzed water on my image and then again used my pencil over the wet part of my image. At first it seemed like it wasn't working well, but after the water soaked in more it almost seem like a pastel/crayon of some sorts. 


To finish things off, I added my image in a frame and then used some vinyl for my sentiment piece. Which I don't have an electric die cutting machine, so I used the vinyl with a regular old die and machine. (note: for that process, I did have to run it through my machine many times.) 

Thanks so much for stopping by!
Enjoy your day! 

SRM Stickers supplies:
Gold Vinyl