Friday, August 29, 2014

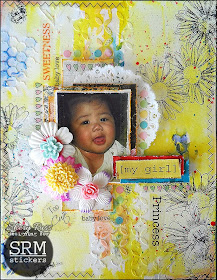
My Girl Mixed Media Layout by Shery


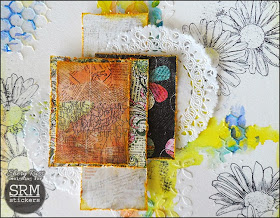
Hello there! Shery Russ here to share a mixed media layout. I had a blast putting together this layout and using some fantastic SRM Stickers: We've Got Your Border: Baby GirlExpress Yourself: Everyday Girl, and Fancy Stickers Sentiments Baby. I also used a couple of the 4" round white lace doilies.

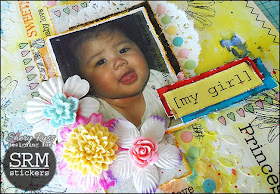
If there's one thing I love more than my writing and art, it's my niece, Alexa, whom I've referred to as The Adorable One since I held her in my arms when she was 5 days old. She's the daughter of my youngest sister and I love them both to pieces. I consider her my girl :o). She'll be turning 3 in a couple of months, but for my layout, I printed a photo of her that was taken when she was 5 months old.

SRM Stickers Blog - My Girl Mixed Media Layout by Shery - #mixed media #layout #doilies#borders #stickers #baby #girl

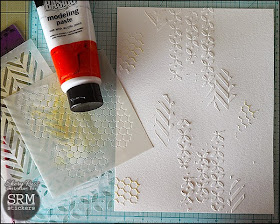
To create this mixed media layout, I started with an 8.5" by 11" cold-press watercolor paper. I applied Liquitex modeling paste onto stencils (Hero Arts, The Crafter's Workshop, and Plaid) .

SRM Stickers Blog - My Girl Mixed Media Layout by Shery - #mixed media #layout #doilies#borders #stickers #baby #girl

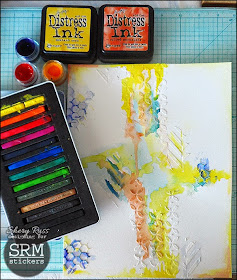
When the modeling paste was dry, I watercolored some areas using Distress inks, Twinkling H2Os, and Inktense Blocks.

SRM Stickers Blog - My Girl Mixed Media Layout by Shery - #mixed media #layout #doilies#borders #stickers #baby #girl

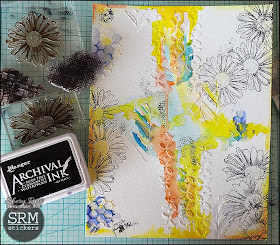
Next, I did some stamping on the page. I used stamps I'd designed and drawn for STAMPlorations and stamped them with jet black archival ink.

SRM Stickers Blog - My Girl Mixed Media Layout by Shery - #mixed media #layout #doilies#borders #stickers #baby #girl

I then layered some designer paper and 4" round white lace doilies. I distressed the edges of the papers then applied VersaMagic chalk ink on the edges.

SRM Stickers Blog - My Girl Mixed Media Layout by Shery - #mixed media #layout #doilies#borders #stickers #baby #girl

I added mulberry paper flowers and for their centers, I used some of the plastic resin flowers I made last year. I gave the page a watercolor wash with Twinkling H20s. Then came the fun part: adding the SRM Stickers to decorate my page. These stickers are so wonderful to use because they're transparent -- they blend easily onto the page! I finished my mixed media layout by adding red and blue spatters.

Here's a close up of the photo cluster. 

SRM Stickers Blog - My Girl Mixed Media Layout by Shery - #mixed media #layout #doilies#borders #stickers #baby #girl

Thanks so much for letting me share my project. I hope I've inspired you to use those fabulous SRM Stickers in your stash to create a mixed media layout!  How many SRM Stickers do you count?  

Thursday, August 28, 2014

Tiny Tube Ornaments by Diane


Hello!  Diane Jaquay here and I have a fun idea for you today using The Tiny Tube from SRM.  I decided to make some Christmas ornaments with them, and that idea took me in several different directions.

SRM Stickers Blog - Tiny Tube Ornaments by Diane - #tube #altered #christmas #fancy #stickers #twine #ornaments

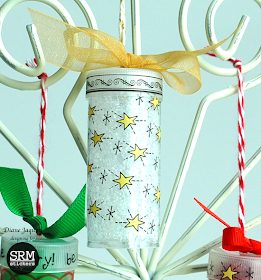
For the first ornament I thought it would be fun to try and add glitter to a tube.  I've seen this done with round clear ornaments so I thought "why not a clear tube?"!  I love anything that shimmers in the light on my Christmas tree and I know this will look beautiful on it! 

SRM Stickers Blog - Tiny Tube Ornaments by Diane - #tube #altered #christmas #fancy #stickers #twine #ornaments

Just some glue into the tube. I think any glue that dries clear would work for this.  Then I spread the glue around the inside of the tube with a paint brush to coat evenly.  Sprinkle in some German glass glitter, a fairly chunky glitter, but I'm sure any glitter would work.  Poke a hole in the tube cap with a piercing tool, then thread some Twinery Gold Shimmer Bakers Twine through the hole to make a hanger.  To decorate this tube I used We've Got Your Border Christmas stickers winding the stars around the tube at an angle and decorating the cap with a Fancy Sticker Sentiments Christmas border.  I finished the ornament with some pretty, shimmery gold ribbon tied at the top.

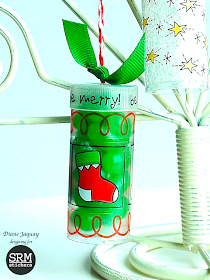
After making the first ornament I thought "wouldn't it be fun to make these into ornaments but fill them with candy too!"  As a child I always loved anything edible hanging from the tree, and I'm sure most kids would agree :)  The tube can be opened, the candy eaten, then just replace the cap and you have a cute, keepsake ornament!  I filled this tube with green apple jelly beans.  I decorated it with some stocking stickers from We've Got Your Sticker Merry, and borders stickers from We've Got Your Border Christmas and We've Got Your Border Birthday.  I found that 3 of the square stocking stickers fit perfectly around the Tiny Tube.  Again I used some Twinery Bakers Twine (this time Maraschino) to make the hanger, and I tied a bit of green ribbon on top.
SRM Stickers Blog - Tiny Tube Ornaments by Diane - #tube #altered #christmas #fancy #stickers #twine #ornaments

 I decorated the last tube with tree stickers from We've Got Your Sticker Merry and border stickers from We've Got Your Border Christmas and filled with red coated chocolate candies.  These tubes hold the perfect amount of candy, not too much, not too little, just enough for a special treat :)   I topped this one off with a little red bow.

 SRM Stickers Blog - Tiny Tube Ornaments by Diane - #tube #altered #christmas #fancy #stickers #twine #ornaments

If you didn't want to fill Tubes with candies you can fill them with anything colorful, small buttons or beads for example.  I am thinking to make a special little Advent tree with them.  SRM carries number stickers that could be used to mark the days, and there are lots of fun little treats you could fill these with other than candy, such as tiny toys or stickers.  With these tubes, your imagination is the only limit!

Wednesday, August 27, 2014

Back To School Treat Bag by Cathy H.


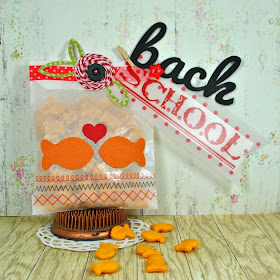
Hi everyone!  Cathy Harper here and I can't believe how the summer has flown by!  Back to school time is almost here.  My granddaughter Raini will be going into first grade this year.  I thought I would create a little treat bag for her so she could have a fun snack on her first day.  It is full of gold fish crackers! 

I started with a Glassine Chevron Embossed Bag and added 3 different sticker stitches from the Valentine Sticker Stitches along the bottom of the bag.  I then cut a couple of goldfish and a little heart with my Silhouette Cameo.

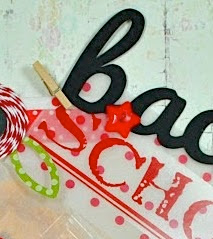
For some added embellishments I layered the word "School" from the Express Yourself/School set on a vellum banner that I cut on the Cameo, along with word "back" cut out of black card stock. 

SRM Stickers Blog - Back To School Treat Bag by Cathy H.- #school #embossed #bag #glassine #stickers #numbers #twine #treat  

 A cute little mini clothes pin and a tiny little "2" from the Calendar Numbers Small set add a bold statement to the bag. 


SRM Stickers Blog - Back To School Treat Bag by Cathy H.- #school #embossed #bag #glassine #stickers #numbers #twine #treat

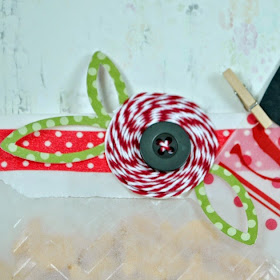
I finished my little treat bag with a Maraschino Twine flower.  

SRM Stickers Blog - Back To School Treat Bag by Cathy H.- #school #embossed #bag #glassine #stickers #numbers #twine #treat

I love using SRM's Glassine bags...I can't wait to make more little treat bags for my two favorite little people!

Tuesday, August 26, 2014

A Very Special Day Card by Cassonda


Hi Everyone! Cassonda Tadlock here to share with you a card I created using the Fancy Sentiments Birthday sticker sheet.  It has 17 fancy sentiments, fancy borders printed on clear and even a fancy flourish. This sticker sheet is so amazing! 


This card is a little over the top for me but I'm a layer girl so I went to town with different techniques. :)

Here's how I created it.  The background is a mix of teal, bright pink and pearl paints swiped on with a flat paintbrush. After allowing it to dry, I stamped a collage stamp with white and black stazon ink. It gave it a bit of a shabby look. 


Next came some layers of circle and square shapes, using pop dots for dimension. Then...wrapped the card with yellow lace and tulle, added a few stick pins with sequins and some green water dots.

The little dress was cut by some old packaging as a template. I placed the sentiment sticker right on top with a little crocheted flower attached. 
Oh...you're curious about the yellow "lace" at the bottom of the dress?  That's created by cutting a 2 1/2" yellow punched piece into 4 pieces and adhering 2 of them underneath the dress. Pretty clever, huh? ;)


The last thing I added was some stickles glitter glue to the white embossed paper and a little strip of the border from the sentiment sticker sheet. 
I hope you have a Very Special Day! ♥ 

Monday, August 25, 2014

Birthday Bird House Tube by Shantaie


Hello from Shantaie Fowler!  Are you a fan of SRM clear Tubes like I am?  I have used them for party favors, gifts, and ornaments. There are so many ways to use them!  You start with an empty tube, a perfect palette for crafting and the possibilities are endless!


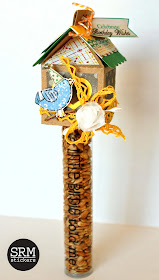
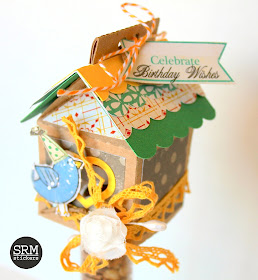
When Susan challenged us to use Tubes in a new way I start dreaming up all kinds of things! I decided to  build a birdhouse and I think it worked out pretty well! I filled the Standard 7" Tube with sunflower seeds and added a fun sticker sentiment from the We've Got Your Sticker Plus/Birdie.

SRM Stickers Blog - Birthday Bird House Tube by Shantaie - #tube #altered #birthday #stickers #fancy #mixed media #favors #twine #silhouette

This birdhouse was cut using the Silhouette in shades that hold onto to summer and quietly beckons fall! To make this adorable bird I put the Birdie Sticker on white cardstock and trimmed around it, I added a bitty party hat from a patterned paper and coated the bird with glossy accents and sprinkled it with clear glitter.  The banner was also cut from patterned paper and tied to the roof with Marigold Twinery Twine, then added a Fancy Birthday Sticker Sentiment

SRM Stickers Blog - Birthday Bird House Tube by Shantaie - #tube #altered #birthday #stickers #fancy #mixed media #favors #twine #silhouette

I hope the next time you need a little Birthday something you will give this a try!

Friday, August 22, 2014

Doily Thank You Card Tutorial by Shannon


Are you a doily lover?  I am!  Shannon Morgan here today with a tutorial for making a fun and fancy layered card!  Sometimes a thank you is in order for a kind and thoughtful friend or family member, this card is a great way to do just that. The best part? Beautiful SRM doilies!

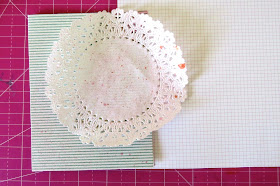
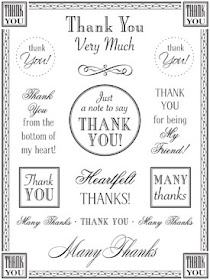
Start by gathering things to create your card: a card base, some patterned papers, SRM doilies and SRM Fancy Thank You stickers. Take this time to mist your doily if you want to.

SRM Stickers Blog - Doily Thank You Card Tutorial by Shannon - #card #thanks #doilies #stickers #stitches #borders $fancy #sentiments #tutorial

The next thing you're going to want to do is add your doily to your card as shown below. Leave some of that card base showing. 

SRM Stickers Blog - Doily Thank You Card Tutorial by Shannon - #card #thanks #doilies #stickers #stitches #borders $fancy #sentiments #tutorial

Get ready to add some layers and dimension. You can choose a few different coordinating patterns, or go crazy and add some contrasting colors and patterns. Distress the edges if you want, but this is all personal preference, there's no wrong or right way to do this!

Add one layer off center to the right side. Add a piece of wash tape to the top. Add your next layer on top of that one, slightly off center as well. The vellum layer is optional. If you add the vellum, you can staple it to the previous layer before you stick it down onto the card front. 

SRM Stickers Blog - Doily Thank You Card Tutorial by Shannon - #card #thanks #doilies #stickers #stitches #borders $fancy #sentiments #tutorial

I added an additional doily. I misted it, let it dry and then added foam dots to the back. They're black, but it's ok because you'll be covering it up if you don't have white. 

SRM Stickers Blog - Doily Thank You Card Tutorial by Shannon - #card #thanks #doilies #stickers #stitches #borders $fancy #sentiments #tutorial

I started adding details like borders, border stickers and the card sentiment base. I added washi tape to the bottom and top. I then measured, trimmed and adhered SRM Sticker Stitches on top of the washi tape. It creates effortless stitching! I also added a little sweet saying from the Thank You Fancy Sentiment sheet. I then added an additional layer on top of the doily. Grab a relatively simple patterned paper and place a heart shape or mask on top and mist. Wait for it to dry. Round the edges if desired and tear along the bottom. Add some sticker stitches across the heart. Add another piece of washi tape and if you're up to it...another staple.

SRM Stickers Blog - Doily Thank You Card Tutorial by Shannon - #card #thanks #doilies #stickers #stitches #borders $fancy #sentiments #tutorial

The next step is cutting a vellum heart to go on top of the heart. This step is optional, but it adds a delicate feel to the card. Place it on card as shown. 

SRM Stickers Blog - Doily Thank You Card Tutorial by Shannon - #card #thanks #doilies #stickers #stitches #borders $fancy #sentiments #tutorial

You can add the sentiment now. I added one from the Thank You Sentiment sheet. I placed it slightly below the stitches knowing that I was going to add some sequins and other fun little touches. 

SRM Stickers Blog - Doily Thank You Card Tutorial by Shannon - #card #thanks #doilies #stickers #stitches #borders $fancy #sentiments #tutorial

I added some sequins, some splotches of mist and ink, a cute little heart at the top and heart sequin above the sentiment. 

SRM Stickers Blog - Doily Thank You Card Tutorial by Shannon - #card #thanks #doilies #stickers #stitches #borders $fancy #sentiments #tutorial

This card is all ready to be mailed to someone deserving! Thanks for letting me share! ❤

Thursday, August 21, 2014

Flower Power Tube Tutorial by Cathy A


Greetings from Cathy Andronicou!  Today I want to share with you a tutorial using a SRM Mini Tube and some SRM Punched Pieces.  I love how you can make carnation flower shapes out of punched circles, so I thought I would share for any one that hasn't tried it before and the best bit, is you don't have to spend ages cutting circles because they are already done!

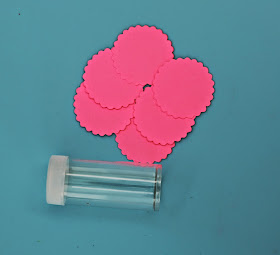
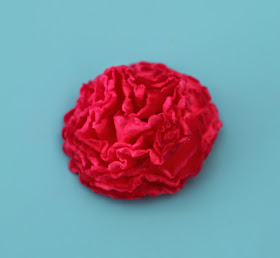
1.  Start with 7 Small Hot Pink Punched Pieces.

SRM Stickers Blog - Flower Power Tube Tutorial by Cathy A - #tubes #twine #stickers #punched pieces #congrats #favor #gift #container #tutorial

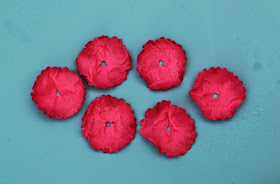
2.  Ink edges with Memento Lilac Posies and punch a hole in the centre of each circle.

SRM Stickers Blog - Flower Power Tube Tutorial by Cathy A - #tubes #twine #stickers #punched pieces #congrats #favor #gift #container #tutorial

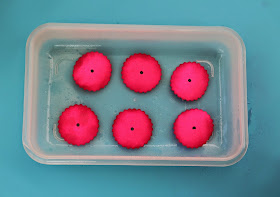
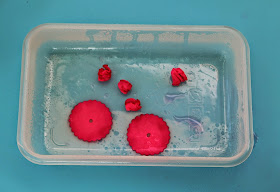
3.  Place in a tray and liberally spritz with water.

SRM Stickers Blog - Flower Power Tube Tutorial by Cathy A - #tubes #twine #stickers #punched pieces #congrats #favor #gift #container #tutorial

4.  Carefully scrunch scalloped circles.

SRM Stickers Blog - Flower Power Tube Tutorial by Cathy A - #tubes #twine #stickers #punched pieces #congrats #favor #gift #container #tutorial

5.  Open back out, they will be delicate while wet so do this slowly.

SRM Stickers Blog - Flower Power Tube Tutorial by Cathy A - #tubes #twine #stickers #punched pieces #congrats #favor #gift #container #tutorial

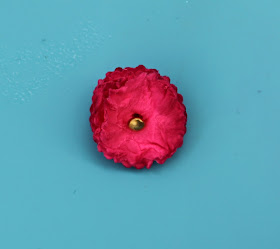
6.  Place all 7 circles on top of each other and place a brad through the centre.

SRM Stickers Blog - Flower Power Tube Tutorial by Cathy A - #tubes #twine #stickers #punched pieces #congrats #favor #gift #container #tutorial

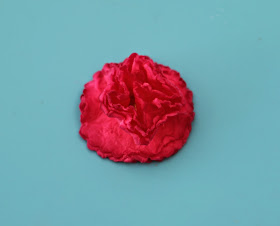
7.  Fluff up the individual circles around the brad.

SRM Stickers Blog - Flower Power Tube Tutorial by Cathy A - #tubes #twine #stickers #punched pieces #congrats #favor #gift #container #tutorial

8.  Spray with Shimmer Spritz spray sparkle and leave to dry, when dry the flower will be really robust.

SRM Stickers Blog - Flower Power Tube Tutorial by Cathy A - #tubes #twine #stickers #punched pieces #congrats #favor #gift #container #tutorial

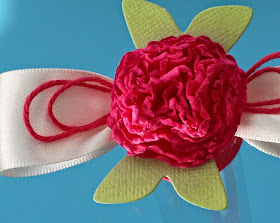
9.  Die cut some leaves and create a bow from ribbon add some loops of twine and adhere to top of tube.

SRM Stickers Blog - Flower Power Tube Tutorial by Cathy A - #tubes #twine #stickers #punched pieces #congrats #favor #gift #container #tutorial

10.  Wrap twine around the side of the cap and apply Congrats and pennant border stickers to main body of the tube 

SRM Stickers Blog - Flower Power Tube Tutorial by Cathy A - #tubes #twine #stickers #punched pieces #congrats #favor #gift #container #tutorial

11.  Then fill with goodness.


SRM materials used: 

Other materials used: Cream Satin Ribbon, Green Cardstock, Penny Black Leaves die, Imagine Craft/Tsukineko Memento Lilac posies ink and Shimmer Spritz spray Sparkle.

Hope you have enjoyed this tutorial and that you will be making bouquets of paper flower Tubes soon!  These little tubes make the best gift container or party favor.  Pop some candy inside for a favor or some money inside for a gift!

Wednesday, August 20, 2014

Birthday Party Diecut Bag by Michele


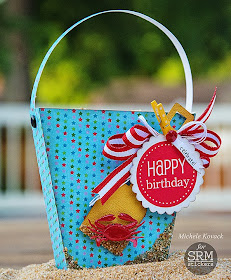
 Michele Kovack here with a fun summer birthday party bag! The cute sand pail is perfect for a late August celebration.  It was cut using my Silhouette.  I added sand to the bucket and shovel using glossy accents. I added a cute red lobster to the pail and added glossy accents to his body. 

SRM Stickers Blog - Birthday Party Diecut Bag by Michele - #birthday #favor #punched pieces #silhouette #stickers

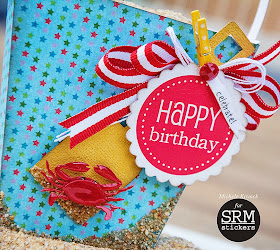
I added ribbon and two...yes two...SRM sentiment stickers!  The round happy birthday sticker is from the Take 2 Stickers by the Dozen.  It was adhered to a white scalloped punched piece (Told you I would be using them again soon!)  ;)   I also added a wooden clothespin that I had painted yellow.  I gave it a few polka dots and glued a red rhinestone to it.  The mini "celebrate" is from SRM's Birthday Birdie Stickers by the Dozen.  Love using mini stickers on my projects!

SRM Stickers Blog - Birthday Party Diecut Bag by Michele - #birthday #favor #punched pieces #silhouette #stickers

And look at how many stickers you get on one sheet of Take 2 stickers!  You can make 11 more of these fun birthday party bags from just one sheet.  And there are 10 colors of punched pieces from which to choose.  

 
Enjoy these last few weeks of summer my friends!  Hope you can use some of my crafty techniques on a project that you do soon! 


Tuesday, August 19, 2014

Gift of Love by Annette


Welcome SRM Stickers friends.  Annette Allen here with you today to share a fun way to give a sweet gift to the one you love. 

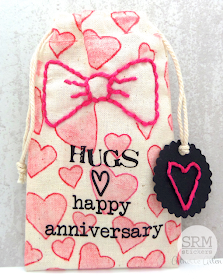
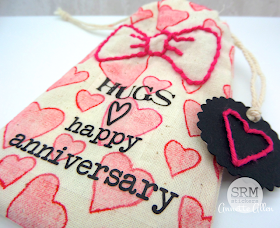
I have taken the SRM Stickers Muslin Small Bag and stitched a fun bow from Amy Tangerine stencils using The Twinery's Solid Maraschino Twine.  Then I used a heart stencil to make fun hearts as a background.  So fun to stencil the SRM Muslin Bags!  To top it off I added SRM Stickers Sticker Sentiments. Love how those clear stickers can be put on any type of surface and melt right in!

SRM Stickers Blog - Gift of Love by Annette - #bag # gift #muslin #twine #love #stencils #stickers #punched pieces #valentine

It is always fun to add a little tag, so I used SRM Stickers Small Scalloped Punched Pieces, black.  The stitched heart is from Amy Tangerine stencils using The Twinery's Pink Sorbet twine.

SRM Stickers Blog - Gift of Love by Annette - #bag # gift #muslin #twine #love #stencils #stickers #punched pieces #valentine


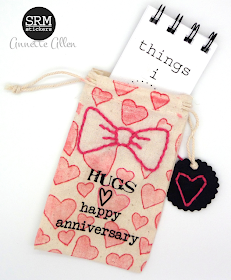
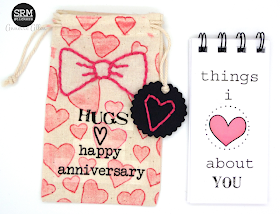
And now to make it just a little more special I made this fun little book to go inside.

SRM Stickers Blog - Gift of Love by Annette - #bag # gift #muslin #twine #love #stencils #stickers #punched pieces #valentine

I used my Zutter Bind it All to make the little book and added SRM Stickers: Stickers By the Dozen Valentines and Express Yourself #42041 Everyday Girl on the cover to make a sweet title.

SRM Stickers Blog - Gift of Love by Annette - #bag # gift #muslin #twine #love #stencils #stickers #punched pieces #valentine

Thanks for dropping by and thanks for letting me share.  
Happy Crafting!

Monday, August 18, 2014

Fancy Thank You Cards by Christine


Do you like to make cute cards, fancy cards, simple cards?  SRM Stickers has got you covered in all of those areas!  Christine Meyer joining you today and we're going to focus on fancy cards using some of the Fancy Sentiments Stickers!  There are six different topics available for your choosing - my cards today will be using the Thank You Fancy Sentiments Stickers.

SRM Stickers Blog - Fancy Thank You Cards by Christine - #fancy #stickers #thanks

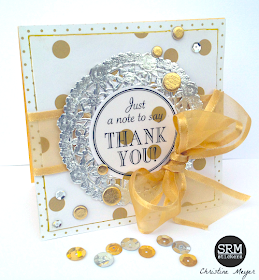
Metallic colors just scream fancy and are so trendy right now!  I haven't played a ton with metallics lately so  I decided to focus on gold and silver elements in my fancy cards.  

SRM Stickers Blog - Fancy Thank You Cards by Christine - #fancy #stickers #thanks #card #doily #silver #metallic

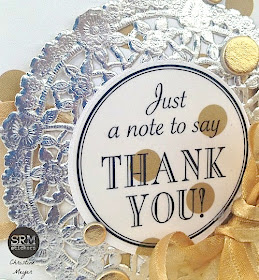
  silver SRM doily made the perfect base for my circle sentiment and using it adds enough texture that I don't have to add a bunch more!  I added the sentiment sticker to a patterned paper intentionally so that those gold dots would pop out a little. I love having that option with clear stickers!

SRM Stickers Blog - Fancy Thank You Cards by Christine - #fancy #stickers #thanks #card #doily #silver #metallic

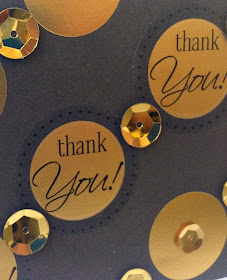
For my second card I used a patterned paper with gold metallic dots already on it.  I then added my Fancy Thank You stickers over the top of those and added sequins in between.  I focused my stickers on the middle row of polka dots.

These stickers fit perfectly on the gold dots with the black dotted outline circling the outside.  Despite the paper being a black color they still showed up and add a little something extra!  

SRM Stickers Blog - Fancy Thank You Cards by Christine - #fancy #stickers #thanks #card #doily #silver #metallic

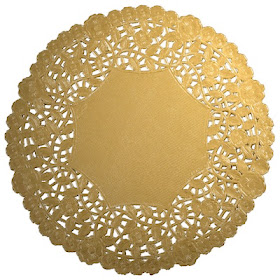
And did you know that SRM also has GOLD Doilies?  They are fabulous!  See all SRM Doilies HERE.  


SRM Stickers Blog - Fancy Thank You Cards by Christine - #fancy #doily #gold #metallic

Hope I've inspired you to get your Fancy on!  Be sure to join us tomorrow for more fun here on the SRM Blog!