Friday, August 30, 2013

Mini Calendar Layout by Juliana


Love when SRM's Mini Calendars are used in non-traditional ways like on a layout.  Juliana Michaels has created a wonderful layout backing the clear calendars onto several patterned papers.  She then has them dancing across the top and bottom of her layout showing the passing of time. 


SRM's Clear Mini Calendars can be used not only in layouts but on cards, altered projects and of course on mini calendars, a great gift idea. 


Here's closeup showing a SRM Border playfully moving across the mini calendars and the mini "happiness is" sentiments also from the Borders are the perfect touch.


I spy more SRM Stickers in the "blessing" definition and the pointing hand that points to Juliana's journaling.  


There are so many interesting elements to this layout and SRM's clear stickers fit right in.  

Thursday, August 29, 2013

Thank You Treats by Michelle


Michelle Giraud loves to create gift sets.  They are just the right touch for a little something for someone special.  What a great way to say "Thank You!".

For this set Michelle used SRM's 2" x 2" x 2" clear square box.   She embellished it with some playful dot borders from SRM's Thank You Border set, added a sentiment from SRM's Thanks We've Got Your Sticker and topped it off with a big, beautiful bow!  Those gummy dots look delicious and the colors are perfect.


Michelle then created a 6 1/4" x 3  1/2" card, again using some playful dot borders from SRM's Thank You set, added a sentiment from SRM's Thanks Sticker Sentiments.  She added a pretty layered paper flower and decorated the envelope with one of the borders from the Thank You set to coordinate with her card.  


What a beautiful pair of projects these are.  So fun and happy. I love all the different Thank You products SRM has from which to choose.


Just in case you want to CASE this gift set, here are the SRM products that Michelle used on this project: 

Sticker Sentiments - Thank You

Clear Box - 2" x 2" x 2" 


And a big Thank You to Michelle for creating this happy project!


Wednesday, August 28, 2013

Back to School Coupon Book by Laurel


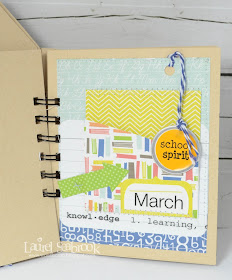
A couple of years ago Laurel Seabrook made her husband a 'Date a Month' coupon book for their anniversary.  Included with each month was a date and the money to pay for it (dinner, weekend away, lunch, etc).  Her oldest daughter really liked it and said she wanted a coupon book too.  In preparation of her daughter heading off to University in the fall Laurel decided to make her a monthly coupon book.  We all know that students don't have a lot of extra cash so each month Laurel included something fun; a pre paid Visa card, some movie tickets, a restaurant gift certificate, etc. 

Enjoy looking at all the wonderful little details on each page of Laurel's Back to School SMASH style Coupon Book. She's used lots of SRM Stickers on almost every page.  Can you spot them all?


 Laurel has been slowly filling the book and has just a few months left to create before she gives it to her daughter.  

 SRM's school themed stickers were perfect for adding some extra little details.  She also used SRM's Large Sleek Calendar Months stickers to label each month and then added little extra bits from SRM's School and High School Express Yourself sets.  And as a nice finishing touch, some Twinery twine.

Here are the SRM Stickers that Laurel used in her project. 


WOW!  Thank you Laurel for such great inspiration for a fabulous gift.  The beauty about this project is that you can change up the theme and create a coupon book for any special occasion!  It's a gift that just keeps on giving! 

Tuesday, August 27, 2013

Mixed Media Layouts by Yvonne


Yvonne Yam loves to get inky when creating her Mixed Media projects and she loves to top them off with SRM Stickers!  The clear stickers work beautifully with mixed media.  Check out all the stickers that Yvonne used on this layout that was masked and misted. 


Love how she puts the clear stickers right on her photos.  And Yvonne is loving the Sticker Stitches.  She used them in 3 different places on this layout and she's got plenty more for other projects! 

Here are the stickers that Yvonne used: 


On her second layout, which was also masked and misted, Yvonne, in her own words, "went crazy with stickers!".  She likes to keep her layouts relatively flat and that's why she loves to use SRM Stickers to help her finish her layouts.


As Yvonne says "SRM stickers are great for "dressing" up the edges of your photos, especially if you are too lazy to ink (like me!)."  Yvonne also loves to use stickers to fill up speech bubbles that are so popular these days.  


Here are the stickers Yvonne used on her second layout: 

Thanks for all the inspiration Yvonne, showing us how SRM Stickers are just perfect for Mixed Media layouts!  

Monday, August 26, 2013

School Days Card by Shelly


Shelly Kurth wanted to make a School Days project decided to go with a nice CAS card! :)  It's stamped and stickered and all blinged up.  How fun!


 What a great back to school card for a child of any age. Shelly tried to make it very 'hip' and fun, maybe for a somewhat older kid. Love how the Sticker Stitches have the look of a spiral notebook.  


Here's the sticker that Shelly used, SRM's Live Life School Sticker.


What a great idea to tuck this fun and fabby card into your child's back on the first day of school with a nice little note inside!  Thanks Shelly for the inspiration.

Friday, August 23, 2013

Fancy Christmas Cards by Lesley


Lesley Croghan has created a set of 4 beautiful Christmas cards using just one SRM Sticker, the Fancy Christmas Sticker Sentiment.  I love how our design team members give us lots of inspiration for making multiple cards from just 1 sheet of stickers.  


There are 17 different sentiments on this sheet along with 4 beautiful fancy borders. 


Here's a look at all of Lesley's cards.  Each card has a beautiful red flower and some black "Charcoal" Twinery Twine.  


Love the combination of twill ribbon and twine on this card.  


The fancy sticker borders are perfect on this horizontal formatted cards.  


And the sticker flourish under the fancy Merry Christmas Sentiment is the perfect touch!


Thanks Lesley for all the inspiration.  I'm sure that many of our readers will  start working on their fancy Christmas card sets soon!  

Thursday, August 22, 2013

Girly Gift Wraps by Angi


Angi Barrs just loves making gift card sets!  Instead of using these playful packets as birthday gifts, Angi decided to add them to "college care packages" for her oldest daughter. She's in college out in California and Angi likes to surprise her with gift cards to her favorite eateries. What a great idea! College kids love to get stuff like this in the mail. Plus you can dress up your gift wraps with some fun and fabulous SRM Stickers.

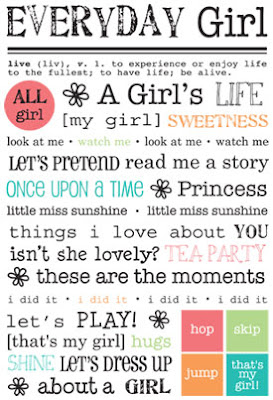
Angi used SRM's Everyday Girl and We've Got Your Sticker Princess sets to embellish her pair of SRM Glassine Bags. And she mounted her stickers onto Bright Blank Labels by the Dozen from SRM. Once she finished embelling the bags, Angi tucked gift cards inside!  


And check out Angi's next gift card holder!  She's added a SRM sticker to a popsicle stick and adhered it to a SRM Glassine Bag.  It's a unique little embellishment that will add some fun to your gift wraps.

That's what Angi loves about SRM stickers. You can adhere them to just about anything!  Love how Angi used a SRM Labels by the Dozen to mount her princess crown.  


Thanks for the inspiration Angi.  Your daughter is going to love her treats!  

Wednesday, August 21, 2013

School Days Gift Set by Corri


Corri Garza is ready for the first day of school!  She created this adorable gift set for a teacher using her Cameo to create this fun apple shaped card.  Corri added a SRM sticker from the Teacher Say it with Stickers to black card stock.  I love the star and button embellishments and the Cappuccino Twine.


Corri then created this Tiny TUBE holder.  It's a bottle holder but she reduced the size to fit the Tiny TUBES.  She filled the Tiny TUBES with gumballs and embellished the front of the holder with a sticker from SRM's Freestyle School set.  And then she added the same embellishments as she put on the apple shaped card. 


What a perfect pair this gift set makes!  That teacher is going to love her gift.  


 Here are the SRM products that Corri used on this project: 


What a great way to begin the school year. 

Tuesday, August 20, 2013

Mixed Media Tutorial by Angélique


If you love Mixed-Media, you are going to love today's post from Angélique Jarrier.  She has created covers, front and back, for a photo album or Art Journal. This tutorial is loaded with photos but well worth it!  And as an added bonus, Angélique has created a step by step slide show for you.  Giving even more details of how to create this fabulous project.  Click here for the LINK


Angélique decided to use the theme of Love using SRM's Fancy Love Sticker Sentiments.  Angélique is impressed with how easily the stickers worked on this project, with very good resistance to the paints she used.

First we will show you the finished project.  Here is the front.  


And here is the back. Notice the SRM "Love" and "I Love You" clear stickers that are woven into this intricate design.  


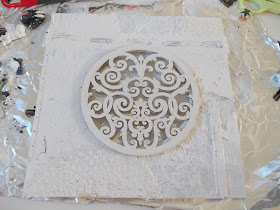
And here is how Angélique created her covers.  First you will need two wooden supports or rigid cardboard. We'll start with the front cover of our album.


Angélique used a pre-cut board.  Start by pasting over different materials (aluminum foil, paper textures, lace, ribbons) to create the desired surface.  


Cover everything (wait for complete drying glue) with effect paint (paint structure or relief).


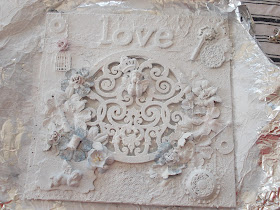
 Once this groundwork done and dry, decorate and give relief with various embellishments such as flowers, charms and beads.


Embellish as much as you want to.


Cover embellishments with same white paint.  


Add more embellishments if you like.  Angélique loves using salvaged objects on her projects!


Once again, cover in paint.


Once dry, decorate adding color.  Angélique likes to use different types of paints and inks including spray inks, metal paints and acrylic paints.  


Once paint is applied, let dry and proceed to the second cover.  Now we will see how Angélique applies stickers, blending in yet another media in her project.  She used aluminum foil to cover the back cover. 


Apply the SRM Fancy stickers before painting.  Just stick them onto the aluminum foil, cover everything, including the stickers, with paint.  Lightly rub stickers to position them.  When completely dry, clear the stickers with a baby wipe to make the stickers appear.  


Add additional stickers and embellishments to your cover.  When in position, cover with paint.  As with the front cover, we will use various inks and paints.  


TIP:  Angélique often likes to create using old clear stamps used. She gives them a second life, adding them into the mix.   Here an angle stamp that's been painted.


And there's a butterfly stamp!


Finally, we will apply with a dry Cut'n new paint colors, to give relief to our project. Apply colors slightly and later wipe with a cloth to create a fade.


And here's the final result after a few hours


So now you are trained!  Time to try some mixed media!  Be sure to share your Mixed Media project using our stickers on the SRM Flickr.  We'd love to see what you create.